
Decorate a Wooden Heart: Gift Tissue Paper and Faux Floral DIY Tutorial

With this budget-friendly DIY tutorial, learn how to create a beautiful decorative wooden heart using gift tissue paper and faux floral pieces. All the materials for this project can be easily found at Dollar Tree. Get creative and make a personalized gift or home decor piece. This tutorial will show you how to decorate a wooden heart using gift tissue paper and faux floral to create a beautiful, personalized gift without breaking the bank.

Wooden hanging heart paint pink with heart pattern and faux floral and gold letters

Decorate a Wooden Heart Video Tutorial

Materials such as, faux flowers, scissors, paint, tissue paper, and gold letters

Materials
Dollar Tree purchases
One wooden heart 
Gift tissue paper
Faux floral

Items needed
Hot glue/Adhesive
Scissors
Mod Podge
Paintbrush
Optional-Parchment paper

Items I already had on hand
Gold letters (this is optional)
Mini iron (this is used for applying the gift tissue paper and Mod Podge)


Tissue paper and Mod PodgeMod Podge and tissue paper over wooden heart
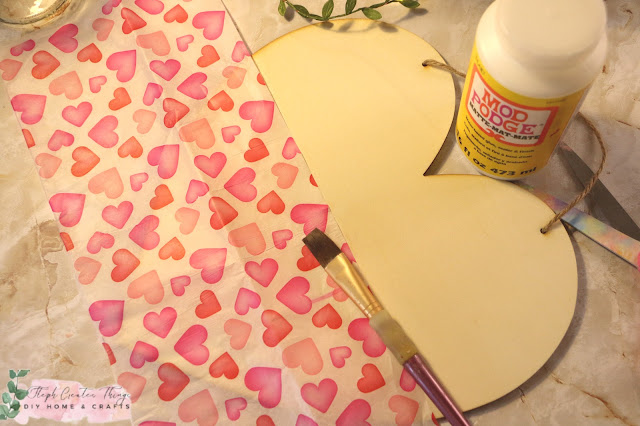
Begin by cutting a section of tissue paper that you will add to the wooden heart. You can choose to add the paper to only half of the heart or cover the entire surface. 

Next, apply Mod Podge to the section of the heart where you will add the tissue paper. Place the tissue paper over the Mod Podge and cover it with a sheet of parchment paper. Use a mini iron to iron over the paper, which will help reduce the appearance of creases and lines. 

Using a sanding block
Sanding block near wooden heart with heart tissue paper pattern

To achieve a blended look, you can use a sanding block on the wooden heart. 

Applying acrylic paintWooden heart pattern near acrylic paint and paintbrush

Apply acrylic paint to the unpainted section of the heart. You can use one or more colors and blend them.

Adding the letters
Pink painted wooden heart with heart pattern tissue paper and gold letters

 If you want, you can add letters to the heart. For example, you could add "love" just above the design. 

Adding the faux floral
Faux white flowers, floral cutters and painted wooden heart

Finally, use floral cutters to cut your flowers and add them to the wooden heart using adhesive. You can add them around one side of the heart or all the way around it.
Completed wooden heart sign with faux flowers, heart pattern and gold letters

You have finished decorating the wooden heart. This craft is perfect for those looking for budget-friendly home decor, and it serves as an excellent addition to any Valentine's Day decoration.

You may also enjoy

Pin Share Save

Pinterest pin showing hanging heart decoration with faux floral, gold letters, and heart pattern


Comments

  1. This is so pretty! I love your choice of patterned paper and the artificial flowers finish it off nicely.
    Thanks so much for sharing with #MMBC.

    ReplyDelete
    Replies
    1. Jayne, thank you. It was a fun project to work on.

      Delete
  2. Oh, this is so cute! What a sweet design. Visiting from Crazy Little Lovebirds linkup.

    ReplyDelete
  3. This is such a simple craft but it's so pretty. What a lovely design. x

    ReplyDelete
  4. A great tutorial and the end result is so pretty! Thank you for sharing it.

    ReplyDelete
    Replies
    1. Thank you so much. I'm happy to hear you enjoyed this craft.

      Delete
  5. The decorated heart is very pretty. I love the tissue combination. #MMBC

    ReplyDelete
    Replies
    1. Carol, thank you. 😊 I appreciate you visiting.

      Delete
  6. Steph, this is so pretty! I appreciate you sharing the video too.
    Thanks bunches for sharing this tutorial with Sweet Tea & Friends this month sweet friend.

    ReplyDelete
  7. Another brilliant creation. I always love seeing what you come up with. Featuring when my link party opens.

    ReplyDelete
    Replies
    1. Carol, thank you so much for visiting my blog and for the feature!

      Delete
  8. Thank you for sharing this adorable craft with us at Farmhouse Friday 333. I'll be featuring it tomorrow. Hope you link up again soon. I love your crafts! pinned

    ReplyDelete
    Replies
    1. Cindy, aw thank you so much. I love sharing at your party.

      Delete

Post a Comment

I love hearing from you! Your comments and creative ideas truly brighten my day. I do my best to respond to everyone, so if you have a question or just want to say hello, please leave a note below. To keep our community a positive and inspiring space, spam or off-topic comments will be removed. Happy crafting!

Popular posts from this blog

Easy Steps to Create a Cozy Autumn Tablescape at Home

Hello everyone! I’m excited that you decided to visit the blog today. I wanted to share how to create a cozy autumn tablescape at home. My goal was to design something warm and inviting, as our table is a space where we share conversations, drink coffee, tackle homework, and simply enjoy each other’s company.  I typically don’t go all out when decorating my dining table, but I wanted to show you how I styled it using decor pieces I already had. I would love for you to join me in this decorating adventure! Watch the video tutorial Create a Cozy Autumn Tablescape at Home Items I'm adding to my table:  -White tablecloth runner - Battery-operated leaf lights  - Reusing glass jars  - Mini pumpkins and other fall decorations  - Small "Hello Fall" sign  - Faux flowers I began by spreading my white tablecloth down the center of the table. Around Halloween, I purchased this tablecloth a few years ago at my local Walmart. After laying it out, I realized that I could ...

Easy Autumn Leaf Wood Riser | Using Dollar Tree Wooden Leaves

  Hello! I'm so happy that you decided to stop by. I hope all is well. Today we are creating an Autumn leaf wood riser. I purchased a pack of wooden leaves and wood square blocks from my local Dollar Tree. I wasn't sure what I was going to create with them. I found a piece of scrap wood in my garage and  I figured I would create a wood riser with a wood leaf design. This is a simple craft and is great for beginners.  Video tutorial Materials One scrap wood section -The size  of the one I am using is 7¾ x 3½ Paint -I'm using espresso for my riser and red for my wooden  leaves Four wood square pieces -Purchased a pack at Dollar Tree  (These are being used for the legs on the wood riser) Wooden leaves -Purchased a pack at Dollar Tree I am using 6 leaves. Depending on the size of the wood you use, you  could end up using more or less Paintbrush Hot glue Faux fall floral or leaves Floral cutters Start by taking your paint and applying it onto your scrap woo...

How I Styled 6 Fall Trays Using Simple Reused Decor

  This fall, I wanted to challenge myself to decorate with just a few simple items—things most of us already have tucked away in our craft bins. With one round tray, a Dollar Tree lantern, a battery‑operated LED candle, a handful of faux florals, and a mix of Dollar Tree pumpkins, I created six different autumn looks. Each one feels cozy, seasonal, and unique, all without buying a bunch of new décor. My goal was to show how versatile your everyday pieces can be. By swapping out colors, textures, and small accents, you can build fresh designs that fit your style and your space. Watch the video tutorial Decorating Each Tray My First Tray: Classic Lantern & Autumn Florals For my first tray, I began by placing a round tray on a woven placemat to create a cozy base. Next, I placed the black lantern in the center and added a small LED candle inside. I figured this would provide a soft autumn glow that I love. I took yellow faux florals and arranged them around the lantern to brighten...

How to Create Fall Crate Décor Using Dollar Tree Items

Hello everyone! I hope you are doing well. You all know how much I love these wooden crates from Dollar Tree. I created this cute fall decor that can be added to a tiered tray or mantel. We'll use one wooden crate and a house plaque from Dollar Tree. Let's create and decorate together! Please check out my newest link party on the  Crazylittlelovebirds  blog if you haven't already. It runs from Fridays at 9:00 a.m. MST to Tuesdays at 11:00 p.m. MST.  Video tutorial Materials One wooden crate One wooden house plaque Acrylic paint Wooden letters Any Adhesive or Hot glue Foam craft blocks Faux fall floral/greenery Paintbrushes Mod Podge Decorative paper Floral cutters Scissors One pencil for tracing I have chosen to decorate with mini pumpkins, a squirrel figurine, and an unpainted leaf ornament for the fall season. Step 1: Tracing your wooden house plaque onto decorative paper Place the wooden house plaque on the decorative paper and trace its shape with a pencil. Cut out th...

DIY Valentine's Wooden Heart Riser.

Create a charming Valentine's wooden heart riser with this DIY craft tutorial. It's a perfect addition to your holiday decor and makes a heartfelt gift. Get step-by-step instructions and unleash your creativity! Be sure to check out the video tutorial below Materials One Wooden heart  (Target Dollar Aisle) Three large wooden beads Diamond Gem wrap (Purchased at the Dollar Tree. Sticky backing) Paintbrush Paint  (I'm using a light pink) Scissors Faux Flowers Adhesive (E6000, Any will work) Hot Glue Start by taking your wooden heart, and applying pink paint to the front surface. It is entirely up to you, but you can also apply paint to the bottom side of your wooden heart.   You will need around two coats of paint when you are completely finished. Once you have applied all coats of the paint, set your wooden heart aside, and allow it to dry. First, take three large beads and apply some white paint to each of them. Set them aside to dry. After the beads have dried, flip...

Search This Blog

All content Copyright

Copyright 2021-2026 I ask that you do not take or use my photos or words without permission. If you have any questions, please feel free and contact me. Also, for more information on this blog, check out the disclosure policy tab above. Thank you