Dollar Tree Hack: Round Mirror Riser Decor with Mini Winter Scenery

 Thank you for stopping by to create a beautiful winter-themed decor piece with me using an easy Dollar Tree hack. We'll transform a simple round mirror into a mirror riser with mini winter scenery on a budget. This craft is perfect for adding a touch of seasonal charm to your home decor. Before we begin, let me provide you with a detailed materials list so you can easily get creative.

Video tutorial


For this DIY project, you will need

Round mirror 
Faux craft snow
Mod Podge
Craft gems for embellishments
A mini holiday ornament such as a truck and tree
Hot glue
Wooden craft legs (I'm using 1'' wooden peg people)
Acrylic paint

Materials-Mod Podge-faux snow-craft gems-acrylic paint-mirror-paintbrush-wooden legs

Adding acrylic paint to wooden legs

Start by painting each of the four wooden legs with acrylic paint. Allow the legs to dry after painting.

White Acrylic paint-paintbrush-wooden peg people

Four painted white wooden legs

Applying Mod Podge to mirror

Next, take your paintbrush and apply a thin circle of Mod Podge around the mirror. Then, sprinkle the faux snow over the Mod Podge and shake off any excess snow.

Mod Podge, mini mirror, Paintbrush, Faux snow

Attaching wooden legs to mirror


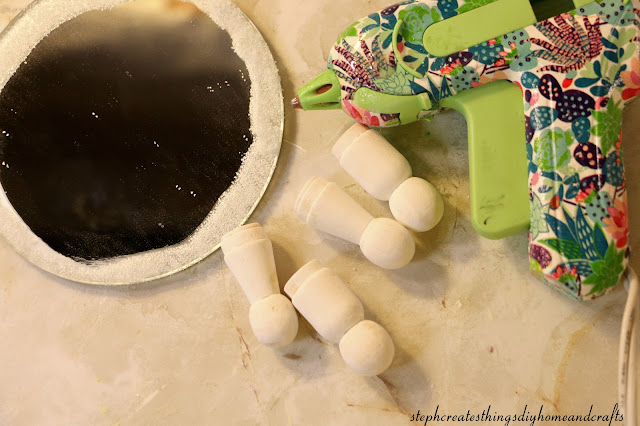
Flip the mirror over so the bottom is facing up. Prop it on a wooden lid to keep the faux snow in place while attaching the wooden legs. Use hot glue to attach the four wooden legs to the mirror.

Mirror with faux snow, Painted wooden legs and hot glue

Adding decorations

After attaching the legs, flip the mirror over. Use hot glue to add mini decorations to the mirror.
Finally, add craft gems around the mirror (this step is optional). You can also add mini lights to your decoration to make it look more festive.

Craft gems, mini truck, mini tree, and Mirror with faux snow

mini mirror with faux snow, craft gems, mini truck and mini tree

Your mirror riser mini winter scenery is now complete. Thank you for stopping by and creating it with me! I appreciate all of you and hope to see you soon.

Round mirror riser with mini winter scenery

You may also enjoy


Pin Share Save
Pinterest pin showing round mirror riser decor with mini winter scenery


Comments

  1. This is such a sweet little winter scene idea! I love how you put this together. Thanks for sharing it with is at Thursday Favorite Things. :)

    ReplyDelete
    Replies
    1. Pam, thank you so much. I appreciate you taking the time to visit. :)

      Delete
  2. Such a cute idea!! What an amazing way to create a winter-y scene on a budget!

    ReplyDelete
  3. What a clever way to build a riser! I love it! Thanks for sharing!

    ReplyDelete
  4. How cute. I love using mirrors like that, not as good as lights/candles but I like them a lot. Thanks so much for linking up at #AThemedLinkup 170 for Winter Crafts and Décor. Pinned.

    ReplyDelete
    Replies
    1. Dee, thank you so much. I know how much you love lights! You know you could always add lights around the mirror. :) Thank you so much for visiting.

      Delete
  5. P.S. I'll be featuring this today at Thursday Favorite Things, starting at 10:00 a.m. CST. :)

    ReplyDelete
  6. this is so lovely! You are so crafty!

    ReplyDelete
  7. Love this Steph! This is so sweet and attractive.
    Thanks bunches for sharing this with Sweet Tea & Friends this month dear friend.

    ReplyDelete
    Replies
    1. Paula, I'm so happy to hear you enjoyed this craft. Thank you for visiting. 😊

      Delete
  8. Visiting again to say thanks so much for linking up at the #UnlimitedLinkParty 140. Pinned.

    ReplyDelete
  9. CONGRATS Stephanie! Your post is FEATURED at the #UnlimitedLinkParty 141!

    ReplyDelete

Post a Comment

Thank you so much for taking the time to leave a comment. Your comments brighten my day. I hope that you know that it is appreciated. I do my best to respond to every comment. If you have a question, please feel free and ask away!

Popular posts from this blog

DIY Canvas Floral Art

  Create stunning DIY canvas floral art for fall with faux flowers. This easy and affordable project will add a beautiful touch to your home decor. Get step-by-step instructions and unleash your creativity! Hi everyone! It's finally autumn, and I'm thrilled about it! I have a simple craft idea to share with you today. I loved the result of my first canvas floral art project, so I thought I'd take you through a few simple steps to create your very own. For this project, I am using a canvas bought from Dollar Tree and some faux flowers that I purchased earlier. Video tutorial Materials One canvas Faux floral Paint-I'm using acrylic and chalk paint Paintbrush Hot glue Floral cutters Step 1: Apply paint to canvas Start by applying paint to your canvas. I applied two coats of black acrylic paint. Allow your canvas to dry completely before proceeding. Step 2: Painting a vase onto the canvas. You are now ready to create your painted vase on your canvas. To create the outline o

DIY Happy Spring Sign

  Hello, and welcome. I want to thank every single one of you that take the time to check out my crafts. I love working on crafts and sharing my creations with all of you. I hope to inspire, and even motivate beginner crafters to start a new project. I appreciate you so much. And if you haven't yet checked out my YouTube channel, be sure to for video tutorials.  Today we are working on a happy spring sign. This sign is perfect to welcome in the Spring season. I went to my local Dollar Tree, and I was able to finally find the fluffy bunny bottom! Of course, I decided to add that to this project. If you're ready let's create your very own Happy Spring sign. Video tutorial Materials needed I will be including all materials used in this craft, and I will also include where I purchased some of my items. Not all prices and locations will be listed since some of the materials I already had on hand. Bunny bottom-- Purchased at Dollar Tree for $1.25 Wooden letters-- Purchased at Wal

Design your very own organizer using Dollar Tree Items

  Learn how to design and create your own personalized organizer using affordable Dollar Tree items. Get creative with materials and follow these easy DIY steps to make a unique and functional organizer for your home or office space. Hi everyone! I hope that you are doing well. Recently I took a trip to my local Dollar Tree and found these stackable plastic organizers.  Today we're going to design our very own organizer. To create your organizer you will only need a few materials. Most of my materials were purchased at my local Dollar Tree store. You will need three of the plastic organizing drawers.  Be sure to check out my YouTube channel for more DIY tutorials-- For more DIY Tutorials Click here! And I would love it if you subscribed to the channel DIY Organizer video tutorial below Materials THREE STACKABLE ORGANIZING DRAWERS 5X5X1.75 IN ASSORTED FAUX PEARL BEADS SMALL WOOD BEADS PEEL AND STICK FLORAL DECALS PEEL AND STICK DECORATIVE PAPER HOT GLUE PAINT- I'M USING ACRYLIC

Pinterest


Crazylittlelovebirds Link Party