
Christmas Camper Shadow Box

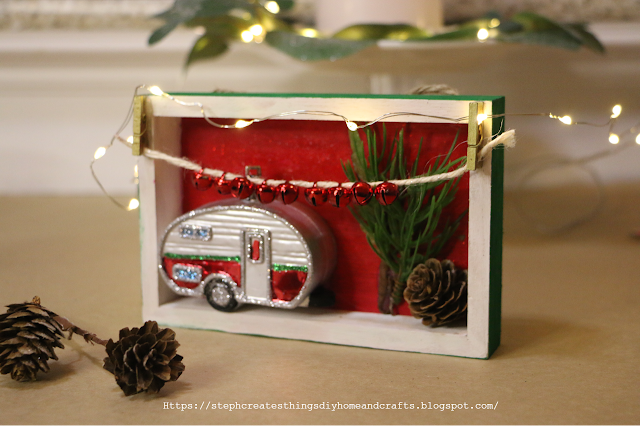
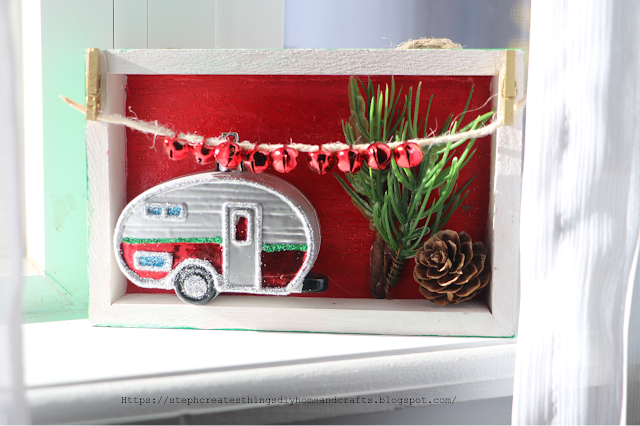
 Get in the holiday spirit with a delightful Christmas Camper Shadow Box! This DIY craft project combines the warmth of Christmas and the appeal of a camper in a distinct and imaginative way. Discover how to create your own unique Christmas Camper Shadow Box with this comprehensive guide. Ideal for adorning your home during the holiday season or as a thoughtful gift idea.

Shadow box displayed with mini lights and mini camper with foliage

Video tutorial


Hi everyone! I am so excited to share this simple Christmas DIY shadow box craft. This craft can be completed within 10 minutes and only takes a few materials. 
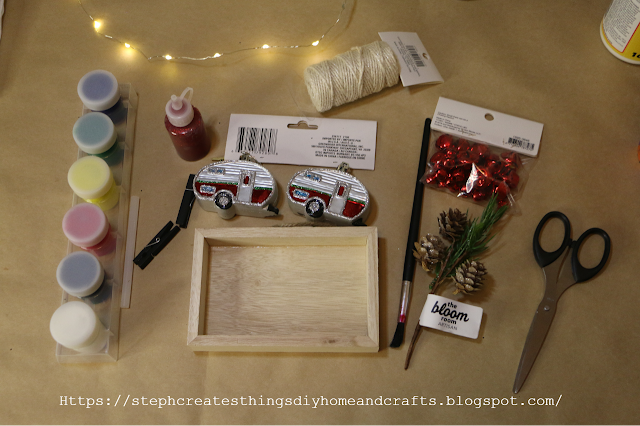

Materials such as mini campers, glitter, paint, and mini craft clothespins.

Materials Needed

- One Wood Shadow Box
Purchased at Michael's

-One set of Camper Ornaments 
I picked this up at my local Dollar Tree craft store

-Red bells

-Paint
Red, white, and green
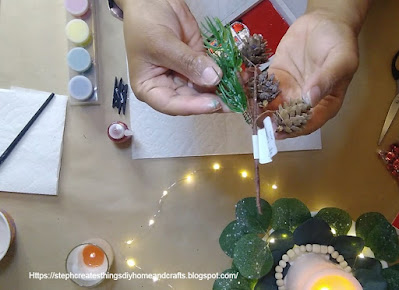
-Greenery/pinecones

-Twine, or String

-Hot glue

-Scissors

-Red glitter
This is optional for the inside of your box

-Craft clothespins 
I used gold for my box


Creating your Shadow Box design

Start by painting the inside of your box red. The sides, top, and bottom of the inside will be painted white. Once you have painted the inside of your box, you can now paint the outside of your box. Start with painting the front outer section white. 

Painted wooden shadow box

Painted wooden shadow box


Begin to paint the outside of your box green. The top, sides, and bottom of the outer sections of your box will be painted green. 

Painted wooden shadow box


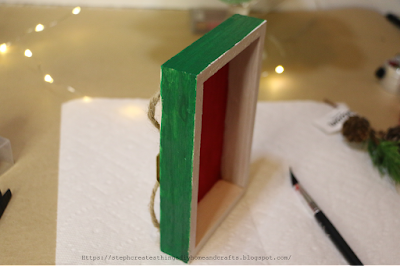
Set your box aside, and allow it to completely dry. 

This step is completely optional, but once you have allowed your box to dry, you can add some red glitter to the back section that you have painted red. 

Hands applying red glitter to painted wooden shadow box


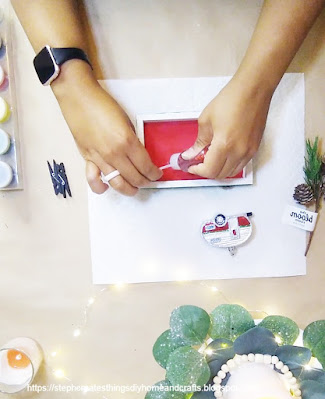
Next, take your hot glue, and attach your camper to the inside of your box.  
After doing this, you can add your greenery and pinecone. 

Hands holding faux foliage


Take your craft clothespins, and add them to the front, top section of your box. One clothespin on each side of your box. Use some hot glue to add them.

Next, take your scissors, and cut off a strand of twine. You will want your strand of twine to be long enough to go from one clothespin to the other. 

Hands attaching twine to top of shadow box


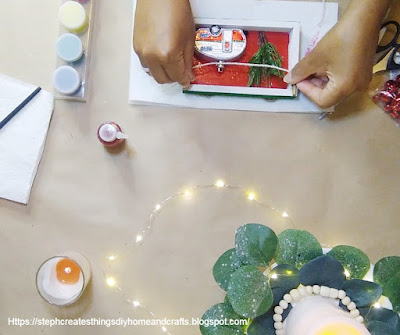
Take some of your bells, and string them along the twine. Once you have done this, take the ends of your twine, gently open up the clothespins, and add the ends of the twine on both sides.

Once you have added on your bells your project is now complete. This was such a fun, and easy craft to create. I think this will look great added to a tray with other Christmas decorations. Let me know what you think in the comment section. Also if you have any questions about this craft, please let me know.


Completed Christmas shadow box displaying mini camper, mini red bells, and foliage

I'll see you soon! 

You may also enjoy

Pin/Share/Save

Completed Christmas Shadow box with text description


Comments

  1. Es un adorno navideño precioso. Saludos

    ReplyDelete
  2. This is absolutely adorable! Thank you for sharing at Party In Your PJ's - you are being featured on my blog Tuesday evening.

    ReplyDelete
  3. This is the cutest thing. It'll be a feature at Handmade Monday later today, thank you for joining and sharing it with us :-)

    ReplyDelete
  4. This is so adorable! I love the details.Thanks for sharing at the TFT party!

    ReplyDelete
  5. Very cute, love it, the lights too! Thanks so much for linking up at the Unlimited Link Party 91. Shared.

    ReplyDelete
  6. I can't believe the campervans are Christmas tree ornaments, they are super cute! What a lovely idea for Christmas! Sim x #UnlimitedLinkParty

    ReplyDelete
    Replies
    1. Sim, I couldn't believe it too! I saw them at the store, and I knew I had to purchase them. This was a fun creation. Thanks so much for stopping by.

      Delete
  7. CONGRATS! Your post is FEATURED at the Unlimited Link Party 92!

    ReplyDelete
    Replies
    1. Dee, thank you! I'm so happy to hear that. I'll be sure to visit.

      Delete

Post a Comment

Thank you so much for taking the time to leave a comment. Your comments brighten my day. I hope that you know that it is appreciated. I do my best to respond to every comment. If you have a question, please feel free and ask away!

Popular posts from this blog

Dollar Tree Mini Bead Floral Spring Wreaths

Transform Dollar Tree's mini bead wreaths into beautiful spring floral bead wreaths with this easy DIY tutorial. Add a touch of spring to your home decor with this creative and budget-friendly project.  I'm excited to share a quick and simple DIY project with you today. Last year, I purchased two mini bead hanging decorations displayed with the fall decor. I decided to add them to my craft stash and use them in the springtime. In this tutorial, I will show you how to create mini bead floral wreaths and provide a full list of materials needed for each step.  Dollar Tree Mini Bead Floral Spring Wreaths Video tutorial Materials Round mini beaded hanging decorations Artificial floral accents One large craft/popsicle stick Paintbrush Acrylic paint Floral cutters Hot glue/Adhesive Step one: Applying paint Before painting, remove any previous decorations such as the plaid autumn leaves that were attached to the wreaths I'm using. To start with, apply paint to your beaded wreath. Y

Transforming Ice Cream Cups: DIY Spring Tea Cup Floral Arrangements

  Today, we'll explore a fun and easy DIY project involving repurposing plastic mini ice cream cups into beautiful spring tea cup floral arrangements. This project is a great way to add a touch of spring to your home decor.  Before throwing away those plastic cups, consider the many possibilities in creating something new.  For this project, you will only need a few materials. Our main materials for creating the faux tea cup will be the ice cream cup and air-dry clay. So, if you're ready to create this adorable and creative springtime tea cup floral decoration, let's begin! VIDEO TUTORIAL Materials Plastic ice cream cups (I am reusing two plastic ice cream cups) Spanish moss Floral Mod Podge Decorative floral napkin Artificial spring flowers Acrylic paint (I'm using white) Paintbrush  Optional- Bumblebee button and small dowel rod- Dimensions : 0.1 inches x 6 inches. Air dry clay Scissors Foam block Preparing your cups After washing your ice cream cups and drying them c

Eco-Friendly Crafting: How to Make a Beautiful Flower Holder from Cardboard

Discover how to create a beautiful flower holder from cardboard in an eco-friendly way. Hello everyone, today I'm excited to share an eco-friendly crafting project with you.  While cleaning up my wrapping paper collection, I noticed the paper roll had run out, leaving only the cardboard paper center. Instead of throwing it away, it would be a great opportunity to reuse the paper and create something beautiful.  Video tutorial Materials - Cardboard paper (preferably thicker wrapping paper) - Faux flowers (such as tulips and greenery) - Two fabric hearts and butterfly stickers - Two craft clothespins - Hot glue or glue stick - Twine -Hole puncher - Optional faux flexible flowers to wrap around the twine. Step one: Preparing the paper To get started, cut a piece of cardboard paper. Make sure to choose a size that will fit the flowers you plan to use later on in the craft. The size of the section should be large enough to accommodate the flowers in the center of the sleeve. For my proj

Decoupaged Glass Jar Candle Holders with Faux Leaves and Gold Wire

  Learn how to create beautiful decoupaged glass jar candle holders using leaves and gold wire. This DIY project is a perfect way to upcycle old glass jars and create unique candle holders for your home decor.  I hope you're all doing well. The weather has cooled down and we're enjoying the change. Today, I'd like to share a quick upcycling decoupage project with you all. I had some extra glass yogurt jars lying around and bought two taper candle holders from Target's dollar section. I wasn't sure what to do with them at first. In today's project, I will show you how to decorate small glass jars using faux fall leaves and gold wire. Video tutorial Materials You need two taper candle holders, a paintbrush, Mod Podge, faux fall leaves, or a decorative napkin, hot glue, two battery-operated tealight candles, and gold wire.  Applying Mod Podge and faux leaves to glass jars To start with, grab a paintbrush and use it to apply Mod Podge on your glass jar. I suggest ap

4 Easy Floral Gift Wrapping Ideas

 Hello everyone! Today, I am sharing four simple ideas to gift wrap using faux floral, embellishments, craft clips, twine, and a few other materials. It's a fun and personalized way to wrap a gift and a great way to utilize any leftover materials you have from a previous craft or project. If you're ready, I would love it if you join me in decorating! Video tutorial Materials for Box Number One Wrapping paper mini flower decorations Paintbrush Acrylic paint Scissors Start by wrapping your box using your wrapping paper and tape. I purchased this brown wrapping paper at my local Dollar Tree.  Next, using your paintbrush begin to add a few dots of paint to your wrapping paper.  After, take your twine and begin to wrap it around your box. I decided to wrap a section around the middle going across and a section going from the top to the bottom of my box. Once you have done this, tie your twine off into a knot and remove any of the remaining twine. You are ready to begin attaching you

DIY Spring Flower Terra Cotta Pot

Hello everyone! Today, I'm excited to share a simple re-do craft that will transform a plain terra cotta pot into a beautiful spring gift. I'm reusing one of my old terra cotta pots from a previous project for this craft.-  Spring Floral Clay Pot Design  With just a few easy steps, I'll show you how to create a stunning spring flower pot display that would make the perfect Mother's Day gift, or just to welcome Spring. Let's get started! DIY Spring Flower Terra Cotta Pot Video tutorial Materials Artificial flowers One terra cotta pot (I'm reusing a pot from a previous craft) Acrylic paint Craft stick Faux pearl embellishments Foam block Adding paint and other designs I used a pot that was previously painted and had some twine added to it. I decided to keep the existing paint and twine and add a few painted flowers to the pot. For the flowers, I used light purple and blue for the petals, and white for the center of each flower. Adding embellishments I decided to a

Fall Floral Display Using Glass Yogurt Jars

 Hi everyone. I hope that you are all doing well. I am patiently waiting for Fall to arrive. Fall is my favorite season of them all. I love the golden leaves, hot apple cider by the fire pit, sitting out in the evenings roasting marshmallows. It is simply the best for me. Do you have a favorite season? What do you enjoy about it?  Today I am sharing a quick upcycle craft. I decided to use my glass Oui yogurt jars. I love these little jars and what a perfect way to reuse them. I will show you how to decorate these jars using mod podge, and acrylic paint. We will add faux flowers to each glass jar as well. Video tutorial Materials  Three small glass jars I'm reusing my Oui glass yogurt jars Twine Acrylic paint Paintbrushes Mod podge Decorative napkin Faux floral and foliage Decorative tape/Washi tape Scissors Applying paint to glass yogurt jars Begin by applying your paint to two of your glass jars. Each jar needed around three coats of paint.  I used acrylic chalk paint. Cutting you

How to Make an Easy Hydrangea Grapevine Wreath

This easy tutorial teaches how to make a beautiful grapevine wreath with pink hydrangea flowers. Perfect for spring home decor. Hello everyone! Today, I am excited to share my latest creation with you. I decided to make a simple wreath for the Spring season using some materials I already had at home. You don't need many materials to create your own wreath, which makes this project perfect if you're looking for something to do with some extra materials you have lying around. Video tutorial Materials One grapevine wreath  18" diameter Artificial hydrangea flowers One hello decoration Wire Floral cutters Twine String Paint To create a new spring-themed wreath, start by painting your hello sign. If you already have a hello sign, you can change its color to match this project. Allow the paint to dry completely before moving on.  Once the sign is dry, attach it to your grapevine wreath. I suggest using a string to attach the sign. Pick a string color that blends in with the pain