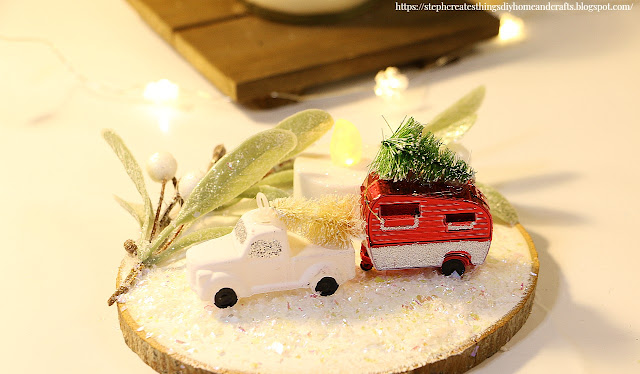
Wood Slice Winter Scenery Décor

Hello there! I hope you're doing well. If you're looking to spruce up your holiday home decor, I've got just the thing for you - a charming Wood Slice Winter Scenery Décor. In this tutorial, I'll show you how to create a stunning winter scenery display using just one wood slice from Dollar Tree. You'll need a few other materials like a miniature truck and camper ornaments, which you can easily get from Walmart. If you're like me, you might already have them on hand. So, let's get started and create this craft together!

Winter wood slice decoration with faux snow, holiday foliage, mini white truck and red camper

Video tutorial


Materials, such as wood slice, mini truck ornaments, glue spray, and paint

🌟Materials needed🌟 One wood slice-Purchased this particular one at Dollar Tree Mini truck and camper ornaments - These are from Walmart Faux Holiday greenery White acrylic paint The faux snow package is from Dollar Tree Scissors Hot glue, or any other adhesive
Spray glue
Optional- one battery-operated tealight candle


Wood slice, paintbrush and acrylic paint

Begin by removing any of the twine, or rope from your wood slice. The wood slice I purchased was actually meant for hanging. I used my scissors and removed the rope. If yours does not come with any rope, you are good to go. After, take your white acrylic paint, and apply your paint over the top of your wood surface. I applied one coat of paint. 

Painted white wood slice with holiday foliage

Be sure that your paint is completely dry. After, take your winter greenery, and begin to add it to your wood. Take your hot glue, add it to your wood, and add your greenery.

Painted wood slice with holiday foliage, spray glue, and faux snow

After, take your spray glue, and begin to spray the painted surface of your wood. I sprayed on a thin layer of my glue. If you do not have spray glue, any multi-purpose/all-purpose glue would also work. Such as clear gel tacky glue, Elmer's craft glue, and a few others that dry clear.


Painted white wood slice, foliage, and faux snow

After adding your glue to your wood, take your faux snow, and begin to sprinkle a layer over your glue.

Hand holding mini truck ornament above winter wood slice decor

You are now ready to add on your mini truck and camper. I started off using hot glue when I added my truck and camper. I noticed it was not the best adhesive when adding them over my faux snow. If you encounter this, I would suggest using another bonding adhesive, such as E6000.


Winter wood slice decoration with faux snow, holiday foliage, mini white truck and red camper

Winter wood slice decoration with faux snow, holiday foliage, mini white truck and red camper

Your winter scenery is complete and ready to be displayed. I love how simple this was to create. If you would like, you could add a battery-operated tealight candle for some added glow. Thank you so much for stopping by, and creating with me. I appreciate all of you!  

Pin Share Save

Pinterest pin showing Winter wood slice decoration with faux snow, holiday foliage, mini white truck and red camper


Comments

  1. Oh, how cute! Thanks so much for linking up at A Themed Linkup 131 for Christmas Crafts and Décor. Shared.

    ReplyDelete
  2. So cute! What a great idea. Thanks for joining us at the Home Imagined party today.

    ReplyDelete
  3. Steph, this is so sweet! I'm fairly new to crafting. But this sounds like something I'd like to try. I appreciate you sharing this tutorial with Sweet Tea & Friends this month my friend.

    ReplyDelete
  4. This is so sweet, you've put it all together so beautifully.

    ReplyDelete
  5. So effective, and gorgeous.
    I visited you via Whimsy Home Wednesday Blog Link Party No. 53
    I linked up this week with = 13+14. Come and join us Mon - Saturday at SeniorSalonPitStop. You will find the linkup information under BLOGGING.

    ReplyDelete

Post a Comment

Thank you so much for taking the time to leave a comment. Your comments brighten my day. I hope that you know that it is appreciated. I do my best to respond to every comment. If you have a question, please feel free and ask away!

Popular posts from this blog

Decoupaged Glass Jar Candle Holders with Faux Leaves and Gold Wire

  Learn how to create beautiful decoupaged glass jar candle holders using leaves and gold wire. This DIY project is a perfect way to upcycle old glass jars and create unique candle holders for your home decor.  I hope you're all doing well. The weather has cooled down and we're enjoying the change. I'd like to share a quick upcycling decoupage project with you all today.  I had some extra glass yogurt jars and bought two taper candle holders from Target's dollar section. I wasn't sure what to do with them at first. In today's project, I will show you how to decorate small glass jars using faux fall leaves and gold wire. Video tutorial Materials Needed: - Two taper candle holders - A paintbrush - Mod Podge - Faux fall leaves or a decorative napkin - Hot glue - Two battery-operated tealight candles - Gold wire Applying Mod Podge and faux leaves to glass jars To start with, grab a paintbrush and use it to apply Mod Podge on your glass jar. Apply a small amount of M

Easy Steps to Create a Cozy Autumn Tablescape at Home

Hello everyone! I’m excited that you decided to visit the blog today. I wanted to share how to create a cozy autumn tablescape at home. My goal was to design something warm and inviting, as our table is a space where we share conversations, drink coffee, tackle homework, and simply enjoy each other’s company.  I typically don’t go all out when decorating my dining table, but I wanted to show you how I styled it using decor pieces I already had. I would love for you to join me in this decorating adventure! Video tutorial Create a Cozy Autumn Tablescape at Home Items I'm adding to my table:  -White tablecloth runner - Battery-operated leaf lights  - Reusing glass jars  - Mini pumpkins and other fall decorations  - Small "Hello Fall" sign  - Faux flowers I began by spreading my white tablecloth down the center of the table. Around Halloween, I purchased this tablecloth a few years ago at my local Walmart. After laying it out, I realized that I could achieve that look by laye

DIY Winter Wonderland Reusing Tea Tin Container

Have you ever wondered what to do with those tea tin containers once you’ve finished using them? While going through my tea storage, I came across one nearly empty tin. After finishing it off, I decided to create a beautiful winter scene using the tin. I absolutely love making these little winter displays by repurposing tin containers. If you’d like to create one yourself, I would love for you to follow along! Video tutorial Materials Needed: - Tin container - Acrylic paint - Sanding block (optional) - Paintbrush - Foam block - Decorative tissue paper - Mod Podge - Winter decorations (I’m using faux snow cotton, a winter tree, and a wooden house) - Hot glue - Optional: stamp and ink, faux pearl stickers Prepare the Tin Container: Start by applying paint to the tin container. I chose to use my sanding block beforehand to prepare the surface for paint.   Once sanded, apply your acrylic paint. Make sure to allow the paint to dry completely. I needed three coats for full coverage. Cut the

Turn Old Glass Jars into Beautiful Fall Candle Holders

Get ready to get creative this fall with DIY upcycled glass candle decorations. Follow this easy step-by-step guide to transform old glass jars into beautiful seasonal decor pieces. I will demonstrate how to create two fall candle decorations using glass jars. You will only need a few materials to get started. If you're ready, let's begin! Video tutorial Materials Glass jars fall decorated leaves faux fall leaves Acrylic paint Twine or craft string Hot glue Paintbrush Mod Podge Battery-operated tealight candles Applying paint and Mod Podge Begin by mixing paint and Mod Podge. I decided to do this for my jars to give them more of a stained-glass appearance. I went with brown and orange for my jars. Adding napkin cut-outs and faux leaves After cutting out your napkin designs, use Mod Podge to adhere them to your first jar. Make sure to remove the second layer of the napkin before adding each cutout to the jar. Apply Mod Podge to the jar, place the design over the Mod Podge, and

Fall Floral Display Using Glass Yogurt Jars

 Hi everyone. I hope that you are all doing well. I am patiently waiting for Fall to arrive. Fall is my favorite season of them all. I love the golden leaves, hot apple cider by the fire pit, sitting out in the evenings roasting marshmallows. It is simply the best for me. Do you have a favorite season? What do you enjoy about it?  Today I am sharing a quick upcycle craft. I decided to use my glass Oui yogurt jars. I love these little jars and what a perfect way to reuse them. I will show you how to decorate these jars using mod podge, and acrylic paint. We will add faux flowers to each glass jar as well. Video tutorial Materials  Three small glass jars I'm reusing my Oui glass yogurt jars Twine Acrylic paint Paintbrushes Mod podge Decorative napkin Faux floral and foliage Decorative tape/Washi tape Scissors Applying paint to glass yogurt jars Begin by applying your paint to two of your glass jars. Each jar needed around three coats of paint.  I used acrylic chalk paint. Cutting you

How to Create Fall Crate Décor Using Dollar Tree Items

Hello everyone! I hope you are doing well. You all know how much I love these wooden crates from Dollar Tree. I created this cute fall decor that can be added to a tiered tray or mantel. We'll use one wooden crate and a house plaque from Dollar Tree. Let's create and decorate together! Please check out my newest link party on the  Crazylittlelovebirds  blog if you haven't already. It runs from Fridays at 9 am MST to Tuesdays at 11 pm MST.  Video tutorial Materials One wooden crate One wooden house plaque Acrylic paint Wooden letters Any Adhesive or Hot glue Foam craft blocks Faux fall floral/greenery Paintbrushes Mod Podge Decorative paper Floral cutters Scissors One pencil for tracing I have chosen to decorate with mini pumpkins, a squirrel figurine, and an unpainted leaf ornament for the fall season. Step 1: Tracing your wooden house plaque onto decorative paper Place the wooden house plaque on the decorative paper and trace its shape with a pencil. Cut out the traced sha

Create With Me: Autumn Grapevine Wreath

Let's create a beautiful autumn grapevine wreath together with this easy-to-follow DIY craft tutorial. It's an excellent way to add a touch of seasonal charm to your home decor. Today, we'll use mini pumpkins, faux fall floral, a metal sign, faux greenery, and other materials to make the wreath. Follow the step-by-step instructions provided to make your own autumn grapevine wreath. Video tutorial Materials One Grapevine wreath- The size of my wreath is 14'' Two mini pumpkins Twine One sign- I am using a metal welcome sign from Dollar Tree Floral cutters Faux fall flowers and greenery Ribbon-For creating a bow Scissors Step 1: Adding greenery to the wreath To start, insert your greenery into the spaces of your grapevine wreath, pulling each piece through the openings. You can also secure your greenery with floral wire and continue adding around the wreath. Step 2: Adding mini pumpkins to the wreath First, determine the placement of your mini pumpkins on the wreath. A

🌟🎄Easy DIY Christmas Wood Decorative Stars | Decoupage and Decorate

  Get creative this Christmas and learn how to make easy and beautiful DIY wood decorative stars. With the art of decoupage and some simple decorating techniques, you can add a touch of handmade charm to your holiday decor. Find step-by-step instructions and inspiration for creating your own festive stars. Hello everyone! Today I am bringing you another quick and easy Christmas craft. I found these cute wooden stars at Target for one dollar each, and I figured we would do some decoupage, and create some cute Christmas designs on them. If you're ready, I would love it if you created it with me. Video tutorial Materials needed Two wooden stars purchased at Target White acrylic paint Two mini bows Two decorative holiday napkins Two mini ornaments Hot glue Scissors One paint brush Twine or craft rope Mod podge One marker for tracing Begin by applying your acrylic paint onto each of your wooden stars. I applied one coat to each of my wooden stars. Be sure that after you allow your paint