
DIY Budget-Friendly Succulent Plant Hanger Design

 Hi everyone! I hope that you are doing well. Today I am sharing an easy DIY craft that is budget-friendly, and easy to create. A material list will be provided, along with step-by-step instructions on creating your very own. Be sure to check out the video tutorial below.

Hanging faux succulents in picture frame design

Close-up of faux succulent and hanging frame design

Video tutorial


Craft materials such as, paint, floral cutters, sponge brush, faux succulents, and framed art

Materials

One 4x4 framed art
Acrylic paint
Faux succulents
Hot glue and any other heavy-duty adhesive
Twine
Scissors
 Floral cutters
Paintbrush

You can find most of these materials at your local Dollar Tree
This project costs under five dollars

Acrylic paint, sponge brush and framed art on a table

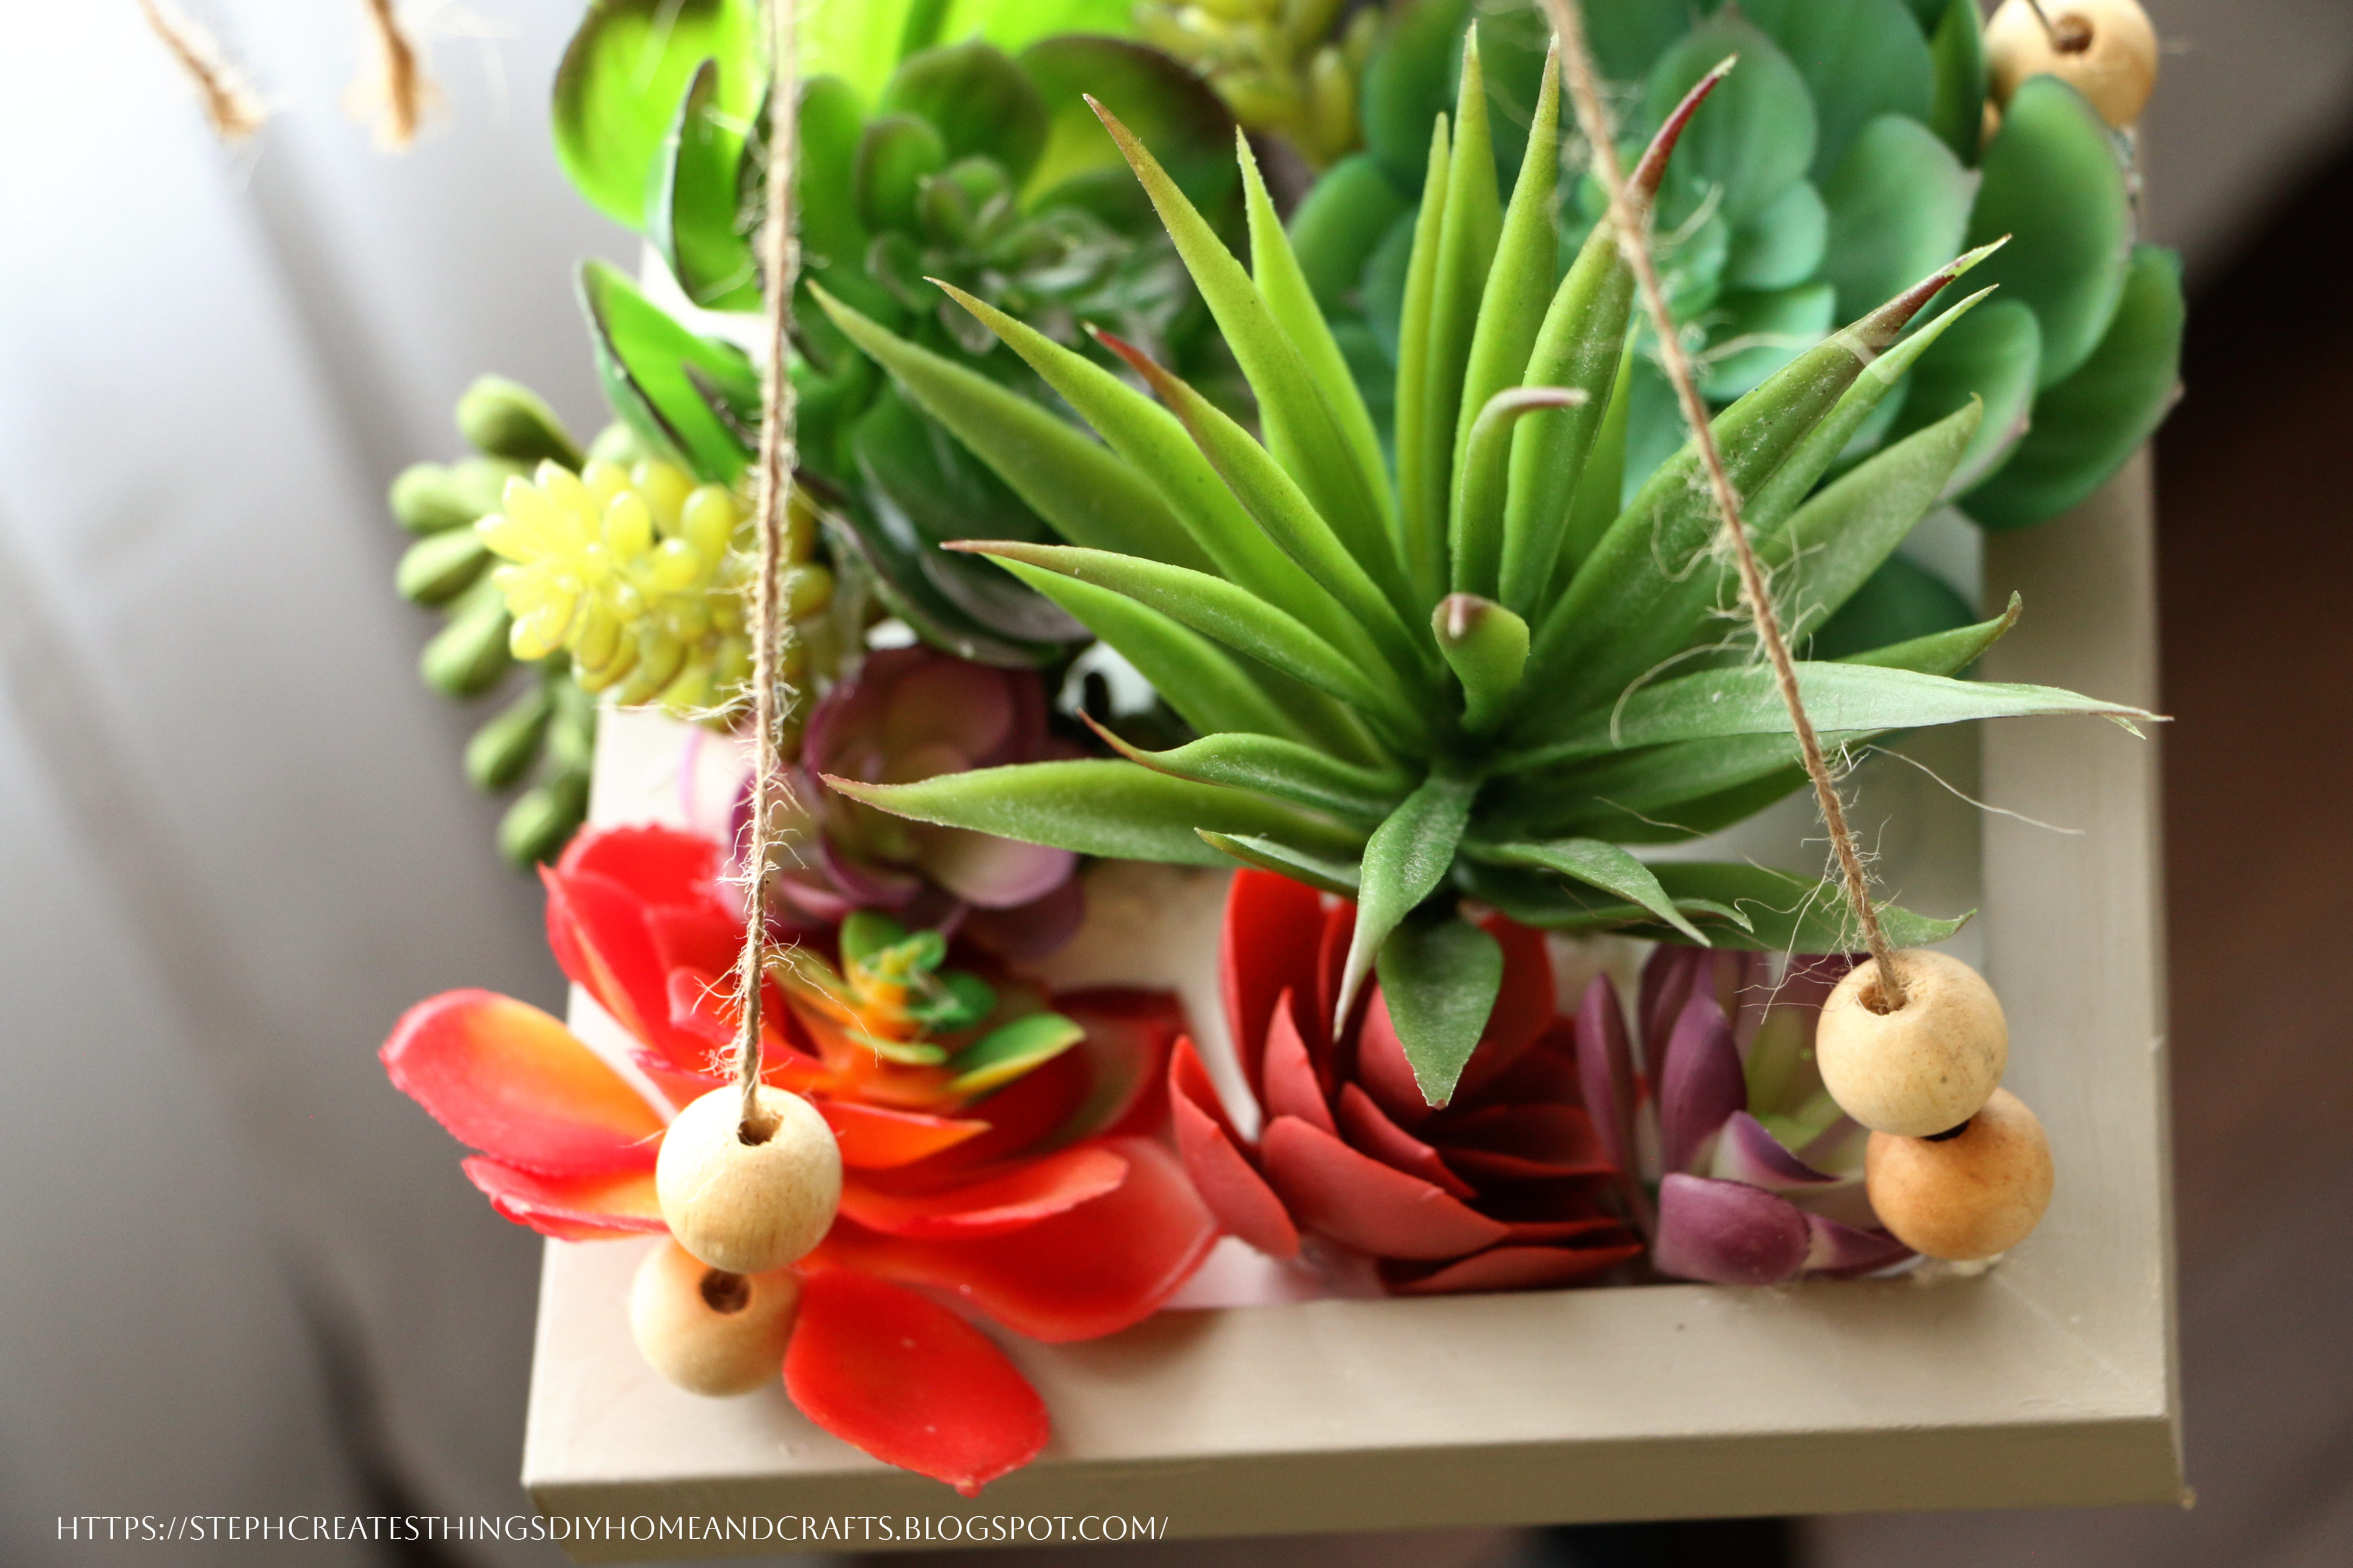
If your frame comes with beads as shown in the picture above, take your scissors and remove the beads. You will actually reuse the beads later on in this craft. Take the inner section of your out and set it aside. Next, take your acrylic paint and paintbrush, and begin to apply your paint to your frame.
I applied three coats of my paint to my frame.

Painted framed on a table

Paint near painted frame and paintbrush

Next, use your paintbrush you apply paint over the inner section of the frame we removed earlier. I applied my white paint since the board had writing on it. I gave it around two coats of paint and after I used my blow dryer to give it a quick dry.

Twine, painted frame, adhesive and scissors on a table

Once you have painted the board, take it and pop it back into place on your frame. Now you are ready to begin cutting strands of your twine. Take your twine and cut four strands of the same size. You will need to determine how low you will want your plant hanger to be when cutting your twine. 

Twine, painted frame and adhesive on a table

Next, using your adhesive, begin to attach each strand of twine to the corners of your frame. I decided to use this all-purpose Loctite adhesive along with my hot glue. You can use any heavy-duty adhesive that you have on hand.  

Painted frame with attached twine and beads

Now you are ready to use your beads in your design. I decided to add two beads to each strand of twine. If your frame did not come with the beads like my frame did, you can also just add your own beads, or create this without the beads as well.

Painted frame and wooden beads attached and faux succulents

Next, take your floral cutters and begin to cut your succulents to size.

Hand holding faux succulent over painted frame

After, take each succulent flower and begin to glue them down in the middle of your frame.  Once you add all of your succulents, take your four strands of twine and bring them together at the very top. Make sure that when you lift your frame up by the twine, your plant hanger is leveled. Tie off the top of the twine in a knot.

Completed Close-up of succulent plant hanger design

This craft was super simple to create, budget-friendly, and takes very little time.
I hope you enjoyed creating this with me. Be sure to let me know if you decide to create your very own succulent plant hanger.

Hanging succulent planted hanger design displayed outdoors

If you enjoyed this craft you may also be interested in this craft-UPCYCLED PLASTIC BOWL HANGING PLANTER

Thank you so much for stopping by and creating with me. I'll see you soon.

Pin Share Save

Succulent plant hanger design Pinterest image with text

Comments

  1. I love succulents and have them all over my home! I like this DIY!! Thanks so much for linking up at the #UnlimitedLinkParty 109. Shared.

    ReplyDelete
    Replies
    1. Dee, thank you! Succulents are beautiful. :) Always a pleasure linking up at your link party.

      Delete
  2. Oh wow, I love succulents! As a kid in SA my dad had a HUGE succulent garden, and its still one of my favorite type of plants. This idea you have of the plant hanger is so gorgeous. I think I need to do something like this but with real succulents.
    I visited you via Crafty Creators Link Party #64
    If you are not already part of SSPS, this is a personal invite to hop over and come and share your posts with us at Senior Salon Pit Stop, every Monday to Saturday.
    See my entries: 21+22+23 and then navigate to the bottom of my page for the Senior Salon Pit Stop linkup, we hope to meet you there virtually

    ReplyDelete
    Replies
    1. I love that your dad had a huge succulent garden. I am sure it was beautiful. I love the idea of using real succulents! Thank you so much for stopping by, and I will be sure to check out your link party. :)

      Delete
  3. I'm featuring you this week when the next To Grandma's house we go Wednesday link party starts - thanks for sharing with us!

    ReplyDelete
    Replies
    1. Thank you so much! I'll be sure to stop by. :)

      Delete
  4. Wonderful little tutorial. It turned out so adorable. This post will be a feature this week. #HomeMattersParty

    ReplyDelete
    Replies
    1. Donna, thank you so much! I appreciate it. :)

      Delete
  5. I love this Stephanie, something I do not need to worry about keeping alive is a win in my book! So clever to use the sign as the base for the succulents. I love them, you may be amazed I am working on a small garden of them. If they do not make it on their own, then there is no hope for them!

    ReplyDelete
    Replies
    1. Aw, thank you so much. I love succulents so much and lately I have been using faux succulents in my designs. A small succulent garden sounds lovely. I love that so much.

      Delete
  6. This is so cute Stephanie! Love the use of faux succulents because I kill absolutely every single living thing that comes in my house that doesn't breathe lol! My so whispered to the plants that I bought last year at Walmart on the way to the car, "Sorry my mom chose you. You're going to die soon. So, so sorry guys." LOL! I have a few of the Dollar Tree signs, so all I need is a few succulents. Thanks for sharing on Crafty Creators!!
    Niki | Life as a LEO Wife

    ReplyDelete
    Replies
    1. Niki, you are so cute! You made me laugh so much when I read your comment. I've killed a few plants, but I've learned when you keep at it, with just a little practice and patience, it comes together. Thanks so much for stopping. And it is always a pleasure sharing on Crafty Creators.

      Delete
  7. Steph, this is just lovely. Thanks for sharing this tutorial with Sweet Tea & Friends this month dear friend.

    ReplyDelete
  8. This is absolutely adorable!! How clever! I love succulents, but for some reason I do have trouble keeping them alive, so this is perfect for me. I've featured this post today at Thursday Favorite Things. :)

    ReplyDelete
  9. Such a clever idea, it looks so modern and chic.

    ReplyDelete
  10. Congratulations, Steph, as you are being featured at SSPS 306. See you again next week https://esmesalon.com/tag/seniorsalonpitstop/

    ReplyDelete
  11. Such a BRILLIANT idea Steph! You are so very creative!

    ReplyDelete

Post a Comment

Thank you so much for taking the time to leave a comment. Your comments brighten my day. I hope that you know that it is appreciated. I do my best to respond to every comment. If you have a question, please feel free and ask away!

Popular posts from this blog

Dollar Tree Mini Bead Floral Spring Wreaths

Transform Dollar Tree's mini bead wreaths into beautiful spring floral bead wreaths with this easy DIY tutorial. Add a touch of spring to your home decor with this creative and budget-friendly project.  I'm excited to share a quick and simple DIY project with you today. Last year, I purchased two mini bead hanging decorations displayed with the fall decor. I decided to add them to my craft stash and use them in the springtime. In this tutorial, I will show you how to create mini bead floral wreaths and provide a full list of materials needed for each step.  Dollar Tree Mini Bead Floral Spring Wreaths Video tutorial Materials Round mini beaded hanging decorations Artificial floral accents One large craft/popsicle stick Paintbrush Acrylic paint Floral cutters Hot glue/Adhesive Step one: Applying paint Before painting, remove any previous decorations such as the plaid autumn leaves that were attached to the wreaths I'm using. To start with, apply paint to your beaded wreath. Y

Transforming Ice Cream Cups: DIY Spring Tea Cup Floral Arrangements

  Today, we'll explore a fun and easy DIY project involving repurposing plastic mini ice cream cups into beautiful spring tea cup floral arrangements. This project is a great way to add a touch of spring to your home decor.  Before throwing away those plastic cups, consider the many possibilities in creating something new.  For this project, you will only need a few materials. Our main materials for creating the faux tea cup will be the ice cream cup and air-dry clay. So, if you're ready to create this adorable and creative springtime tea cup floral decoration, let's begin! VIDEO TUTORIAL Materials Plastic ice cream cups (I am reusing two plastic ice cream cups) Spanish moss Floral Mod Podge Decorative floral napkin Artificial spring flowers Acrylic paint (I'm using white) Paintbrush  Optional- Bumblebee button and small dowel rod- Dimensions : 0.1 inches x 6 inches. Air dry clay Scissors Foam block Preparing your cups After washing your ice cream cups and drying them c

Eco-Friendly Crafting: How to Make a Beautiful Flower Holder from Cardboard

Discover how to create a beautiful flower holder from cardboard in an eco-friendly way. Hello everyone, today I'm excited to share an eco-friendly crafting project with you.  While cleaning up my wrapping paper collection, I noticed the paper roll had run out, leaving only the cardboard paper center. Instead of throwing it away, it would be a great opportunity to reuse the paper and create something beautiful.  Video tutorial Materials - Cardboard paper (preferably thicker wrapping paper) - Faux flowers (such as tulips and greenery) - Two fabric hearts and butterfly stickers - Two craft clothespins - Hot glue or glue stick - Twine -Hole puncher - Optional faux flexible flowers to wrap around the twine. Step one: Preparing the paper To get started, cut a piece of cardboard paper. Make sure to choose a size that will fit the flowers you plan to use later on in the craft. The size of the section should be large enough to accommodate the flowers in the center of the sleeve. For my proj

Decoupaged Glass Jar Candle Holders with Faux Leaves and Gold Wire

  Learn how to create beautiful decoupaged glass jar candle holders using leaves and gold wire. This DIY project is a perfect way to upcycle old glass jars and create unique candle holders for your home decor.  I hope you're all doing well. The weather has cooled down and we're enjoying the change. Today, I'd like to share a quick upcycling decoupage project with you all. I had some extra glass yogurt jars lying around and bought two taper candle holders from Target's dollar section. I wasn't sure what to do with them at first. In today's project, I will show you how to decorate small glass jars using faux fall leaves and gold wire. Video tutorial Materials You need two taper candle holders, a paintbrush, Mod Podge, faux fall leaves, or a decorative napkin, hot glue, two battery-operated tealight candles, and gold wire.  Applying Mod Podge and faux leaves to glass jars To start with, grab a paintbrush and use it to apply Mod Podge on your glass jar. I suggest ap

Mini Picket Fence Hanging Decoration

Add a charming touch to your spring décor with this DIY mini picket fence hanging decoration. Learn how to create this cute and easy project to brighten up any space. Today I am sharing a simple craft that anyone can do. This craft is simple, and it doesn't take many materials. I'd love it if you joined me in creating this craft!  Mini Picket Fence Hanging Decoration  Video tutorial Materials Needed One wooden fence decoration- purchased at Dollar Tree Mod Podge One decorative napkin-purchased one pack at Dollar Tree Paint- I'm using chalk paint.-White and Misty pink One mini watering can decoration-I found this in the gardening section at Dollar Tree One paint brush Floral Hot glue  Scissors One pencil for tracing Floral snips Optional- butterfly sticker Step 1: Adding paint to the mini fence Start off by, applying a layer of white chalk paint onto your picket fence. You can also apply the white chalk paint to the spaces between the pickets using a smaller paintbrush. Set

4 Easy Floral Gift Wrapping Ideas

 Hello everyone! Today, I am sharing four simple ideas to gift wrap using faux floral, embellishments, craft clips, twine, and a few other materials. It's a fun and personalized way to wrap a gift and a great way to utilize any leftover materials you have from a previous craft or project. If you're ready, I would love it if you join me in decorating! Video tutorial Materials for Box Number One Wrapping paper mini flower decorations Paintbrush Acrylic paint Scissors Start by wrapping your box using your wrapping paper and tape. I purchased this brown wrapping paper at my local Dollar Tree.  Next, using your paintbrush begin to add a few dots of paint to your wrapping paper.  After, take your twine and begin to wrap it around your box. I decided to wrap a section around the middle going across and a section going from the top to the bottom of my box. Once you have done this, tie your twine off into a knot and remove any of the remaining twine. You are ready to begin attaching you

DIY Spring Flower Terra Cotta Pot

Hello everyone! Today, I'm excited to share a simple re-do craft that will transform a plain terra cotta pot into a beautiful spring gift. I'm reusing one of my old terra cotta pots from a previous project for this craft.-  Spring Floral Clay Pot Design  With just a few easy steps, I'll show you how to create a stunning spring flower pot display that would make the perfect Mother's Day gift, or just to welcome Spring. Let's get started! DIY Spring Flower Terra Cotta Pot Video tutorial Materials Artificial flowers One terra cotta pot (I'm reusing a pot from a previous craft) Acrylic paint Craft stick Faux pearl embellishments Foam block Adding paint and other designs I used a pot that was previously painted and had some twine added to it. I decided to keep the existing paint and twine and add a few painted flowers to the pot. For the flowers, I used light purple and blue for the petals, and white for the center of each flower. Adding embellishments I decided to a

Fall Floral Display Using Glass Yogurt Jars

 Hi everyone. I hope that you are all doing well. I am patiently waiting for Fall to arrive. Fall is my favorite season of them all. I love the golden leaves, hot apple cider by the fire pit, sitting out in the evenings roasting marshmallows. It is simply the best for me. Do you have a favorite season? What do you enjoy about it?  Today I am sharing a quick upcycle craft. I decided to use my glass Oui yogurt jars. I love these little jars and what a perfect way to reuse them. I will show you how to decorate these jars using mod podge, and acrylic paint. We will add faux flowers to each glass jar as well. Video tutorial Materials  Three small glass jars I'm reusing my Oui glass yogurt jars Twine Acrylic paint Paintbrushes Mod podge Decorative napkin Faux floral and foliage Decorative tape/Washi tape Scissors Applying paint to glass yogurt jars Begin by applying your paint to two of your glass jars. Each jar needed around three coats of paint.  I used acrylic chalk paint. Cutting you