Simple DIY Autumn Floral And Bead Wreath

 Create a beautiful autumn wreath with this simple DIY tutorial. Learn how to incorporate floral elements and beads to make a stunning seasonal decoration for your home.

Hello! I am delighted to have you here with me today. For this DIY project, I have a simple idea that I think you'll love. We will be creating an Autumn floral and bead wreath using just a few materials. If you're viewing this project, I'm sure you love Fall as much as I do. It is my favorite season, and I have been busy creating new crafts to share with all of you.

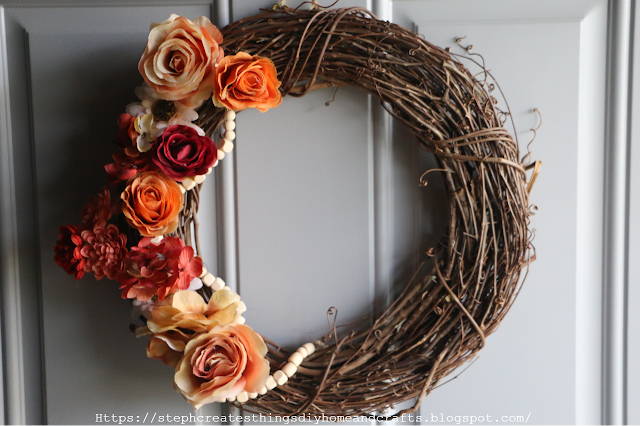
Image of grapevine wreath with beaded garland and faux fall flowers


Video tutorial


How to create an Autumn floral and bead wreath

Faux fall floral, grapevine wreath, beads, and elastic chord

Materials

  • One wreath $4.99 (I'm using a grapevine wreath, and I purchased it at Michael's. It is a 14'' wreath)
  • Faux fall floral (My flowers were purchased at Michael's, and it was actually a stem bundle) $9.99, but they are having a sale. I paid $4.99
  • Beads $1.60 (Purchased at Michael's)
  • Stretch cord $2.88 (Purchased at Walmart)
  • You will also need wire cutters or scissors
Total spent around $14

Creating your wreath


Faux floral being added to grapevine wreath

Cutting and placing faux floral in wreath


To begin with, start by cutting your flowers to the desired size. You can remove some of the wire stems to make it easier to place the flowers through the wreath without them being too long. 
Next, take each flower and add them to your wreath. You can choose to add them to the top, bottom, or just one side of the wreath depending on your preference. 
When adding the flowers, simply insert them through the wreath and bend the wire slightly for a secure fit.


Stringing on beads on stretch cord

Adding beads to stretch cord

To start making your stretch cord and bead wreath, take your stretch cord and cut around 10 inches of it using your scissors. Ensure that your cord is long enough to go around each flower when you loop your beads on your wreath around them.

Once you have cut the cord, start adding your beads. Slide your first bead down the cord and tie a knot around it once you reach the bottom of the cord. Keep adding beads until the cord is filled with beads. Tie the top section of the cord like you did for the bottom section.

Adding the bead garland to the wreath

Now, you can start looping your beaded stretch cord through your flowers and the wreath. Begin from the top and wrap the cord around your wreath and top flower. Keep doing this until you reach the bottom of the flowers. Tuck the end of your beads into the bottom section of the flowers.

Finally, if you want to ensure that your beads stay securely on the wreath, take some extra stretch cord and tie it around the bottom section of the beads. Loop it through your wreath and tie it off.

Your beautiful wreath is now ready to display. If you enjoyed making this project, check out my other DIY projects on my blog and my YouTube channel, Steph Creates-DIY Home & Crafts, where I include video tutorials. Let me know in the comments if you decide to create your very own floral and bead wreath.

Pin/Save/Share


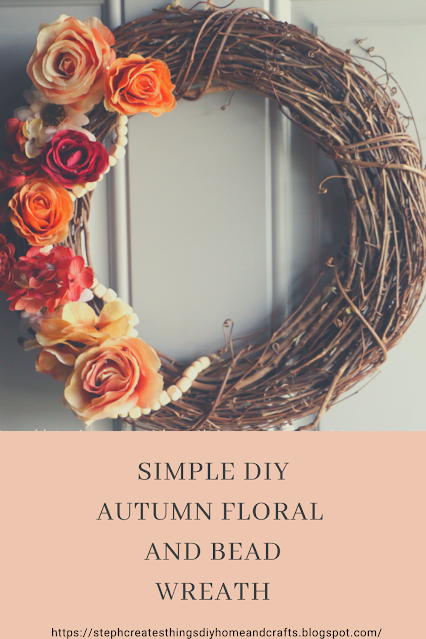
Pinterest pin image of Autumn floral and bead grapevine wreath along with text description


close up of faux floral on grapevine wreath


Grapevine wreath with beaded garland and faux flowers

Thanks so much for stopping by!

♥ Stephanie

Comments

  1. Wow! So beautiful, Steph! I've never tried to make a wreath before, but this makes me want to for sure!

    ReplyDelete
    Replies
    1. Tai, aw thank you so much! You put a smile on my face. Yes, definitely give this wreath a try. It is very simple, and beautiful once it is complete. :)

      Delete
  2. Joanne, thank you so much! And thank you for stopping by. :)

    ReplyDelete
  3. I really love this wreath. I love that you have added beading to it, makes it look different to other Autumn wreaths

    ReplyDelete
    Replies
    1. Thank you, Natasha. I was thinking the same thing when I was creating it. I wanted it to be different. :) Thanks so much for visiting.

      Delete
  4. So pretty! I love the colors and the extra touch the beads add. Visiting from Grammy's Grid Unlimited linkup.

    ReplyDelete
    Replies
    1. Jennifer, thank you so much. I appreciate you visiting.

      Delete
  5. How pretty! Love the grapevine wreath and the color of the flowers. Thanks so much for linking up at the #UnlimitedLinkParty 135. Pinned.

    ReplyDelete
    Replies
    1. Dee, thank you so much. I really enjoyed putting this wreath together.

      Delete
  6. CONGRATS Stephanie! Your post is FEATURED at the #UnlimitedLinkParty 136!

    ReplyDelete
  7. Steph, this is stunning! Pinned📌
    Thanks' bunches for sharing with Sweet Tea & Friend's this month dear friend. I'm so happy you're here.

    ReplyDelete

Post a Comment

Thank you so much for taking the time to leave a comment. Your comments brighten my day. I hope that you know that it is appreciated. I do my best to respond to every comment. If you have a question, please feel free and ask away!

Popular posts from this blog

Fall Floral Display Using Glass Yogurt Jars

 Hi everyone. I hope that you are all doing well. I am patiently waiting for Fall to arrive. Fall is my favorite season of them all. I love the golden leaves, hot apple cider by the fire pit, sitting out in the evenings roasting marshmallows. It is simply the best for me. Do you have a favorite season? What do you enjoy about it?  Today I am sharing a quick upcycle craft. I decided to use my glass Oui yogurt jars. I love these little jars and what a perfect way to reuse them. I will show you how to decorate these jars using mod podge, and acrylic paint. We will add faux flowers to each glass jar as well. Video tutorial Materials  Three small glass jars I'm reusing my Oui glass yogurt jars Twine Acrylic paint Paintbrushes Mod podge Decorative napkin Faux floral and foliage Decorative tape/Washi tape Scissors Applying paint to glass yogurt jars Begin by applying your paint to two of your glass jars. Each jar needed around three coats of paint.  I used acrylic chalk paint. Cutting you

4 Easy Floral Gift Wrapping Ideas

 Hello everyone! Today, I am sharing four simple ideas to gift wrap using faux floral, embellishments, craft clips, twine, and a few other materials. It's a fun and personalized way to wrap a gift and a great way to utilize any leftover materials you have from a previous craft or project. If you're ready, I would love it if you join me in decorating! Video tutorial Materials for Box Number One Wrapping paper mini flower decorations Paintbrush Acrylic paint Scissors Start by wrapping your box using your wrapping paper and tape. I purchased this brown wrapping paper at my local Dollar Tree.  Next, using your paintbrush begin to add a few dots of paint to your wrapping paper.  After, take your twine and begin to wrap it around your box. I decided to wrap a section around the middle going across and a section going from the top to the bottom of my box. Once you have done this, tie your twine off into a knot and remove any of the remaining twine. You are ready to begin attaching you

Upcycle Your Candle Lids: Easy Steps for Fall Shelf Decor

Hello everyone! Happy Autumn! I'm excited that fall has arrived. Today I'm going to share an easy upcycled craft idea with you. We'll be creating Autumn shelf sitter decor using two candle lids. I wasn't sure what to do with my candle lids, but I decided to make fall shelf sitter decor after giving it some thought. If you're ready, let's begin building your very own. Video Tutorial Materials - Two candle lids (wooden or metal) - Acrylic paint - Paintbrush - Mod Podge (optional) - Craft moss - Mini wooden mushrooms - Scissors - Assorted fall decor (e.g. flowers, fall vase filler glitter leaves, smaller faux succulent flowers in deep purple color) - Hot glue Begin by applying acrylic paint to both the wooden lid and wooden mushrooms. I decided to paint the tops of the wooden mushrooms orange and brown. First, if your napkin is 2-ply, remove the second layer. Then, use scissors to cut out the designs you want to add to the project. Afterward, use a smaller paintbru

DIY Floral Print Halloween Tabletop Décor

Hello everyone! Thank you for stopping by. Today, I want to share a quick tutorial on creating a floral print Halloween tabletop decoration. I found a lovely floral print while shopping at my local Hobby Lobby, and after going through my Halloween supply, I came up with this quick craft idea. Last year, I bought a wooden Halloween ghost decoration for two dollars, but I still needed to paint it. I decided to create this simple design, and I would love it if you would join me in making one too! Video tutorial Materials: - One wooden Halloween ghost decoration (Any round Halloween wood decor will work) - Floral print or any napkin design of your choice - Hot glue - One wooden block or other wooden object to use for propping the decor - One wooden square section (I'm reusing scrap wood that I had on hand) - Scissors - Craft letters (I'm using gold foam letters) - Acrylic paint (I'm using black, pink, and white) To start, apply black acrylic paint to the Halloween decoration as

Transforming a Metal Can into Shabby Chic Keepsake Decor

Hello everyone, I am excited to share this easy DIY project with you. We will be transforming a metal can into a charming shabby chic keepsake decor using a fabric heart garland, paint, and a few other materials. You will love the end result of this project. Let's turn your trash into treasure with this simple DIY project. I will provide a detailed list of materials below. If you're ready, let's start creating our keepsake decor. Shabby Chic Keepsake Decor Video tutorial Materials One metal can Acrylic paint in Ballet Slipper by Waverly and white Four acorn wooden dowels with a 1’’ 3/8’’ hole purchased from Hobby Lobby Paintbrush Fabric heart garland from Dollar Tree Repurposed fabric from an old vest Decorative sticker pack from Dollar Tree Faux pearls Faux paper flower Applying paint to a metal can Begin by taking a metal can and applying acrylic paint to it. Use a heating tool between each coat of paint. I recommend using acrylic paint with a matte finish and applying ar

Create a Cute Christmas Wooden Tabletop Decoration

  Create a cute and festive Christmas wooden tabletop decor with this easy DIY craft project. Perfect for adding a touch of holiday cheer to your home or as a thoughtful handmade gift. Get inspired and start crafting today! Hello everyone, today I will show you how to create a cute decoration in no time! I am using a wooden triangle decoration that I purchased from Dollar Tree a few months ago. If you can't find a wooden triangle, you can also build one using scrap wood material. This craft requires just a few materials, such as Mod Podge, paint, and a decorative napkin. Below, I will provide a detailed step-by-step tutorial along with a full materials list. Check out the video tutorial Materials - Mod Podge - One wooden decorative triangle 8'' x 8'' - Acrylic paint - Craft embellishments (I am using craft gems) - Stretch cord - Mini Christmas ornaments - Optional-Faux snow powder - Gold letters - One mini bow -Hot glue -Scissors Applying acrylic paint to the wooden

Spring Hanging Design Using Bamboo Serving Boards

 Today I am sharing an easy project. We are creating two Spring hanging designs using bamboo serving boards. I purchased these boards at my local Big Lots store. It was two for five dollars. I actually was not sure what I was going to do with them, but the other day I figured it out. I will provide a step-by-step tutorial, a material list, and a video tutorial will also be included. Happy crafting! Video tutorial Main materials Hot glue or any adhesive of your choice Floral cutters Twine Faux floral Pencil Scissors Paintbrush Acrylic paint First design One wooden serving board One decorative napkin Mod Podge Second design Ribbon One craft chalkboard watering can Floral sticker Painting the serving board Begin by applying your acrylic paint to your wooden serving board.  Adding the decorative napkin Next, take your decorative napkin and unfold it. Place your napkin on top of your painted board and begin to trace out the center of your board. If your napkin has a second layer be sure to

DIY Faux Blossom Branch Tree

Are you looking to add some charm to your living space on a budget? Try making your own DIY Faux Blossom Branch Tree. In this tutorial, I will guide you through the process of creating your blossom branch tree. The best part is that this project requires just a few simple materials, and you can even repurpose a section of a tree branch. Alternatively, you can use a smaller section of a tree branch or one similar to the one I am using. So, if you're ready to start, come along and create your blossom branch tree with me. DIY Faux Blossom Branch Tree video tutorial Materials  Section of branches from a tree in my yard faux florals and leaves hot glue  A planter pot Floral cutters  A foam floral block, and optional rocks After inserting your tree branch into the foam block, you can add rocks on top. This will provide additional weight to your pot and prevent the tree branch from shifting or moving around. Cutting the flowers and leaves To create a beautiful blossom tree, follow these s