
Simple Beaded Heart Decorations

In this easy DIY craft tutorial, you can learn to create beautiful and simple beaded heart decorations. These decorations are perfect for adding a touch of charm to your home or gifting to your loved ones. We will be decorating two beaded heart garlands that were purchased during a sale at Hobby Lobby. If you're ready, I would love it if you decorated along with me. So, let's get started and unleash your creativity today!

Hanging beaded heart decorations

Beaded Hearts Video tutorial


Materials

Materials

Two beaded hearts
I purchased these on sale at Hobby Lobby
Paintbrush
Faux mini roses  and Faux pressed flowers
Any faux flowers will work
Decorative ribbon
Floral cutters
Scissors
Acrylic paint
If you decide to paint your beaded hearts
Mini birdhouses
I purchased them at Hobby Lobby
Hot glue

Apply paint to wooden beads
Beaded hearts and acrylic paint

Begin by applying paint. I decided I wanted to paint my beaded hearts. I went with light pink and white paint for my two hearts. 

Painted beaded hearts

Adding ribbon, floral, and embellishments
Beaded hearts, ribbon, scissors and hot glue

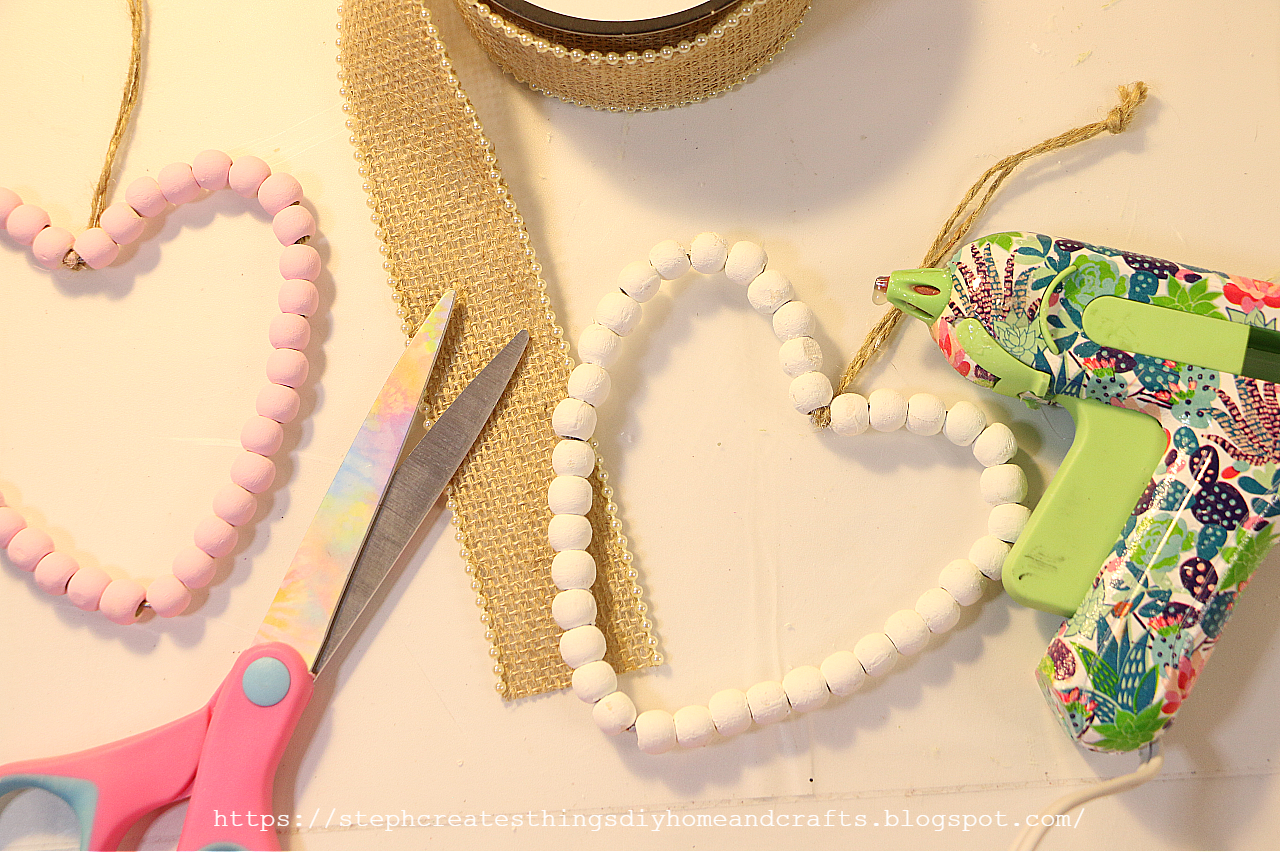
After the paint has dried, take your ribbon and use your scissors to cut two small sections of your ribbon. 

Beaded heart with ribbon

Take your ribbon and use your hot glue to attach your ribbon to the back side of your beaded heart. If you paint your heart, be sure to add a little extra hot glue to your ribbon. I noticed that it didn't want to adhere are first. But I took a little extra glue and applied it. 

After, take your scissors and remove any of the remaining ribbons from the side of the heart.

Beaded heart with ribbon, floral and floral cutters

After you have glued on your ribbon, use your floral cutters and begin to cut your faux flowers. I chose to go with mini faux roses, but any flowers will work with your design. Use your hot glue to attach your flowers to your heart. I added roses on the side of my heart.

Painted beaded hearts with floral and ribbon

Next, take your second heart and begin to cut your ribbon for it. You will repeat the previous steps when working with the heart and ribbon.

Decorated painted beaded hearts

After taking your pressed faux flowers and leaves, add them to your second heart. I also took one of my mini birdhouse decorations and added it to my first heart. I just added some hot glue when attaching it to the ribbon. 

Your beaded heart decorations are complete. Aren't they so cute? I love how they turned out. They were so simple to decorate.

Hanging beaded heart decoration

Hanging beaded heart decoration

Be sure to check out my YouTube channel for more DIY projects. 


Thank you so much for stopping by and creating this craft with me. I appreciate all of you. I'll see you soon.

Pin Share Save

Pinterest pin showing beaded heart decoration


Comments

  1. How cute! Another one for my upcoming themed party :) Thanks so much for linking up at the Unlimited Link Party 99. Shared.

    ReplyDelete
  2. These are so pretty! Featuring when my link party opens.

    ReplyDelete
    Replies
    1. Carol, thank you so much. I'm so happy to hear that you enjoyed it. 🥰

      Delete
  3. So cute! I just love all things wood beads! Thanks for sharing on Happiness is Homemade! Hope to see you over on Crafty Creators (if you haven't yet, I'm checking HIH first lol).
    Niki | Life as a LEO Wife

    ReplyDelete
    Replies
    1. Niki, thank you! I will double check to see if I also shared it on Crafty Creators. Thank you so much for stopping by.

      Delete
  4. Visiting again to say thanks so much for linking up at A Themed Linkup 139 for All Things Love and Valentine’s Day. Shared.

    ReplyDelete
    Replies
    1. Dee, thank you! It's always a pleasure linking up at your parties.

      Delete
  5. I love these Steph, they are so pretty. They are a feature at Handmade Monday this week :-)

    ReplyDelete
    Replies
    1. Thank you so much. I'm always so happy to hear when my crafts are enjoyed. I will be sure to stop by!

      Delete
  6. Steph, these are so cute. I love your work.
    Thank you for sharing this with Sweet Tea & Friends this month dear friend.

    ReplyDelete
    Replies
    1. Paula, thank you. I am so happy to hear you enjoyed this craft. :)

      Delete
  7. These beaded Valentine's are so cute. Congratulations, you are being featured on Thursday Favorite Things. I hope you stop by. https://www.eclecticredbarn.com/2023/02/valentine-ideas-on-thursday-favorite.html
    Hugs,
    Bev

    ReplyDelete
    Replies
    1. Bev, Thank you so much. ❤️ I will stop by for a visit.

      Delete
  8. Stephanie, CONGRATS! Your post is FEATURED at A Themed Linkup 140 for Tablescapes from the previous linkup for All Things Love and Valentine’s Day.

    ReplyDelete
  9. What a fun project. Thanks for sharing.

    ReplyDelete
  10. So darling, Stephanie. They turned out great. Thanks for sharing this post at the Will Blog for Comments #23 linkup. Looking forward to what you share at #24. :) Have a great week.

    ReplyDelete
    Replies
    1. Jennifer, thank you. 😊 I appreciate you visiting. I hope that you're having a wonderful week.

      Delete

Post a Comment

Thank you so much for taking the time to leave a comment. Your comments brighten my day. I hope that you know that it is appreciated. I do my best to respond to every comment. If you have a question, please feel free and ask away!

Popular posts from this blog

Transforming Ice Cream Cups: DIY Spring Tea Cup Floral Arrangements

  Today, we'll explore a fun and easy DIY project involving repurposing plastic mini ice cream cups into beautiful spring tea cup floral arrangements. This project is a great way to add a touch of spring to your home decor.  Before throwing away those plastic cups, consider the many possibilities in creating something new.  For this project, you will only need a few materials. Our main materials for creating the faux tea cup will be the ice cream cup and air-dry clay. So, if you're ready to create this adorable and creative springtime tea cup floral decoration, let's begin! VIDEO TUTORIAL Materials Plastic ice cream cups (I am reusing two plastic ice cream cups) Spanish moss Floral Mod Podge Decorative floral napkin Artificial spring flowers Acrylic paint (I'm using white) Paintbrush  Optional- Bumblebee button and small dowel rod- Dimensions : 0.1 inches x 6 inches. Air dry clay Scissors Foam block Preparing your cups After washing your ice cream cups and drying them c

Easy Double-sided Glass Panel Pressed Flower Design

Learn how to make a beautiful double-sided glass panel with a pressed flower design with this easy and creative craft tutorial . It's perfect for adding a unique touch to your home decor or as a personalized gift.  In this quick DIY project, I'll show you how to create a pressed flower design using a frame decor with panels which I purchased from my local Target for $3. Initially, I wasn't sure what to do with them, but I had a few ideas, and this is what I came up with. The project takes around 10 minutes to put together. Check out the video tutorial Materials Papercraft faux flower embellishments or you can use real dried flowers One frame decor with two plastic or glass panels Paintbrush Acrylic paint Mod podge-I'm using the Super gloss finish Applying paint to the frame Begin by removing the panels from your frame. Once you have removed the glass/plastic panels, set them aside. Take your paintbrush and apply paint to your frame. I painted two coats of paint on my fr

Budget-Friendly Spring Bird Decor: Dollar Tree DIY

  Looking for some creative ideas to decorate your home for the Spring season? Why not give a Dollar Tree wooden birdie a colorful makeover?  The latest Spring decor items available at Dollar Tree will impress you. I recently found a wooden birdie and while I loved its original design, I wanted to add a splash of color to make it more suitable for Spring. If interested, I can take you through a quick and easy tutorial. Video tutorial Materials One bird decor Artificial flowers Acrylic paint Paintbrush Floral cutters Hot glue Step one: Painting the wooden bird  Start with, applying paint to the wooden bird. I recommend mixing white and blue acrylic paint together for a nice color.  Step two: Paint the beak, flowers, and base Next, use a smaller brush to add white acrylic paint to the bird's beak.  After that, you can repaint the flowers with light pink, purple, and yellow. Don't forget to paint the decoration's base stand with white paint too.  Step three: Cutting and adding

Easy DIY Wood Pumpkin Display: Floral Fall Decor with a Decoupage Twist

  Create a stunning fall-inspired display with this budget-friendly DIY craft. Learn how to decoupage wood pumpkins and incorporate floral accents for a charming and seasonal decoration. Video tutorial Hello everyone! I hope you're having a wonderful autumn season so far. How's the weather in your area? Today, it's breezy outside, with a high of 72 degrees, and the sun is shining. I feel grateful to be able to enjoy such a beautiful day, and I hope you do too.   I'd like to share a fun crafting project with you. We'll be decorating wooden pumpkin ornaments from Dollar Tree using decoupage and wooden tumbling blocks to create a pumpkin floral design.  Here are the materials you'll need: - Two wooden pumpkin ornaments (I bought mine from Dollar Tree) - Six wooden tumbling blocks (also from Dollar Tree, but other craft stores may carry them) - Adhesive - Faux floral and greenery - Acrylic paint (I'm using brown) - Foam block - Craft knife - Decorative fall napk

Mini Picket Fence Hanging Decoration

Add a charming touch to your spring décor with this DIY mini picket fence hanging decoration. Learn how to create this cute and easy project to brighten up any space. Today I am sharing a simple craft that anyone can do. This craft is simple, and it doesn't take many materials. I'd love it if you joined me in creating this craft!  Mini Picket Fence Hanging Decoration  Video tutorial Materials Needed One wooden fence decoration- purchased at Dollar Tree Mod Podge One decorative napkin-purchased one pack at Dollar Tree Paint- I'm using chalk paint.-White and Misty pink One mini watering can decoration-I found this in the gardening section at Dollar Tree One paint brush Floral Hot glue  Scissors One pencil for tracing Floral snips Optional- butterfly sticker Step 1: Adding paint to the mini fence Start off by, applying a layer of white chalk paint onto your picket fence. You can also apply the white chalk paint to the spaces between the pickets using a smaller paintbrush. Set

Budget-Friendly Spring Sign Decor: Dollar Tree DIY Inspiration

Are you looking for budget-friendly ways to spruce up your home this spring? I have a great DIY sign decor idea that is perfect for the season and won't break the bank. In this craft, I will guide you through creating your very own Spring sign. I will provide a complete list of required materials and a quick video tutorial for those who prefer visual instructions. Video tutorial Materials Needed One hanging decoration sign  (I found this at my local Dollar Tree near the frames) One Pack of wooden bunnies  (Purchased at Dollar Tree) Decorative Spring napkins Acrylic paint Paintbrush Adhesive/ Hot glue Mod Podge Mini iron and parchment paper  (Needed if applying Mod Podge using this technique) Scissors Step one: Applying paint to the hanging decoration Let's begin by painting the hanging decoration. I painted the three sections of my sign white and it took me three coats to complete the new design. When covering up a sign, keep in mind that you may need more paint based on its p

How to Make a Charming Tea Bag Holder Using a Garden Pot and Wood Circle

  Are you a tea lover looking for a creative DIY project? Learn to create a unique tea bag holder using a garden pot, wood circle, wooden bead, and paper floral decorations. Get inspired and add a personal touch to your tea time. Today, we will make a tea bag holder using a garden ceramic pot and a wooden circle. This holder is both functional and cute. Below, I will provide a list of materials and step-by-step instructions. Video tutorial How to Make a Charming Tea Bag Holder Using a Garden Pot and Wood Circle Materials  Garden pot- I'm using a white 4inch planter pot (The one I am using is a ceramic pot)  One wood circle- I picked up a pack of 6  3'' wood circles at my local Walmart store for $1.80 Mod Podge Decorative napkin Paintbrush One medium or large wooden bead Paper flowers and leaves Adhesive Scissors White acrylic paint Letter stamps Stamp ink Preparing your decorative napkin and Mod Podge Let's begin by taking a decorative napkin and removing the second lay

Easy Dollar Tree Easter Tabletop Decoration

Transform your Easter table into a whimsical wonderland with a delightful metal bunny plaque from Dollar Tree - it's an easy and affordable DIY project! Today we are creating an Easter tabletop decoration using one of the galvanized bunnies from Dollar Tree. I actually purchased it last year, but I hadn't gotten around to creating a craft with it until now. This craft is beginner-friendly and only uses a few materials.  Video tutorial Materials One galvanized bunny sign One rectangular wooden piece  can easily use scrap wood. I am using a wooden piece from a block set. I purchased one round wood piece at Dollar Tree; they come in different shapes. I decided to go with the oval shape. Acrylic paint- I am using a color called celery for the wood pieces and applying white to the bunny sign. Twine Faux greenery and tulips Mod Podge Paintbrush Hot glue Decorative napkin Floral cutters Begin by taking your paintbrush and applying paint over your galvanized bunny. This is not require