
Upcycled Glass Jar Fall Décor With Leaf Lights

Hello everyone. I hope this week is treating you well. Today we are creating a very simple decoration. I decided to upcycle a glass jar and turn it into a Fall decoration. If you have any glass jars with lids, this craft is perfect for reusing those jars.

Fall glass decoration filled with lights, and leaf and pumpkin on the top lid

Video tutorial


materials such as mini leaf lights, faux leaves, candle holder, paint, and hot glue

Materials

One glass jar with a lid
One candleholder
One faux mini pumpkin
Paint
Craft rope
Fall fabric leaves
Hot glue
Harvest leaf lights

Video tutorial


Paint, and glass candleholder on a table

Painted glass candleholder on a table


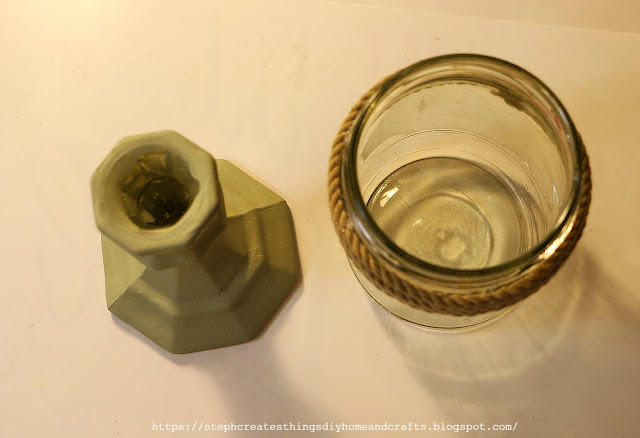
Start by applying paint to your glass candleholder.  I gave my candleholder around two coats of paint. I went ahead and used my blow dryer between coats. 


Paint near a lid on a table

Painted lid on a table


Next, take the lid from your glass jar and apply some paint. I applied two coats of paint to my lid.

Two paint bottles and white foam pumpkin on a table


Apply paint to your mini pumpkin. I decided to combine two paint colors. I used orange and red for my pumpkin.  If you decide to leave your pumpkin as is, that is just fine. 

Glass jar, craft rope and scissors on a table

glass jar with craft rope wrapped around top section


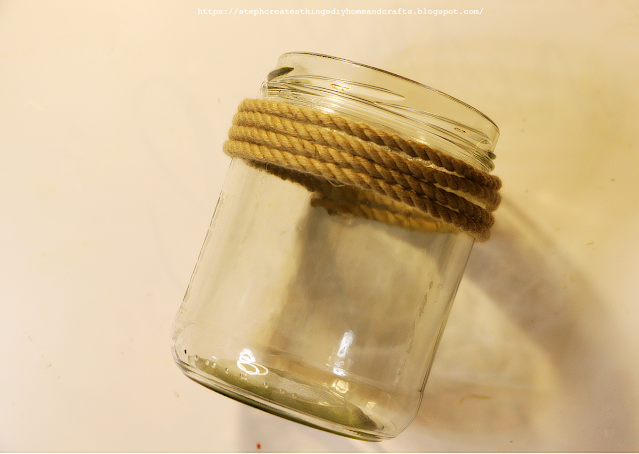
Take your craft rope and begin to add it to your glass jar using your hot glue. Be sure that when adding your rope, add it just below the section where the lids screw onto it. Take your scissors cut off any remaining rope and glue the ends down.

two craft leaves, painted mini pumpkin and lid on a table


After, take your painted lid and glue it on your faux fall leaves. Once you add your leaves, take your mini pumpkin and glue it in the middle on top of your leaves.

painted candleholder next to glass jar


You are now ready to attach your jar to your candleholder. Using some hot glue, add it to the top section of your candleholder. Once you have added your glue, take your glass jar and place it on top.

completed glass jar fall décor


All that is left is to add your fall leaf lights inside your glass jar. You can still place your lid on top, and I was able to turn my lid even with the wire from my lights. 

You can easily use this as a light display, or a fall candy jar. 


glass jar fall decor with leaf lights displayed on windowsill near faux sunflowers

Your upcycled fall glass jar decoration is complete! Thank you so much for stopping by and creating with me. Be sure to check out the video tutorial within this post. Also, I will include a link to my YouTube channel where you can find more DIY projects and fun crafts! I'll see you soon. 


Pinterest pin with imagine of glass jar fall décor and text


Pin/Share/Save


Comments

  1. I love everything about this! You really need a shop :) Thanks so much for linking up at the #UnlimitedLinkParty 129. Pinned.

    ReplyDelete
  2. Visiting again to say if you had a shop, I'd have scooped this up and bought it right away :) I didn't watch the video last time but did just now. It was so relaxing watching you put that all together! Thanks so much for linking up at #IMadeItMondayLinkParty 24. Pinned.

    ReplyDelete
    Replies
    1. Dee, aw you made my day! Thank you so much. I need to open another shop. I'm happy to hear that you found the video relaxing.

      Delete
  3. Stephanie, CONGRATS! Your post is FEATURED at #IMadeItMondayLinkParty 25.

    ReplyDelete

Post a Comment

I love hearing from you! Your comments and creative ideas truly brighten my day. I do my best to respond to everyone, so if you have a question or just want to say hello, please leave a note below. To keep our community a positive and inspiring space, spam or off-topic comments will be removed. Happy crafting!

Popular posts from this blog

A Touch of Spring: Faux Rose & Wildflower Beaded Wreath Tutorial

Today I’m sharing a soft and delicate spring wreath that comes together beautifully with just a few simple supplies. I’m using a beaded wood wreath as my base, along with faux yellow roses, pink artificial wildflowers, and a bit of foliage to bring everything to life. This project is perfect if you’re looking to add a gentle pop of color and a touch of spring charm to your home. Video tutorial  Supplies You’ll Need Beaded wood wreath Faux yellow roses Pink artificial wildflowers Faux foliage Floral/wire cutters Craft wire Trim Your Florals I started by using my floral cutters to trim the stems of each flower. Make sure the stems are short enough to fit nicely against the wreath, but long enough to secure them with wire. Adjust the length to suit your design and the level of fullness you want in your wreath. I began by cutting my yellow roses first. Prepare Your Craft Wire and  Attach the Roses After I trimmed the roses, I cut small sections of craft wire. These will be u...

Summer Craft: DIY Paper Plate Watermelon Flower Hanger

Hey everyone! I'm excited to show you a fun and easy craft. Today, we will be making a summer watermelon floral hanging design using a paper plate. This DIY project is easy to create and fun to welcome the summer season. You'll make this watermelon floral hanging design to display your artificial flowers creatively. It's also a great way to use any extra paper plates you may have lying around and aren't sure what to do with. You may have extras from a birthday party or a BBQ. If you're ready, let's get started creating your floral hanging design! Video tutorial Summer Craft: DIY Paper Plate Watermelon Flower Hanger Materials: - Paintbrush - Artificial flowers - Paper plate (any size you prefer) - String or craft twine - Scissors - Hot glue Optional-Hole Puncher Start by cutting the paper plate in half. Use a darker green paint to cover the bottom area of the plate. Let it dry between each coat of paint. Continue applying paint to each area of the plate. Then, ad...

Easy Steps to Create a Cozy Autumn Tablescape at Home

Hello everyone! I’m excited that you decided to visit the blog today. I wanted to share how to create a cozy autumn tablescape at home. My goal was to design something warm and inviting, as our table is a space where we share conversations, drink coffee, tackle homework, and simply enjoy each other’s company.  I typically don’t go all out when decorating my dining table, but I wanted to show you how I styled it using decor pieces I already had. I would love for you to join me in this decorating adventure! Video tutorial Create a Cozy Autumn Tablescape at Home Items I'm adding to my table:  -White tablecloth runner - Battery-operated leaf lights  - Reusing glass jars  - Mini pumpkins and other fall decorations  - Small "Hello Fall" sign  - Faux flowers I began by spreading my white tablecloth down the center of the table. Around Halloween, I purchased this tablecloth a few years ago at my local Walmart. After laying it out, I realized that I could achieve th...

DIY Simple Decorative Serving Tray

Today we're creating a simple decorative serving tray. While shopping at Hobby Lobby they were having a Spring sale, and I was super excited to see all the markdowns. I decided I would create a simple decorative serving tray. So if you're ready I will take you through the steps of creating your very own tray. Video tutorial Materials  One round wood tray/sign 16  in x 0.98 in (41cm x 2.5cm)- I purchased my sign at Hobby Lobby during their Spring sale Paint- I am using Artminds multi-surface on my stencil design And Folkart Home decor chalk paint for the tray. Color is milk jug in ultra matte Mod podge A set of round sponge brushes One paint brush Two decorative handles  Four screws -for handles One Screwdriver Floral stencil Optional- Drill, and a drill bit for drilling pilot holes into the tray for handles Begin by applying your chalk paint onto your tray. When applying my paint onto my tray, I painted around two to three coats of paint. In between coats, you can use eit...

Easy Dollar Tree Easter Tabletop Decoration

Transform your Easter table into a whimsical wonderland with a delightful metal bunny plaque from Dollar Tree - it's an easy and affordable DIY project! Today we are creating an Easter tabletop decoration using one of the galvanized bunnies from Dollar Tree. I actually purchased it last year, but I hadn't gotten around to creating a craft with it until now. This craft is beginner-friendly and only uses a few materials.  Video tutorial Materials One galvanized bunny sign One rectangular wooden piece  can easily use scrap wood. I am using a wooden piece from a block set. I purchased one round wood piece at Dollar Tree; they come in different shapes. I decided to go with the oval shape. Acrylic paint- I am using a color called celery for the wood pieces and applying white to the bunny sign. Twine Faux greenery and tulips Mod Podge Paintbrush Hot glue Decorative napkin Floral cutters Begin by taking your paintbrush and applying paint over your galvanized bunny. This is not requir...

Search This Blog

All content Copyright

Copyright 2021-2025 I ask that you do not take or use my photos or words without permission. If you have any questions, please feel free and contact me. Also, for more information on this blog, check out the disclosure policy tab above. Thank you