
DIY Mini Wood Lantern

 Hello everyone. I'm so excited to share this mini wood lantern craft with you all. I recently bought a box of wood tumbling blocks from Dollar Tree, and I wasn't sure what I was going to create with them. I decided since I also had some wood craft popsicle sticks on hand that I would use those with the blocks, and create a mini wood lantern. This project took around 30 minutes, but I promise you, you will just love how it all comes together with just a few materials. If you're ready, I'd love it if you created it with me! 

Handmade black lantern with faux floral and greenery displayed on it

Video tutorial


Craft materials such as faux floral, wood tumbling blocks, hot glue, and paint

Materials

One pack of wood tumbling blocks
 I purchased mine at my local Dollar Tree
Ten wood craft popsicle sticks
Paint
 I'm using black paint, I also had some antique white paint on hand, but I went with black paint
Hot glue
Twine
Faux floral, and greenery
One medium-sized bead
One battery-operated candle
Floral snips
Scissors

wood block pieces on a table

Building the top and bottom sections of the lantern

Hand near block pieces to show how to put together lantern

Start by taking five of your tumbling blocks. Using your hot glue them together. You will glue three together in the middle, take the last two blocks, and all of them onto the sides of the three blocks in the middle.  Repeat this step when you work on creating the second set of your blocks. 

Applying paint 

Paintbrush, top and bottom lantern pieces and black paint on a table

Next, begin to add your black paint to your blocks. I added around two coats of paint.

Attaching craft sticks

Image showing bottom of lantern with four craft sticks on each four corners

You are now ready to add your craft popsicle sticks. Start by taking your hot glue, and adding just a little on the end of each popsicle stick. Once you have done this, add the sticks to your painted wood section.  Glue two sticks onto one side of your glued blocks, and take another two sticks and add them on the opposite side.

Image showing lantern being put together

Hand holding top of lantern to show placement

Take your second painted glued block section, and using hot glue add that between the popsicle sticks on the top.  

Unfinished lantern with craft sticks

image showing craft sticks being glued down to create lantern

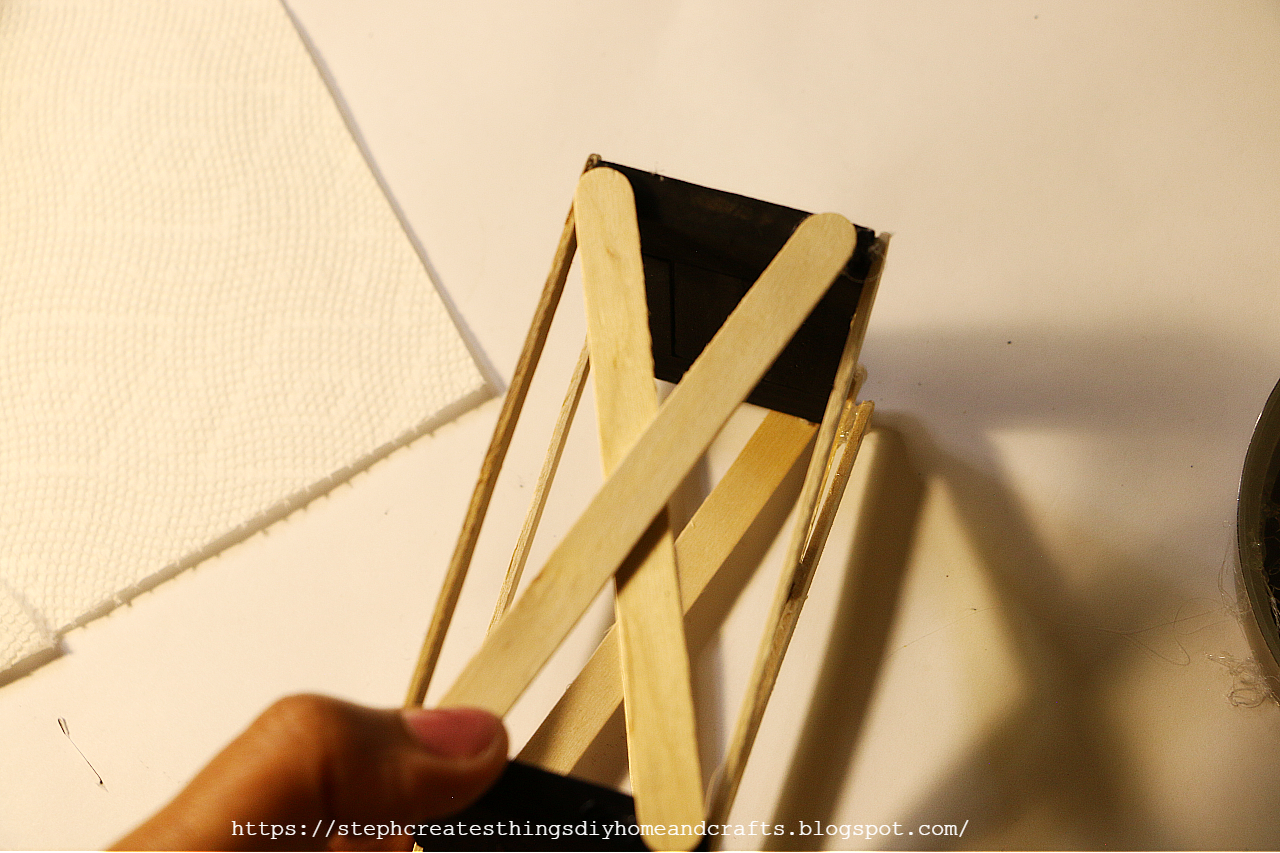
Next, take your wooden craft sticks, and add them. You will create an X when you add them. Add them onto the back, and two sides of your lantern. You will want to keep an opening in the front for when you add your battery-operated candle.

Attaching wooden bead

close up of unfinished lantern

After applying your wood craft sticks, take some hot glue and your medium-sized bead and add it to the top of your glued wood blocks. 

Applying paint to craft sticks and wooden bead

lantern next to black paint, with a few unpainted craft sticks

Next, apply paint to your craft sticks, and wooden bead. 

Adding faux floral and twine

black lantern lying down on table with faux floral and greenery near by

You are now ready to add on your floral, greenery, and twine.

Hand next to handmade lantern showing faux floral and greenery

Take a strand of twine, and tie it around your bead on top. I folded my twine in half and then tied it around my bead. I used some hot glue to glue down any remaining twine once I had cut the ends off.
Take your flowers, and greenery and add them to your lantern. I added my floral on the top section of my lantern, and my vines on the front of my lantern. 

Handmade black lantern with faux floral and greenery displayed on it

All that is left is to take your battery-operated candle and add that to the inside of your lantern. Once you have added that in, take any remaining greenery, and add it to the inside of your lantern. I went ahead and placed a piece of vine on the inside of my lantern. 

Handmade black lantern with faux floral and greenery displayed on it


Close up of black handmade lantern and faux floral and greenery

Handmade black lantern with faux floral and greenery sitting on a windowsill

Your mini wood lantern is now complete! I absolutely love how this project turned out. This is perfectly displayed in any space. I hope you enjoyed this DIY mini wood lantern. Be sure to let me know if you decide to create one too! I'll see you soon.

Pinterest pin image of Handmade black lantern with faux floral and greenery displayed on it


Comments

  1. Great tutorial Steph and a such a gorgeous end result! Thanks for sharing!

    ReplyDelete
    Replies
    1. Hi Denise, you are always so kind. Thank you so much. --And thank you for stopping by. =)

      Delete
  2. I'm a huge fan of using Dollar Tree finds for crafts and decor and this is a darling project! Thanks for sharing at Vintage Charm. xo Kathleen

    ReplyDelete
    Replies
    1. Kathleen, thank you so much. I would have seen this comment sooner if it
      wasn't marked as spam. I have no clue why that happened. Thank you so much
      for stopping by.

      Delete
  3. How cute is that? Love it! Thanks so much for linking up at the Unlimited Link Party 78. Pinned.

    ReplyDelete
  4. Visiting again to say thanks so much for linking up at the #UnlimitedLinkParty 103. Shared.

    ReplyDelete
    Replies
    1. Dee, thank you! Always a pleasure linking up.

      Delete
  5. Stephanie, CONGRATS! Your post is FEATURED at the #UnlimitedLinkParty 104!

    ReplyDelete
  6. I love little things like this I call them charmers because they typically make someone smile thanks for sharing come see us at http://shopannies.blogspot.com

    ReplyDelete
    Replies
    1. Aw, that is nice to hear. Thank you for visiting, and I'm always happy to hear that I was able to make someone smile. :)

      Delete
  7. Omg, this is so adorable 🥰 I have plenty of small leftovers of wood so I'll give it a try when I have time. Where did you buy the flowers?

    ReplyDelete
    Replies
    1. Aw, thank you so much. It's such a simple project. The flowers are from Michaels craft store. :)

      Delete
  8. What an adorable little DIY Stephanie!!
    Thank you for sharing your mini wood lantern at Create, Bake, Grow & Gather this week. I'm delighted to be featuring it at Friday's party and pinning it too.
    Hugs ~ Kerryanne

    ReplyDelete
    Replies
    1. Kerryanne, thank you so much. I'm happy to hear that you enjoyed my mini lantern project. I'm excited to be part of the featured posts at the next party. Thank you. 😊

      Delete
  9. How clever is a wooden lantern built for a candle votive! This is so unique!

    ReplyDelete
    Replies
    1. Thank you so much. This was such a fun project to work on.

      Delete
  10. This is so adorable, I will certainly save the post and make a few of these. So cute :)

    ReplyDelete
  11. This would perfect as a table centerpiece for a summer party. Thanks for sharing the idea. This post will be a feature this week. #HomeMattersParty

    ReplyDelete
  12. Super adorable, Steph! Such a clever DIY, too! Thanks for sharing at Tuesday Turn About. I'll be featuring you at this week's party! Pinned!

    ReplyDelete
    Replies
    1. Julie, I'm so happy to hear you enjoyed my mini lantern craft. It puts a big smile on my face. Thank you, and I'm thrilled to be featured at your party. ♡

      Delete

Post a Comment

Thank you so much for taking the time to leave a comment. Your comments brighten my day. I hope that you know that it is appreciated. I do my best to respond to every comment. If you have a question, please feel free and ask away!

Popular posts from this blog

Decoupaged Glass Jar Candle Holders with Faux Leaves and Gold Wire

  Learn how to create beautiful decoupaged glass jar candle holders using leaves and gold wire. This DIY project is a perfect way to upcycle old glass jars and create unique candle holders for your home decor.  I hope you're all doing well. The weather has cooled down and we're enjoying the change. I'd like to share a quick upcycling decoupage project with you all today.  I had some extra glass yogurt jars and bought two taper candle holders from Target's dollar section. I wasn't sure what to do with them at first. In today's project, I will show you how to decorate small glass jars using faux fall leaves and gold wire. Video tutorial Materials Needed: - Two taper candle holders - A paintbrush - Mod Podge - Faux fall leaves or a decorative napkin - Hot glue - Two battery-operated tealight candles - Gold wire Applying Mod Podge and faux leaves to glass jars To start with, grab a paintbrush and use it to apply Mod Podge on your glass jar. Apply a small amount of M

Fall Floral Display Using Glass Yogurt Jars

 Hi everyone. I hope that you are all doing well. I am patiently waiting for Fall to arrive. Fall is my favorite season of them all. I love the golden leaves, hot apple cider by the fire pit, sitting out in the evenings roasting marshmallows. It is simply the best for me. Do you have a favorite season? What do you enjoy about it?  Today I am sharing a quick upcycle craft. I decided to use my glass Oui yogurt jars. I love these little jars and what a perfect way to reuse them. I will show you how to decorate these jars using mod podge, and acrylic paint. We will add faux flowers to each glass jar as well. Video tutorial Materials  Three small glass jars I'm reusing my Oui glass yogurt jars Twine Acrylic paint Paintbrushes Mod podge Decorative napkin Faux floral and foliage Decorative tape/Washi tape Scissors Applying paint to glass yogurt jars Begin by applying your paint to two of your glass jars. Each jar needed around three coats of paint.  I used acrylic chalk paint. Cutting you

Upcycle Your Candle Lids: Easy Steps for Fall Shelf Decor

Hello everyone! Happy Autumn! I'm excited that fall has arrived. Today I'm going to share an easy upcycled craft idea with you. We'll be creating Autumn shelf sitter decor using two candle lids. I wasn't sure what to do with my candle lids, but I decided to make fall shelf sitter decor after giving it some thought. If you're ready, let's begin building your very own. Video Tutorial Materials - Two candle lids (wooden or metal) - Acrylic paint - Paintbrush - Mod Podge (optional) - Craft moss - Mini wooden mushrooms - Scissors - Assorted fall decor (e.g. flowers, fall vase filler glitter leaves, smaller faux succulent flowers in deep purple color) - Hot glue Begin by applying acrylic paint to both the wooden lid and wooden mushrooms. I decided to paint the tops of the wooden mushrooms orange and brown. First, if your napkin is 2-ply, remove the second layer. Then, use scissors to cut out the designs you want to add to the project. Afterward, use a smaller paintbru

🍂5 Simple Fall Centerpiece Ideas|Perfect for Thanksgiving

 Hello everyone! I hope that you are doing well. I wanted to share 5 fall centerpiece ideas that are perfect for displaying during the fall season and also on Thanksgiving. I put together five simple designs that are affordable, and easy to put together.  Video tutorial For our first design, we will be using six faux mini pumpkins, succulent flowers, two scented candles, and a faux vine. For each centerpiece, I am using my longer rectangle wood tray that I built. If you would like to build your very own just click the link for the tutorial- DIY Decorative Kitchen Tray Build And Decorate I purchased a pack of these mini white and green pumpkins at Hobby Lobby. They are currently having a sale on fall décor and other fall items. I started by taking my pumpkins and placing them onto my tray. You want to be sure to leave room for your candles. Place your candles and begin to add your succulent flowers. I added my succulents between my mini pumpkins. After, take your faux vine and place it

Turn Old Glass Jars into Beautiful Fall Candle Holders

Get ready to get creative this fall with DIY upcycled glass candle decorations. Follow this easy step-by-step guide to transform old glass jars into beautiful seasonal decor pieces. I will demonstrate how to create two fall candle decorations using glass jars. You will only need a few materials to get started. If you're ready, let's begin! Video tutorial Materials Glass jars fall decorated leaves faux fall leaves Acrylic paint Twine or craft string Hot glue Paintbrush Mod Podge Battery-operated tealight candles Applying paint and Mod Podge Begin by mixing paint and Mod Podge. I decided to do this for my jars to give them more of a stained-glass appearance. I went with brown and orange for my jars. Adding napkin cut-outs and faux leaves After cutting out your napkin designs, use Mod Podge to adhere them to your first jar. Make sure to remove the second layer of the napkin before adding each cutout to the jar. Apply Mod Podge to the jar, place the design over the Mod Podge, and

Quick and Easy Fall Theme Wood Riser

 Hi everyone! This weekend we had a cold front move through and honestly, I just wanted to stay in, take naps and drink coffee. Of course, that didn't happen, instead, I ended up at Hobby Lobby. While there, I found a few decorations to add to my newest wood riser that I created. I'm going to take you through some easy steps and help you create your very own simple fall-theme wood riser.   Video tutorial Materials Wooden Square 5" x 5" Shadow Box (I purchased my wooden square at Michaels) Paint Eight wood tumbling blocks (You can find a pack at Dollar Tree) Wood glue Floral cutters Decorations I'm using One mini pumpkin cup Fall fillers One wood crow Faux fall leaves One battery-operated candle Faux fall floral Start by applying paint to your wood square, and your wood tumbling blocks. When painting your blocks apply paint onto just the front and sides of each block. Next,  take your wood glue and begin to glue your blocks together. You will glue tw

Mini Picket Fence Hanging Decoration

Add a charming touch to your spring décor with this DIY mini picket fence hanging decoration. Learn how to create this cute and easy project to brighten up any space. Today I am sharing a simple craft that anyone can do. This craft is simple, and it doesn't take many materials. I'd love it if you joined me in creating this craft!  Mini Picket Fence Hanging Decoration  Video tutorial Materials Needed One wooden fence decoration- purchased at Dollar Tree Mod Podge One decorative napkin-purchased one pack at Dollar Tree Paint- I'm using chalk paint.-White and Misty pink One mini watering can decoration-I found this in the gardening section at Dollar Tree One paint brush Floral Hot glue  Scissors One pencil for tracing Floral snips Optional- butterfly sticker Step 1: Adding paint to the mini fence Start off by, applying a layer of white chalk paint onto your picket fence. You can also apply the white chalk paint to the spaces between the pickets using a smaller paintbrush. Set

Easy DIY Wood Pumpkin Display: Floral Fall Decor with a Decoupage Twist

  Create a stunning fall-inspired display with this budget-friendly DIY craft. Learn how to decoupage wood pumpkins and incorporate floral accents for a charming and seasonal decoration. Video tutorial Hello everyone! I hope you're having a wonderful autumn season so far. How's the weather in your area? Today, it's breezy outside, with a high of 72 degrees, and the sun is shining. I feel grateful to be able to enjoy such a beautiful day, and I hope you do too.   I'd like to share a fun crafting project with you. We'll be decorating wooden pumpkin ornaments from Dollar Tree using decoupage and wooden tumbling blocks to create a pumpkin floral design.  Here are the materials you'll need: - Two wooden pumpkin ornaments (I bought mine from Dollar Tree) - Six wooden tumbling blocks (also from Dollar Tree, but other craft stores may carry them) - Adhesive - Faux floral and greenery - Acrylic paint (I'm using brown) - Foam block - Craft knife - Decorative fall napk