
Upcycled Fall Metal Wagon Decoration

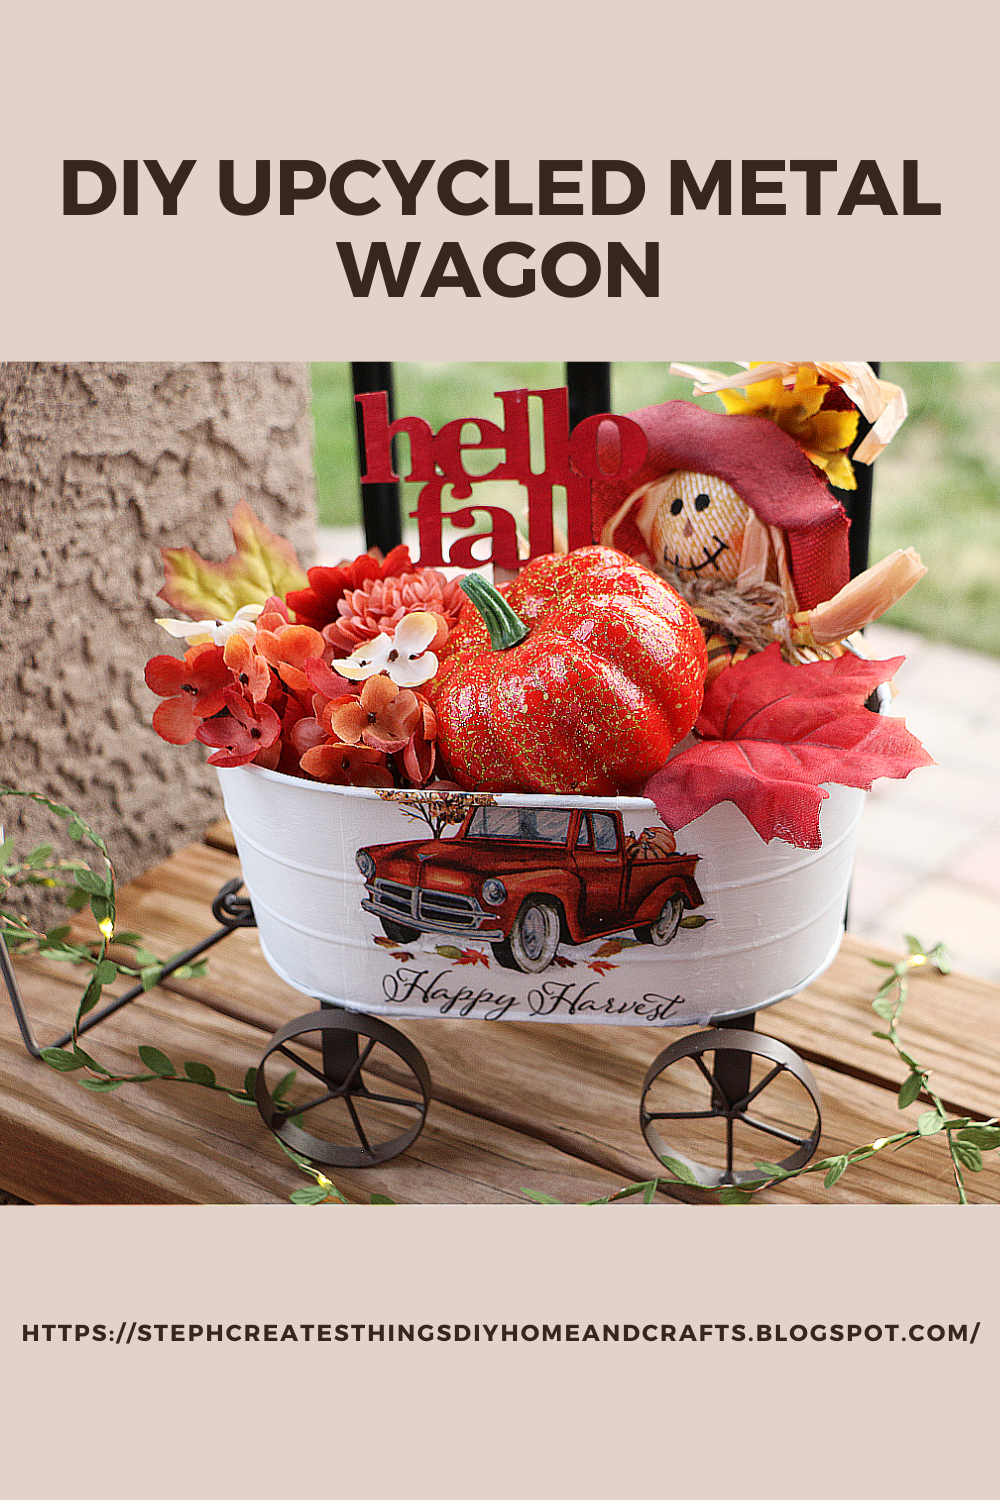
 Hi everyone. I did a little craft supply shopping a few weekends ago. I couldn't resist all of the sales that were taking place. If you haven't gone to Michaels, you should definitely go soon. They have marked down quite a bit in their store. While I was there I picked up a metal wagon. I wasn't sure what I was going to do with it. Soon after, I was able to come up with a few ideas. I decided I'll create a new look for it and it would be added to my other fall decorations. I'll take you through what I did to upcycle my metal wagon. 


Video tutorial


Materials needed

One metal wagon--Purchased at Michaels during their fall sale
One fall decorative napkin
Acrylic paint-white
Mod podge
Hello fall sign
One popsicle stick
Hot glue
Paintbrush
Scissors
Faux fall floral
Floral Cutters
Foam craft blocks
Optional--foam pumpkin, scarecrow, fall leaves


Begin with using your paintbrush to apply your white paint onto your metal wagon. I applied two coats of paint to my wagon. I also used my blow dryer between coats to help dry the paint.


Next, take your decorative napkin and cut out the section that you are going to want to display on your wagon. Take your paintbrush, and apply a thin layer of mod podge onto the section on your wagon. Place your napkin over your mod podge, and gently smooth it out. You can take your blow dryer, and smooth it out while drying it. After, take your mod podge, and add a thin layer on top of your decorative napkin.  Repeat the step with your blow dryer.


Next, take your foam blocks and add them to your wagon. I decided to add just a little hot glue on the bottom side of each foam block. 


After, use your floral cutters and cut your floral to size.


I decided to add my hello fall wood sign. I took a popsicle stick and added some hot glue onto the back of my hello fall sign.  I figured by doing this, I could stick the sign into my foam block, and my sign would be a little more visible on the inside of my wagon.

I decided to add in my pumpkin and scarecrow. You can add any decoration of your choice. This upcycle project was simple. I hope that you have enjoyed this project. Thank you so much for stopping by and creating with me. I'll see you soon! 


Pin/Save/Share


Comments

  1. How cute is that? Love it! Thanks so much for linking up at the Unlimited Link Party 82. Shared.

    ReplyDelete
    Replies
    1. I'm so happy to hear that you enjoyed this. Thank you for stopping by. =)

      Delete
  2. Adorable! Great tutorial and such a pretty end result. Pinned!

    ReplyDelete
    Replies
    1. Denise, thank you so much! I'm so happy to hear you enjoyed it.

      Delete
  3. Such a cute arrangement, perfect for welcoming the autumn. Thanks for sharing with us at Handmade Monday :-)

    ReplyDelete
  4. CONGRATS Stephanie! Your post is FEATURED at the Unlimited Link Party 83!

    ReplyDelete
    Replies
    1. Thank you so much for the feature! 😊 I'll be sure to stop by.

      Delete
  5. This is darling! Visiting from Grammy's Grid (and also from Colorado!) :)

    ReplyDelete
    Replies
    1. Jennifer, thank you! :) I love hearing from other people here in Colorado. Thank you for stopping by.

      Delete
  6. That's really adorable! Great job!

    ReplyDelete
  7. I need to find these word signs stat, these are so cute. Napkin projects are my favorite to work on, I just have not worked on one in a while. I need to get out so I can find some for fall. If you are not selling crafts, you should be Stephanie, you have such adorable ideas!

    ReplyDelete
    Replies
    1. Cara, aw you are too kind. I appreciate that. You can find these word signs at either Dollar Tree or Michael's. I believe I've seen them at Hobby Lobby as well. 🥰

      Delete
  8. Your little fall wagon is even more precious now! Adore those fall vibes! And that scarecrow sure is a cutie!

    ReplyDelete
    Replies
    1. You are always so kind, and I truly appreciate it. -Thank you! I am happy that you enjoyed my fall wagon design. :)

      Delete

Post a Comment

Thank you very much for taking the time to leave a comment. Your feedback brightens my day, and I hope you know its appreciated. I always do my best to respond to every comment. If you have a question, please feel free to ask! When you leave a comment, if you include your name or blog link, I will visit your blog and leave a comment in return! ***Spam or comments that don't provide valuable feedback will be removed.*** Thank you!

Popular posts from this blog

Winter Floral Tray: Easy Steps Using Dollar Tree Cutting Board

 Hello everyone! I’m excited to share my latest craft with you all. Today, we will be creating a floral winter tray using a bamboo cutting board from Dollar Tree. I often come across these bamboo cutting boards at my local Dollar Tree, and this time, I decided to pick one up. This craft is simple and budget-friendly. Join me as we make a winter floral tray using just a few materials! Video tutorial Materials One bamboo cutting board Winter faux foliage Paintbrush Hot glue Four wooden beads Acrylic paint Optional faux mini trees Begin by applying acrylic paint to the wooden cutting board. I decided to mix two colors together: white and English ivy green. Next, take four wooden beads and use hot glue to attach them to the underside of the board. I had a few extra beads from a previous project. After that, attach the faux foliage to the wooden board using hot glue. Depending on how you want to display the items on your board, arrange the foliage around the edges. This will ensure enou...

Fall Floral Display Using Glass Yogurt Jars

 Hi everyone. I hope that you are all doing well. I am patiently waiting for Fall to arrive. Fall is my favorite season of them all. I love the golden leaves, hot apple cider by the fire pit, sitting out in the evenings roasting marshmallows. It is simply the best for me. Do you have a favorite season? What do you enjoy about it?  Today I am sharing a quick upcycle craft. I decided to use my glass Oui yogurt jars. I love these little jars and what a perfect way to reuse them. I will show you how to decorate these jars using mod podge, and acrylic paint. We will add faux flowers to each glass jar as well. Video tutorial Materials  Three small glass jars I'm reusing my Oui glass yogurt jars Twine Acrylic paint Paintbrushes Mod podge Decorative napkin Faux floral and foliage Decorative tape/Washi tape Scissors Applying paint to glass yogurt jars Begin by applying your paint to two of your glass jars. Each jar needed around three coats of paint.  I used acrylic chalk pai...

Spring Hanging Design Using Bamboo Serving Boards

 Today I am sharing an easy project. We are creating two Spring hanging designs using bamboo serving boards. I purchased these boards at my local Big Lots store. It was two for five dollars. I actually was not sure what I was going to do with them, but the other day I figured it out. I will provide a step-by-step tutorial, a material list, and a video tutorial will also be included. Happy crafting! Video tutorial Main materials Hot glue or any adhesive of your choice Floral cutters Twine Faux floral Pencil Scissors Paintbrush Acrylic paint First design One wooden serving board One decorative napkin Mod Podge Second design Ribbon One craft chalkboard watering can Floral sticker Painting the serving board Begin by applying your acrylic paint to your wooden serving board.  Adding the decorative napkin Next, take your decorative napkin and unfold it. Place your napkin on top of your painted board and begin to trace out the center of your board. If your napkin has a second layer be...

All content Copyright

Copyright 2021-2025 I ask that you do not take or use my photos or words without permission. If you have any questions, please feel free and contact me. Also, for more information on this blog, check out the disclosure policy tab above. Thank you