Learn how to design and create your own personalized organizer using affordable Dollar Tree items. Get creative with materials and follow these easy DIY steps to make a unique and functional organizer for your home or office space.
Hi everyone! I hope that you are doing well. Recently I took a trip to my local Dollar Tree and found these stackable plastic organizers.
Today we're going to design our very own organizer. To create your organizer you will only need a few materials. Most of my materials were purchased at my local Dollar Tree store. You will need three of the plastic organizing drawers.
Be sure to check out my YouTube channel for more DIY tutorials--For more DIY Tutorials Click here! And I would love it if you subscribed to the channel
DIY Organizer video tutorial below
Materials
THREE STACKABLE ORGANIZING DRAWERS 5X5X1.75 IN
ASSORTED FAUX PEARL BEADS
SMALL WOOD BEADS
PEEL AND STICK FLORAL DECALS
PEEL AND STICK DECORATIVE PAPER
HOT GLUE
PAINT- I'M USING ACRYLIC MULTI-SURFACE PAINT
SCISSORS
PAINTBRUSH
One pencil
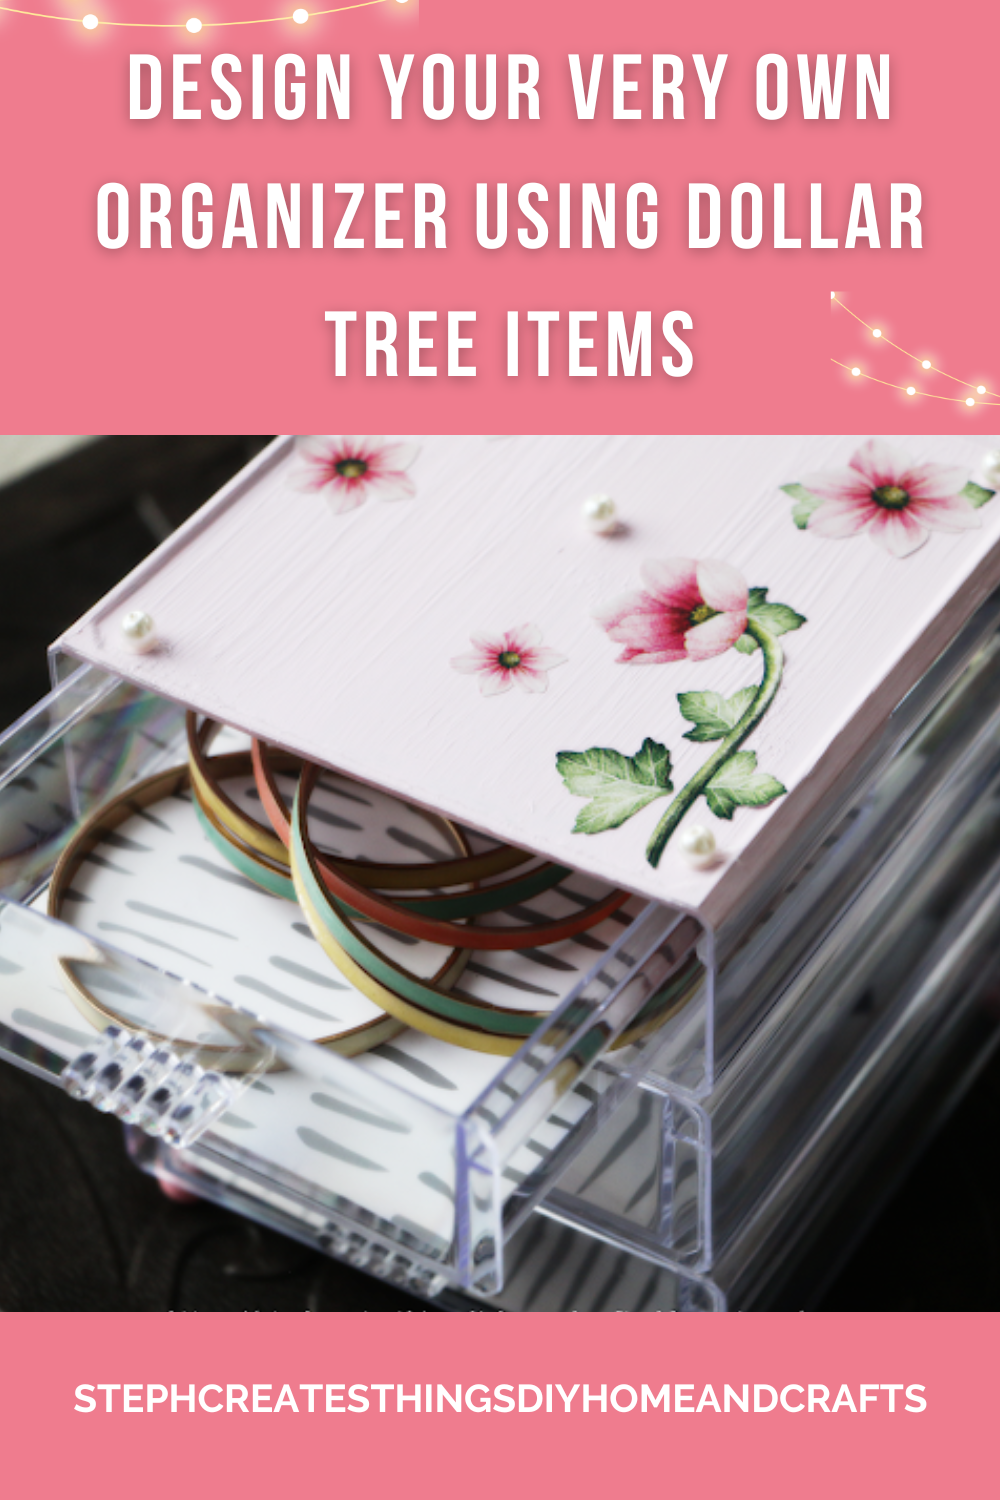
Start by taking your paint, and applying it to one of your plastic organizers. You will only apply paint on the top surface. I used my blow dryer between coats. You will need around two coats of paint.
Afterward, take your floral peel-and-stick stickers, and begin to add them to the top painted section on your organizer.
Next, take your peel-and-stick decorative paper, and begin to trace the outline of one of your plastic organizers. Place your organizer on top of your decorative paper, and trace around it. After tracing it out, take your scissors and cut out the traced shape. In the end, you will end up with three decorative cut-out papers.
Begin to add each traced shape to your organizer drawers. Remove the backing, and gently press each one onto the bottom of your organizer drawer. If your paper is too big, just take your scissors and trim.
Flip only one of your drawers over. Take four of your wood beads and place each bead onto each bottom corner. Your beads will act as legs on the bottom of your organizer. Apply hot glue onto each corner and add each bead.
Next, take each of your organizing drawers and stack them. I used hot glue since I wanted my drawers to not move around. I applied glue onto the four corners of my bottom and middle drawer. Your top drawer should end up being your painted drawer with your floral decal.
After you have stacked your plastic drawers, add your pearls to the top drawer.
Your organizer is now complete. I love how easy this was to design. Let me know if you decide to create your very own. Thank you so much for stopping by, and creating with me.
You might also like
Pin Share Save


Aw, how cute is that? Thanks so much for linking up at the Unlimited Link Party 79. Pinned.
ReplyDeleteWow! That's so pretty! Pinning. (visiting from Grammy's Grid linkup)
ReplyDeleteJennifer, thank you so much!
DeleteVisiting again to say thanks so much for linking up at #IMadeItMondayLinkParty 11. Shared.
ReplyDeleteDee, thank you. Always a pleasure linking up!
DeleteThis is one of the cutest things I've seen this season! I love it. Thank you for sharing it with us on Farmhouse Friday. I'll be featuring it tomorrow. Hope you link up again soon. pinned
ReplyDeleteCindy, thank you so much! I'm so happy to hear that you enjoyed it.
Deletewhat a sweet project, thanks for sharing with us at Creatively Crafty Link Party
ReplyDeleteJanet, thank you so much. 😊 I appreciate you visiting.
DeleteGreat job and well done, love it, pinned it.
ReplyDeleteI visited you via Home Matters Linky Party #453. I linked up this week with = 54+55+56. Come and join us Mon - Saturday at SeniorSalonPitStop as well as #WordlessWednesday #Photography Wednesday - Saturday. You will find the info under BLOGGING
Thank you so much. I appreciate you visiting and pinning as well.
DeleteThis turned out so pretty!
ReplyDeleteSuper cute and so pretty
ReplyDeleteHappy Thanksgiving to you all.
Thank you for sharing your links with us at #286 SSPS Linky. See you again next week.
Thank you so much. Happy Thanksgiving. 😊
DeleteThis is such an adorable idea!
ReplyDeleteThank you so much. :)
DeleteI am totally amazed by this! It's beautiful. Well done! Thanks for sharing this post at the Will Blog for Comments #32. Hope to see you at the next linkup, too. Have a great week.
ReplyDeleteVery cute, such a fun way to give some rather plain plastic drawers a glam glow up!
ReplyDeleteThank you! It was such a fun project.
DeleteWow! These drawers can be displayed and not hidden in a closet now!
ReplyDeleteThank you for visiting.
DeleteThanks for sharing with us on the Homestead Blog Hop! A great craft. Very beautiful
ReplyDeleteKelly, thank you so very much. I appreciate you visiting. :)
DeleteThat looks lovely!
ReplyDeleteJoanne, thank you. 😊
DeleteMy favorite combination...pretty, practical, and Dollar Tree! I have that same silver and white paper. Featuring when my party opens!
ReplyDeleteCarol, thank you! I'm happy you enjoyed it. Excited to be featured at your party.
DeleteSo so pretty! Thanks for joining in on Home Matters Linky Party! I will be featuring your post this week! #HomeMattersParty xx
ReplyDeleteJoy, thank you very much. I appreciate it. ♡
DeleteYour organizer is so pretty! I love the flowers and the other colors you chose. Great idea!
ReplyDeleteDebbie, thank you very much. Happy you enjoyed it. 🤗
DeleteLovely! Featuring you at Wednesdays in the Stuido!
ReplyDeleteThank you 😊
DeleteVery pretty! I 'd love to find a cute organizer like that at my Dollar Tree Store and do the same to dress it up.
ReplyDelete