
Upcycled Glass Jar Autumn Decoration


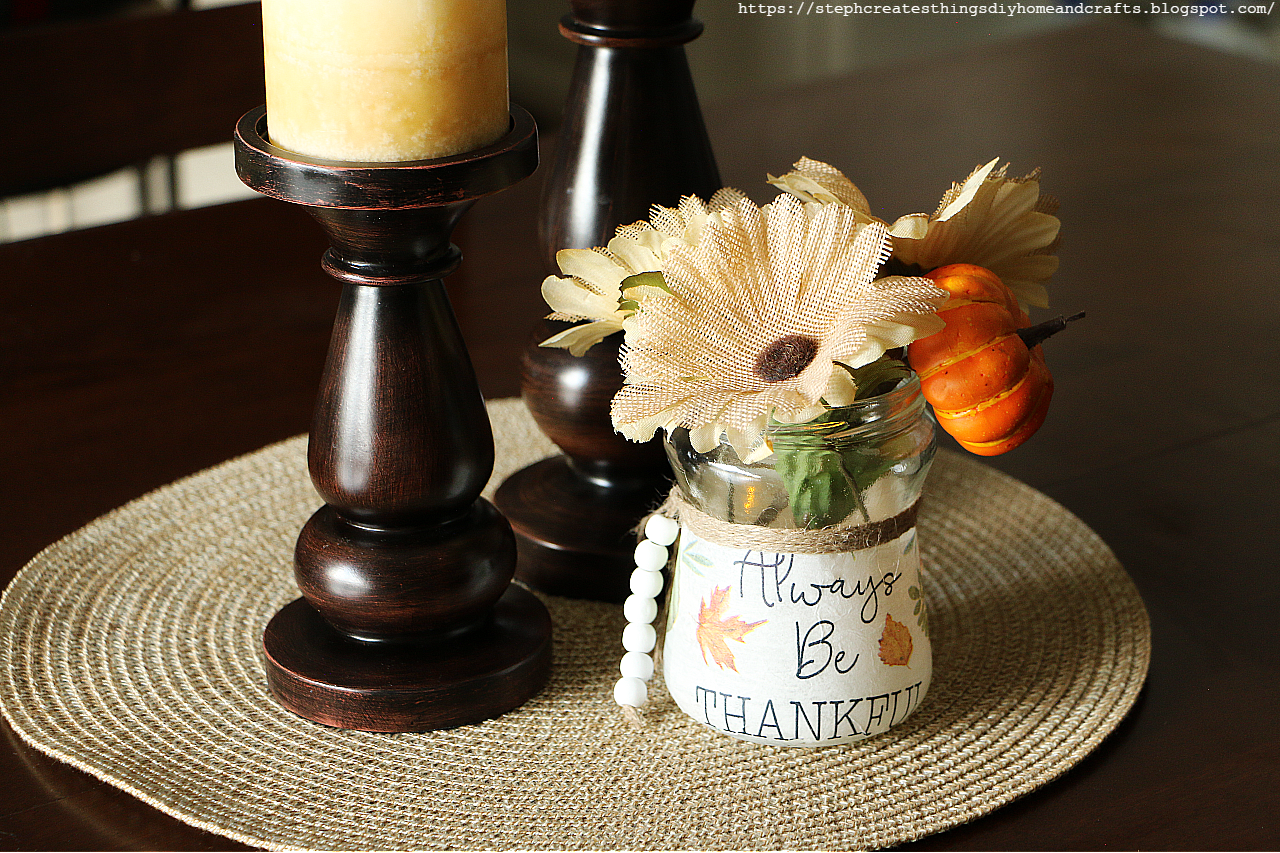
Hello to all! I hope that you're doing well. I'm patiently waiting for Autumn to arrive. I've started creating a few Autumn decorations, and I'd love to share them with you. Today we are creating an Autumn upcycled glass jar decoration. This project is quick, and only uses a few materials. 


Video tutorial


Materials

One glass jar
Mod podge
Twine
Decorative napkin
Scissors
Paintbrush
Wood beads
Paint
Faux fall floral

Optional- battery-operated tealight candle


Start by taking your glass jar, and applying your paint. I left the top section of my glass jar clear. I only applied paint starting at the middle and ending at the bottom of my glass jar.


Next, take your napkin and remove the second layer. Once you have removed the second layer, use your scissors and begin to cut one section of your napkin. 


Begin to add your mod podge to the painted section on your glass jar. 


Take your napkin pieces, and begin to add them over the mod podge. Be sure to cut out any designs you will want to display on your glass jar. 


Take your beads, and begin to string them onto a section of your twine. Once you have added a few beads, cut and tie a knot on the bottom, and top sections of your twine. Be sure to leave a little extra twine on the top section of your beads.


Next, take your twine and wrap the twine around your glass just above the decorative napkin. Wrap it around a few times. Once you have done this, take your scissors and cut off the end of your twine. Tie off your twine. Be sure to leave just a little twine so that you can add your twine with your beads to it.

Take your wood beads, and add them to your jar. I tied my twine around the section of twine that was left over after I wrapped my twine around my jar. 


If you decide to use a battery-operated tealight candle, add it in before adding it to your floral. I love how it gives a soft glow. 


Your glass jar decoration is now complete. I hope that you enjoyed this simple craft. Be sure to let me know if you create your very own. Thank you so much for creating with me. I'll see you soon.

You might also enjoy

Comments

  1. I love fall DIYs. This jar is adorable. Thank you for sharing at #omhgww. See you next week. Tweeted & Pinned.

    ReplyDelete
    Replies
    1. Thank you! So happy to hear you enjoyed it. 😉 Thank you for stopping by.

      Delete
  2. I love the use of napkins in projects, and those little beads are darling!
    Thank you for sharing on Oh My Heartsie Girls WW last week, congratulations...your post is being featured this week!! Pinned!!

    ReplyDelete
    Replies
    1. Thank you! I'm so happy to hear you enjoyed it. Also, thank you for pinning it. I appreciate it. =)

      Delete
  3. A great idea! I love using ModPodge, and I too have made things from beautiful napkins. . . but never thought of upcycling a glass jar like this. Brilliant!

    Thanks so much for joining the Grace at Home party at Imparting Grace. I'm featuring you this week!

    ReplyDelete
    Replies
    1. Thank you so much. 😊 I love that you can use mod podge for so many different
      Things. Thank you so much for stopping by. I'm so happy to be featured on Imparting Grace this week.

      Delete
  4. What a cute idea! I love upcycling old jars. I'll have to try this. I found you over on French Ethereal's link party. I'd love to have you come by & share on Crafty Creators Link Party (Thurs. 6am CST-Mon. 11:59pm each week). You can also share on my other two link parties while you're there if you'd like. Hope to see you there!
    Niki | LifeasaLEOWife.com

    ReplyDelete
    Replies
    1. Niki, thank you so much. Yes, definitely give this a try! --I think that you will love how it turns out. It is a pretty simple craft, and it is always so great when you are able to reuse, and upcycle with project.

      Delete
  5. So pretty, I like too that you put a candle inside. Thanks so much for linking up at the #UnlimitedLinkParty 129. Pinned.

    ReplyDelete
  6. Visiting again to say thanks so much for linking up at #AThemedLinkup 165 for Crafting with Bottles and Jars. Pinned again too.

    ReplyDelete
  7. CONGRATS Stephanie! Your post is FEATURED at #AThemedLinkup 166 for Pumpkin Crafts and Décor from the previous linkup for Crafting with Bottles and Jars.

    ReplyDelete

Post a Comment

Thank you so much for taking the time to leave a comment. Your comments brighten my day. I hope that you know that it is appreciated. I do my best to respond to every comment. If you have a question, please feel free and ask away!

Popular posts from this blog

Dollar Tree Mini Bead Floral Spring Wreaths

Transform Dollar Tree's mini bead wreaths into beautiful spring floral bead wreaths with this easy DIY tutorial. Add a touch of spring to your home decor with this creative and budget-friendly project.  I'm excited to share a quick and simple DIY project with you today. Last year, I purchased two mini bead hanging decorations displayed with the fall decor. I decided to add them to my craft stash and use them in the springtime. In this tutorial, I will show you how to create mini bead floral wreaths and provide a full list of materials needed for each step.  Dollar Tree Mini Bead Floral Spring Wreaths Video tutorial Materials Round mini beaded hanging decorations Artificial floral accents One large craft/popsicle stick Paintbrush Acrylic paint Floral cutters Hot glue/Adhesive Step one: Applying paint Before painting, remove any previous decorations such as the plaid autumn leaves that were attached to the wreaths I'm using. To start with, apply paint to your beaded wreath. Y

DIY Spring Flower Terra Cotta Pot

Hello everyone! Today, I'm excited to share a simple re-do craft that will transform a plain terra cotta pot into a beautiful spring gift. I'm reusing one of my old terra cotta pots from a previous project for this craft.-  Spring Floral Clay Pot Design  With just a few easy steps, I'll show you how to create a stunning spring flower pot display that would make the perfect Mother's Day gift, or just to welcome Spring. Let's get started! DIY Spring Flower Terra Cotta Pot Video tutorial Materials Artificial flowers One terra cotta pot (I'm reusing a pot from a previous craft) Acrylic paint Craft stick Faux pearl embellishments Foam block Adding paint and other designs I used a pot that was previously painted and had some twine added to it. I decided to keep the existing paint and twine and add a few painted flowers to the pot. For the flowers, I used light purple and blue for the petals, and white for the center of each flower. Adding embellishments I decided to a

Transforming Ice Cream Cups: DIY Spring Tea Cup Floral Arrangements

  Today, we'll explore a fun and easy DIY project involving repurposing plastic mini ice cream cups into beautiful spring tea cup floral arrangements. This project is a great way to add a touch of spring to your home decor.  Before throwing away those plastic cups, consider the many possibilities in creating something new.  For this project, you will only need a few materials. Our main materials for creating the faux tea cup will be the ice cream cup and air-dry clay. So, if you're ready to create this adorable and creative springtime tea cup floral decoration, let's begin! VIDEO TUTORIAL Materials Plastic ice cream cups (I am reusing two plastic ice cream cups) Spanish moss Floral Mod Podge Decorative floral napkin Artificial spring flowers Acrylic paint (I'm using white) Paintbrush  Optional- Bumblebee button and small dowel rod- Dimensions : 0.1 inches x 6 inches. Air dry clay Scissors Foam block Preparing your cups After washing your ice cream cups and drying them c

Eco-Friendly Crafting: How to Make a Beautiful Flower Holder from Cardboard

Discover how to create a beautiful flower holder from cardboard in an eco-friendly way. Hello everyone, today I'm excited to share an eco-friendly crafting project with you.  While cleaning up my wrapping paper collection, I noticed the paper roll had run out, leaving only the cardboard paper center. Instead of throwing it away, it would be a great opportunity to reuse the paper and create something beautiful.  Video tutorial Materials - Cardboard paper (preferably thicker wrapping paper) - Faux flowers (such as tulips and greenery) - Two fabric hearts and butterfly stickers - Two craft clothespins - Hot glue or glue stick - Twine -Hole puncher - Optional faux flexible flowers to wrap around the twine. Step one: Preparing the paper To get started, cut a piece of cardboard paper. Make sure to choose a size that will fit the flowers you plan to use later on in the craft. The size of the section should be large enough to accommodate the flowers in the center of the sleeve. For my proj

Wood Box With Glass Bottles Decorative Centerpiece

Hi everyone! I hope that you are all doing well. It has been pretty rainy these past few days. I'm enjoying the rainy weather compared to the really hot days we were getting before.  Today we are working on building a wood box centerpiece. Instead of using the wood crate boxes from Dollar Tree, I wanted to build my own box. For this project, we're using a wood fence picket. I paid $1.48 for one picket, and you can create two boxes with just this one picket. I'm also going to reuse my glass Frappuccino bottles. I will provide a video tutorial as well.  Video tutorial Materials   One wood fence picket- I purchased mine at my local Lowe's for $1.48 Two glass bottles-I am reusing my Starbucks glass bottles Paint Paintbrush Faux greenery Rub-on transfers Wood glue Corner clamps Hot glue One round wooden circle Floral snips Scissors Begin by cutting your wood fence picket. Cut the short ends of your wood 2½ inches. Next, cut the front, back, and bottom of your wood 6¼ inches.

Decoupaged Glass Jar Candle Holders with Faux Leaves and Gold Wire

  Learn how to create beautiful decoupaged glass jar candle holders using leaves and gold wire. This DIY project is a perfect way to upcycle old glass jars and create unique candle holders for your home decor.  I hope you're all doing well. The weather has cooled down and we're enjoying the change. Today, I'd like to share a quick upcycling decoupage project with you all. I had some extra glass yogurt jars lying around and bought two taper candle holders from Target's dollar section. I wasn't sure what to do with them at first. In today's project, I will show you how to decorate small glass jars using faux fall leaves and gold wire. Video tutorial Materials You need two taper candle holders, a paintbrush, Mod Podge, faux fall leaves, or a decorative napkin, hot glue, two battery-operated tealight candles, and gold wire.  Applying Mod Podge and faux leaves to glass jars To start with, grab a paintbrush and use it to apply Mod Podge on your glass jar. I suggest ap

Decorative Wooden Cutting Board

 Hello everyone!  Today we are creating a simple design. I am taking a wooden cutting board, and adding a few design elements to it. I thought this would be a great addition to a tray, or just to add along with my existing decor. I will include a materials list below and also there will be one within the video. Thank you so much for coming along and creating with me. Video tutorial Materials One small wooden cutting board Decorative wrapping paper or tissue paper Acrylic paint Paintbrush Twine or rope Hot glue One heart decoration Scissors Wooden letters Mod podge Optional- Faux greenery One pencil for tracing Tracing and cutting the wrapping paper To begin, place your wrapping paper on a flat surface. Take your wooden cutting board and put it on top of your paper. With a pencil, trace around the board onto the wrapping paper. After tracing, use scissors to cut out the traced shape. Next, lay your cut-out wrapping paper on top of your wooden cutting board.  I decided that I only wanted

Mini Picket Fence Hanging Decoration

Add a charming touch to your spring décor with this DIY mini picket fence hanging decoration. Learn how to create this cute and easy project to brighten up any space. Today I am sharing a simple craft that anyone can do. This craft is simple, and it doesn't take many materials. I'd love it if you joined me in creating this craft!  Mini Picket Fence Hanging Decoration  Video tutorial Materials Needed One wooden fence decoration- purchased at Dollar Tree Mod Podge One decorative napkin-purchased one pack at Dollar Tree Paint- I'm using chalk paint.-White and Misty pink One mini watering can decoration-I found this in the gardening section at Dollar Tree One paint brush Floral Hot glue  Scissors One pencil for tracing Floral snips Optional- butterfly sticker Step 1: Adding paint to the mini fence Start off by, applying a layer of white chalk paint onto your picket fence. You can also apply the white chalk paint to the spaces between the pickets using a smaller paintbrush. Set