
Upcycled Glass Jar Autumn Decoration


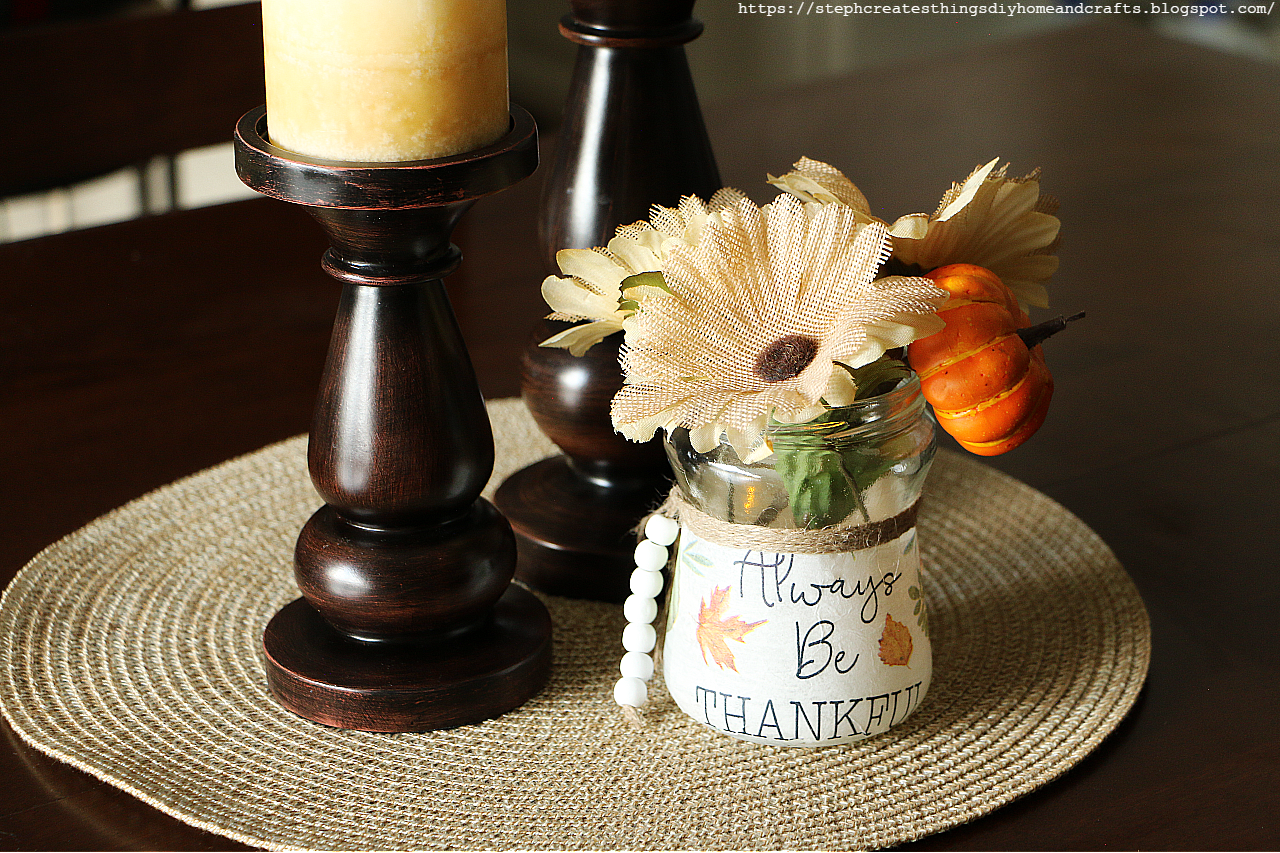
Hello to all! I hope that you're doing well. I'm patiently waiting for Autumn to arrive. I've started creating a few Autumn decorations, and I'd love to share them with you. Today we are creating an Autumn upcycled glass jar decoration. This project is quick, and only uses a few materials. 

Video tutorial


Materials

One glass jar
Mod podge
Twine
Decorative napkin
Scissors
Paintbrush
Wood beads
Paint
Faux fall floral

Optional- battery-operated tealight candle


Start by taking your glass jar, and applying your paint. I left the top section of my glass jar clear. I only applied paint starting at the middle and ending at the bottom of my glass jar.


Next, take your napkin and remove the second layer. Once you have removed the second layer, use your scissors and begin to cut one section of your napkin. 


Begin to add your mod podge to the painted section on your glass jar. 


Take your napkin pieces, and begin to add them over the mod podge. Be sure to cut out any designs you will want to display on your glass jar. 


Take your beads, and begin to string them onto a section of your twine. Once you have added a few beads, cut and tie a knot on the bottom, and top sections of your twine. Be sure to leave a little extra twine on the top section of your beads.


Next, take your twine and wrap the twine around your glass just above the decorative napkin. Wrap it around a few times. Once you have done this, take your scissors and cut off the end of your twine. Tie off your twine. Be sure to leave just a little twine so that you can add your twine with your beads to it.

Take your wood beads, and add them to your jar. I tied my twine around the section of twine that was left over after I wrapped my twine around my jar. 


If you decide to use a battery-operated tealight candle, add it in before adding it to your floral. I love how it gives a soft glow. 


Your glass jar decoration is now complete. I hope that you enjoyed this simple craft. Be sure to let me know if you create your very own. Thank you so much for creating with me. I'll see you soon.

You might also enjoy

Comments

  1. I love fall DIYs. This jar is adorable. Thank you for sharing at #omhgww. See you next week. Tweeted & Pinned.

    ReplyDelete
    Replies
    1. Thank you! So happy to hear you enjoyed it. 😉 Thank you for stopping by.

      Delete
  2. I love the use of napkins in projects, and those little beads are darling!
    Thank you for sharing on Oh My Heartsie Girls WW last week, congratulations...your post is being featured this week!! Pinned!!

    ReplyDelete
    Replies
    1. Thank you! I'm so happy to hear you enjoyed it. Also, thank you for pinning it. I appreciate it. =)

      Delete
  3. A great idea! I love using ModPodge, and I too have made things from beautiful napkins. . . but never thought of upcycling a glass jar like this. Brilliant!

    Thanks so much for joining the Grace at Home party at Imparting Grace. I'm featuring you this week!

    ReplyDelete
    Replies
    1. Thank you so much. 😊 I love that you can use mod podge for so many different
      Things. Thank you so much for stopping by. I'm so happy to be featured on Imparting Grace this week.

      Delete
  4. What a cute idea! I love upcycling old jars. I'll have to try this. I found you over on French Ethereal's link party. I'd love to have you come by & share on Crafty Creators Link Party (Thurs. 6am CST-Mon. 11:59pm each week). You can also share on my other two link parties while you're there if you'd like. Hope to see you there!
    Niki | LifeasaLEOWife.com

    ReplyDelete
    Replies
    1. Niki, thank you so much. Yes, definitely give this a try! --I think that you will love how it turns out. It is a pretty simple craft, and it is always so great when you are able to reuse, and upcycle with project.

      Delete
  5. So pretty, I like too that you put a candle inside. Thanks so much for linking up at the #UnlimitedLinkParty 129. Pinned.

    ReplyDelete
  6. Visiting again to say thanks so much for linking up at #AThemedLinkup 165 for Crafting with Bottles and Jars. Pinned again too.

    ReplyDelete
  7. CONGRATS Stephanie! Your post is FEATURED at #AThemedLinkup 166 for Pumpkin Crafts and Décor from the previous linkup for Crafting with Bottles and Jars.

    ReplyDelete
  8. Stephanie,
    I love your jar, so cute. Congratulations, you are being featured on WWBH. Hope you stop by. https://eclecticredbarn.blogspot.com/2025/08/fall-decorating-on-wwbh.html
    Hugs,
    Bev

    ReplyDelete

Post a Comment

I love hearing from you! Your comments and creative ideas truly brighten my day. I do my best to respond to everyone, so if you have a question or just want to say hello, please leave a note below. To keep our community a positive and inspiring space, spam or off-topic comments will be removed. Happy crafting!

Popular posts from this blog

How to Make Easy Beaded Wine Glass Charms

 I love creating small, simple crafts that add a personal touch to gatherings, and these wine glass charms were such a fun project. They’re easy to make, customizable, and perfect for parties, holidays, or even a cozy night in with friends. Each charm slips right onto the stem of a wine glass, making it easy for everyone to keep track of their drink. These charms come together quickly using beads, wire rings, and small metal pendants. You can mix and match colors and charms to fit any theme, and each one turns out a little different — which is part of the fun. Watch the video tutorial Materials Here’s what I used to make my wine glass charms: Wire rings Beads Small metal charms Jewelry pliers If your wire rings need trimming, use wire cutters—mine didn’t, so I didn’t need them for this project.  Choose your beads and charms Pick out the colors and shapes you want to use. I chose soft pinks, purples, and clear beads, along with heart, spiral, and flower charms. Each charm desig...

How I Refreshed an Old Garden Statue with Paint (Easy Patio DIY)

This charming toad perched on his toadstool has been a beloved part of our patio for years, enduring the passage of time while gradually succumbing to the effects of sun and weather. With each season, he has faded a little more, losing some of his vibrant colors and details. Rather than allowing him to blend into the background and become just another forgotten decoration, I decided it was time to breathe new life into him.  Watch the Video Tutorial I shared the whole process in a quick YouTube Shorts video called “Watch Me Refresh This Old Garden Statue.” It’s a simple before‑and‑after, but such a satisfying one.  Materials I Used Garden statue (mine is a toad on a toadstool) Sandpaper Acrylic paints Small detail brushes Mod Podge (for sealing and protection) Sanding and Painting I began by gently sanding the statue to smooth out the chipped and faded paint. It only takes a few minutes, but it makes such a difference. Once the surface felt ready, I brought out my a...

A Sweet Little Clay Trinket Dish Makeover

If you’re looking for a quick, beginner‑friendly craft, this hand‑painted clay trinket dish is such a sweet project. I’ll show you how to turn a simple clay blank into a petite floral dish with a glossy finish that’s perfect for holding rings, earrings, and tiny treasures. It’s a small DIY that comes together quickly and adds a charming, whimsical touch to any space. Watch the Video Tutorial Want to See the Process? I filmed the whole thing! You can watch the full painting process here: Materials I Used small clay trinket dish acrylic paint (green base + floral colors) fine detail brush gold paint Mod Podge (glossy) This dish started out completely plain. I love pieces like this because they’re basically a blank canvas, no pressure, just play. I chose a soft green base coat to give the florals something cozy and calm to sit on. Once the base was dry, I started building the design: stems and leaves first tiny pops of color for the flowers a thin black outline to make everything stand ou...

Easy Steps to Create a Cozy Autumn Tablescape at Home

Hello everyone! I’m excited that you decided to visit the blog today. I wanted to share how to create a cozy autumn tablescape at home. My goal was to design something warm and inviting, as our table is a space where we share conversations, drink coffee, tackle homework, and simply enjoy each other’s company.  I typically don’t go all out when decorating my dining table, but I wanted to show you how I styled it using decor pieces I already had. I would love for you to join me in this decorating adventure! Watch the video tutorial Create a Cozy Autumn Tablescape at Home Items I'm adding to my table:  -White tablecloth runner - Battery-operated leaf lights  - Reusing glass jars  - Mini pumpkins and other fall decorations  - Small "Hello Fall" sign  - Faux flowers I began by spreading my white tablecloth down the center of the table. Around Halloween, I purchased this tablecloth a few years ago at my local Walmart. After laying it out, I realized that I could ...

Four Colorful Fall Tray Designs Using Faux Pansies

Fall is the perfect season to cozy up your home with warm tones, textured layers, and pops of unexpected color. Today, I’m sharing four creative ways to decorate a fall tray using faux pansies—yes, pansies! These cheerful blooms aren’t just for spring. With the right mix of autumn accents, they can bring a vibrant twist to your seasonal decor.  I'll be showing you how to create four fun and colorful fall tray designs using faux pansies. Follow along as I decorate and show you how to get inspired to add a touch of autumn to your home decor. Video tutorial Whether you're styling a coffee table centerpiece or a kitchen vignette, all you need is: A tray of your choice Faux pansies or other seasonal flowers Decorative pots, metal tins, or vases A few favorite fall-themed accents, like pumpkins, candles, or woodland creatures  1. Thankful & Bright: Yellow Pansies with a Metal Bucket For this first tray, I used my metal autumn bucket that reads “Always Be Thankful”—a Dolla...

Search This Blog

All content Copyright

Copyright 2021-2026 I ask that you do not take or use my photos or words without permission. If you have any questions, please feel free and contact me. Also, for more information on this blog, check out the disclosure policy tab above. Thank you