
Hello everyone! I'm so happy that you decided to stop by. I hope all is well. I created these Spring floral clay pot designs using clay pots that I purchased from my local Dollar Tree. I had created a set of Valentine clay pots on my other blog, DIY Dollar Tree Valentine Clay Pot Floral Design and I loved how they turned out. I decided to create a Spring version of those pots. This craft is beginner-friendly, and you will need just a few materials when creating your spring floral design.

Video Tutorial

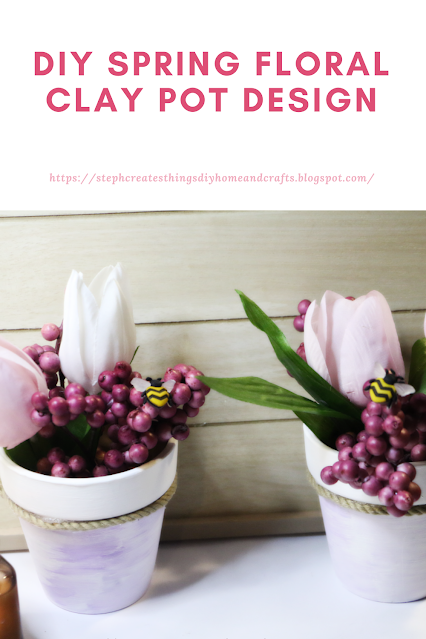
Two clay pots
I purchased these at my local Dollar Tree. One pack comes with two pots for $1.25
Spring floral
I picked my floral up at Hobby Lobby
Paint
White, and a light lavender color
Craft rope
I purchased my rope at Walmart
A pack of buttons
I found a pack of bumble bee buttons for my design. Purchased at Hobby Lobby
Paintbrush
Hot Glue
Scissors/ Wire cutters
Foam blocks
I reused some foam blocks from a previous craft
The total cost for my project was around $8

Next, combine your white, and purple paint. Take your paintbrush, and apply this paint combination to your clay pots. For this, I used one coat of paint on both of my pots.


Next, take your foam pieces and insert them into your clay pots. You can add a small amount of hot glue on the bottom side of your foam pieces before inserting them into your pots. This is not needed but is an option if you want your foam piece to not shift.

After you have inserted your foam pieces you can now take your scissors, or wire cutters, and begin to cut the stems of your floral.


After cutting your floral pieces, you can add them to your pot. If you choose to add them after adding the rope, that is also fine. When adding them just use the stem to poke through the foam pieces, and gently push them through.
Take your hot glue, and apply a thin layer around your pot. I recommend applying the glue, as you apply the rope. This way the glue will not have time to harden if applied in advance.
Just work your way around with the hot glue and rope. Once you reach the end, take your scissors, and remove any extra rope.


All that is left is to take your bumble bee buttons and add those to your floral. Just apply a small amount of hot glue on the back of each button, and add them. I ended up using only two of my Bumble Bee buttons. I added one to each of my clay pots.


You're all done with your Spring floral clay pot design. I hope that you have enjoyed this DIY project. Be sure to let me know if you create your very own design.
I'll see you soon!
You might also like
When clicked you will be redirected to my other blog
Pin/Save/Share
Absolutely adorable. I love the detail of the little bee. Thans for sharing at #omhgww. See you next week. Pinned & tweeted.
ReplyDeleteClearissa, thank you so very much!! =)
DeleteSo sweet, what a pretty idea. Thank you so much for joining us at Handmade Monday :-)
ReplyDeleteThank you so much! :)
DeleteSo pretty, love 'em!! Thanks so much for linking up at the Unlimited Link Party 73. Pinned.
ReplyDeleteDee, thank you so much for stopping by, and for also pinning this craft. =)
DeleteCONGRATS Stephanie! Your post is FEATURED at the Unlimited Link Party 74!
ReplyDeleteDee, thank you so very much!
DeleteThe bees are the perfect touch Stephanie! I love working with terra cotta pots, they are so versatile, these turned out too cute.
ReplyDeleteThank you so much. I'm happy you enjoyed the little bees. 🐝
Delete