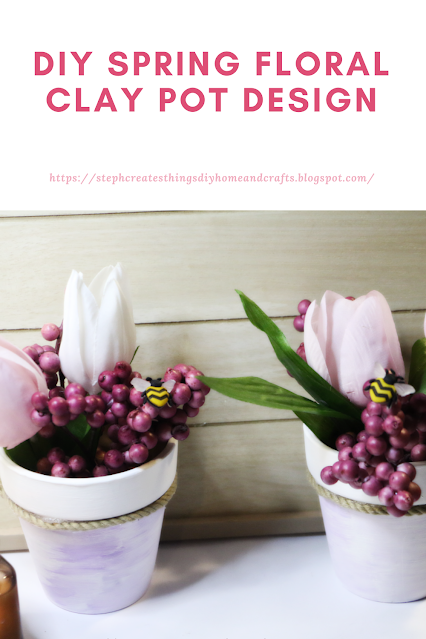
Spring Floral Clay Pot Design

Hello everyone!  I'm so happy that you decided to stop by.  I hope all is well. I created these Spring floral clay pot designs using clay pots that I purchased from my local Dollar Tree.  I had created a set of Valentine clay pots on my other blog, DIY Dollar Tree Valentine Clay Pot Floral Design and I loved how they turned out. I decided to create a Spring version of those pots. This craft is beginner-friendly, and you will need just a few materials when creating your spring floral design. 


Video Tutorial 

Materials needed

Two clay pots
I purchased these at my local Dollar Tree. One pack comes with two pots for $1.25

Spring floral
I picked my floral up at Hobby Lobby

Paint
White, and a light lavender color

Craft rope
I purchased my rope at Walmart

A pack of buttons
I found a pack of bumble bee buttons for my design. Purchased at Hobby Lobby

Paintbrush

Hot Glue

Scissors/ Wire cutters

Foam blocks
I reused some foam blocks from a previous craft

The total cost for my project was around $8


Begin by applying paint to each pot using your white paint.  I applied two coats of paint by the time my pots were completely done. They dry quickly. 

Next, combine your white, and purple paint. Take your paintbrush, and apply this paint combination to your clay pots. For this, I used one coat of paint on both of my pots. 


Next, take your foam pieces and insert them into your clay pots. You can add a small amount of hot glue on the bottom side of your foam pieces before inserting them into your pots. This is not needed but is an option if you want your foam piece to not shift. 


After you have inserted your foam pieces you can now take your scissors, or wire cutters, and begin to cut the stems of your floral.


After cutting your floral pieces, you can add them to your pot. If you choose to add them after adding the rope, that is also fine. When adding them just use the stem to poke through the foam pieces, and gently push them through. 

Take your hot glue, and apply a thin layer around your pot. I recommend applying the glue, as you apply the rope. This way the glue will not have time to harden if applied in advance. 

Just work your way around with the hot glue and rope. Once you reach the end, take your scissors, and remove any extra rope. 


All that is left is to take your bumble bee buttons and add those to your floral. Just apply a small amount of hot glue on the back of each button, and add them.  I ended up using only two of my Bumble Bee buttons. I added one to each of my clay pots.


You're all done with your Spring floral clay pot design. I hope that you have enjoyed this DIY project. Be sure to let me know if you create your very own design. 

I'll see you soon!

You might also like


When clicked you will be redirected to my other blog

Pin/Save/Share


Comments

  1. Absolutely adorable. I love the detail of the little bee. Thans for sharing at #omhgww. See you next week. Pinned & tweeted.

    ReplyDelete
  2. So sweet, what a pretty idea. Thank you so much for joining us at Handmade Monday :-)

    ReplyDelete
  3. So pretty, love 'em!! Thanks so much for linking up at the Unlimited Link Party 73. Pinned.

    ReplyDelete
    Replies
    1. Dee, thank you so much for stopping by, and for also pinning this craft. =)

      Delete
  4. CONGRATS Stephanie! Your post is FEATURED at the Unlimited Link Party 74!

    ReplyDelete
  5. The bees are the perfect touch Stephanie! I love working with terra cotta pots, they are so versatile, these turned out too cute.

    ReplyDelete
    Replies
    1. Thank you so much. I'm happy you enjoyed the little bees. 🐝

      Delete

Post a Comment

Thank you so much for taking the time to leave a comment. Your comments brighten my day. I hope that you know that it is appreciated. I do my best to respond to every comment. If you have a question, please feel free and ask away!

Popular posts from this blog

How to Turn Jars into Festive Holiday Organizers

 Hello everyone! I'm so glad you decided to join me today. I'm excited to share one of my favorite upcycling projects with you. I love giving new life to glass jars, plastic containers, and anything else that can be reused for storage. This project is a fantastic way to repurpose these items for organizing craft supplies or even holiday treats, like wrapped candies and more! Today, we're going to create simple upcycled storage jars. I promise you'll love this project, and these jars also make great gifts! Let's begin building your beautifully decorated holiday storage jars if ready. Video tutorial **Materials Needed:** - A plastic or glass container/jar with a lid   - Mod Podge   - Optional: Epsom salt   - Decorative tissue paper   - Decorations (I'm using the following items):     - Two mini faux gold Christmas trees     - A mini black holiday truck     - Two mini metal white stars     - Faux foliage   - Acrylic paint (I will be using white and black)   - Paint

DIY $8 Holiday Wood Risers. Build And Decorate

Learn how to create stylish and affordable holiday wood risers for just $8. This DIY project will guide you through the process of building and decorating these festive and versatile decor pieces. Get ready to add a touch of charm and elevate your holiday decorations. Hello everyone! I hope you are all doing well. I am excited to share with you another simple DIY project that you can try at home. This project is very easy and affordable, and I only spent around $8 to build my wooden risers. So if you're ready, let's get started and create something beautiful! Video tutorial Be sure to check out the video tutorial.  Material list  Two 6.5'' wood circles One bag of wooden doll heads (These are used for the legs) You will need 8.  Gold wire (Optional) White paint, and black paint Adhesive (I used E6000 for gluing the legs onto the wood circles) Hot glue (This will be used for attaching the gold wire) Wire cutters/scissors (Depending on how thick your wire is) Paint brushes

Decoupaged Glass Jar Candle Holders with Faux Leaves and Gold Wire

  Learn how to create beautiful decoupaged glass jar candle holders using leaves and gold wire. This DIY project is a perfect way to upcycle old glass jars and create unique candle holders for your home decor.  I hope you're all doing well. The weather has cooled down and we're enjoying the change. I'd like to share a quick upcycling decoupage project with you all today.  I had some extra glass yogurt jars and bought two taper candle holders from Target's dollar section. I wasn't sure what to do with them at first. In today's project, I will show you how to decorate small glass jars using faux fall leaves and gold wire. Video tutorial Materials Needed: - Two taper candle holders - A paintbrush - Mod Podge - Faux fall leaves or a decorative napkin - Hot glue - Two battery-operated tealight candles - Gold wire Applying Mod Podge and faux leaves to glass jars To start with, grab a paintbrush and use it to apply Mod Podge on your glass jar. Apply a small amount of M

DIY Dollar Tree Christmas Photo Clip Memo Display

Transform a Dollar Tree mini photo clip into a delightful Christmas memo display with this easy DIY project. It adds a festive touch to your holiday decor while providing a charming way to showcase memories and reminders. Using simple materials, you can create a beautiful display perfect for your home, office, or as a thoughtful gift. This project is ideal for anyone wanting to add a personalized aspect to their Christmas celebrations. Get creative this holiday season with this budget-friendly craft idea! Video tutorial Materials Needed - One mini clip photo frame - Acrylic paint (green and white) - Paintbrush - Glue (hot glue recommended) - Twine - Assorted Christmas decorations (I used mini Christmas trees) - Scissors - Ribbon Remove the Bow    Start by removing the bow from the photo clip frame. It should come off easily since it is attached with hot glue. If it doesn't, use a craft knife to carefully detach it, ensuring not to damage the bow as you will need it later for this p

Target Wood Sleigh Upgrade

Transform your Target wood sleigh into a stunning Christmas centerpiece with this easy DIY upgrade. Get step-by-step instructions and ideas to spruce up your holiday decor. Video tutorial  Hi everyone! I'm so excited to share this simple decorating craft with you. I recently took a trip to one of my local Target stores, and I found this wood sleigh in the Dollar spot. I was pretty excited because I knew I could upgrade the look of this sleigh with just a few materials. Like most of my crafts, I use just a few materials when creating my crafts.  If you're ready let's begin and upgrade this wood sleigh. Materials needed for this craft One Wood Sleigh (Target dollar spot) Wooden Stars  (Joann's Craft Store) White paint Red paint Scissors Hot glue Christmas greenery  (Joann's Craft Store) Twine Optional - Mini lights, Wrapped gifts, Christmas Vinyl Sticker This craft was around $12 Start by applying some white paint to your sleigh. When applying the paint to your sleigh

Easy Dollar Tree Christmas Wooden Tree Decorations

  Create festive and budget-friendly Christmas wooden tree decorations with these easy DIY ideas using supplies from Dollar Tree. Get inspired to add personalized touches to your holiday decor without breaking the bank. Hello everyone! I hope all is well. Today we got a little snow over here in Colorado. How's the weather where you live? Today I'm sharing my latest creation. I created these decorative Christmas trees using the wood ones from Dollar Tree.  Video tutorial Here is a list of materials you will need to decorate your two wooden Christmas trees: Two wooden Christmas trees were purchased at Dollar Tree Two sheets of decorative craft paper Twine Mod Podge Faux craft gems and pearls Scissors Hot glue One paintbrush Acrylic paint Marker or pencil for tracing Start by taking your pencil or marker and tracing out your Christmas tree. Flip your paper over set your tree over the paper and trace it out. Once you have traced out your tree, use your scissors to cut out your trac

Christmas Book Stack Decoration

Create a festive Christmas book stack decoration using wood. This DIY project will add a touch of holiday charm to your home. Find step-by-step instructions and inspiration here. Hello, and welcome! I've decided to start working on some of my Christmas crafts, and since I've had some wonderful feedback on my other wooden stacked book craft, (If you would like to check that craft out, the link is below).  DIY Stacked Wood Books I thought I would work on a Christmas wood book stack craft. If you're ready, let's dive right in, and create your very own Christmas wood-stacked books creation. Video tutorial Materials needed -Dollar Tree Wood Crate -Red bells -Twine -Scissors -Paint -Paint Brush -Hot glue -Gold letters (stickers) -Mini wreath -Gold flowers Creating your books Start by applying paint to your wooden box. The colors I went with were red and green. I wanted green in the middle, and red on the top, and bottom. Since this box has two openings on the side, don't

DIY Winter Wonderland Reusing Tea Tin Container

Have you ever wondered what to do with those tea tin containers once you’ve finished using them? While going through my tea storage, I came across one nearly empty tin. After finishing it off, I decided to create a beautiful winter scene using the tin. I absolutely love making these little winter displays by repurposing tin containers. If you’d like to create one yourself, I would love for you to follow along! Video tutorial Materials Needed: - Tin container - Acrylic paint - Sanding block (optional) - Paintbrush - Foam block - Decorative tissue paper - Mod Podge - Winter decorations (I’m using faux snow cotton, a winter tree, and a wooden house) - Hot glue - Optional: stamp and ink, faux pearl stickers Prepare the Tin Container: Start by applying paint to the tin container. I chose to use my sanding block beforehand to prepare the surface for paint.   Once sanded, apply your acrylic paint. Make sure to allow the paint to dry completely. I needed three coats for full coverage. Cut the