
Easy Dollar Tree Frog Garden Decoration Using One Clay Pot

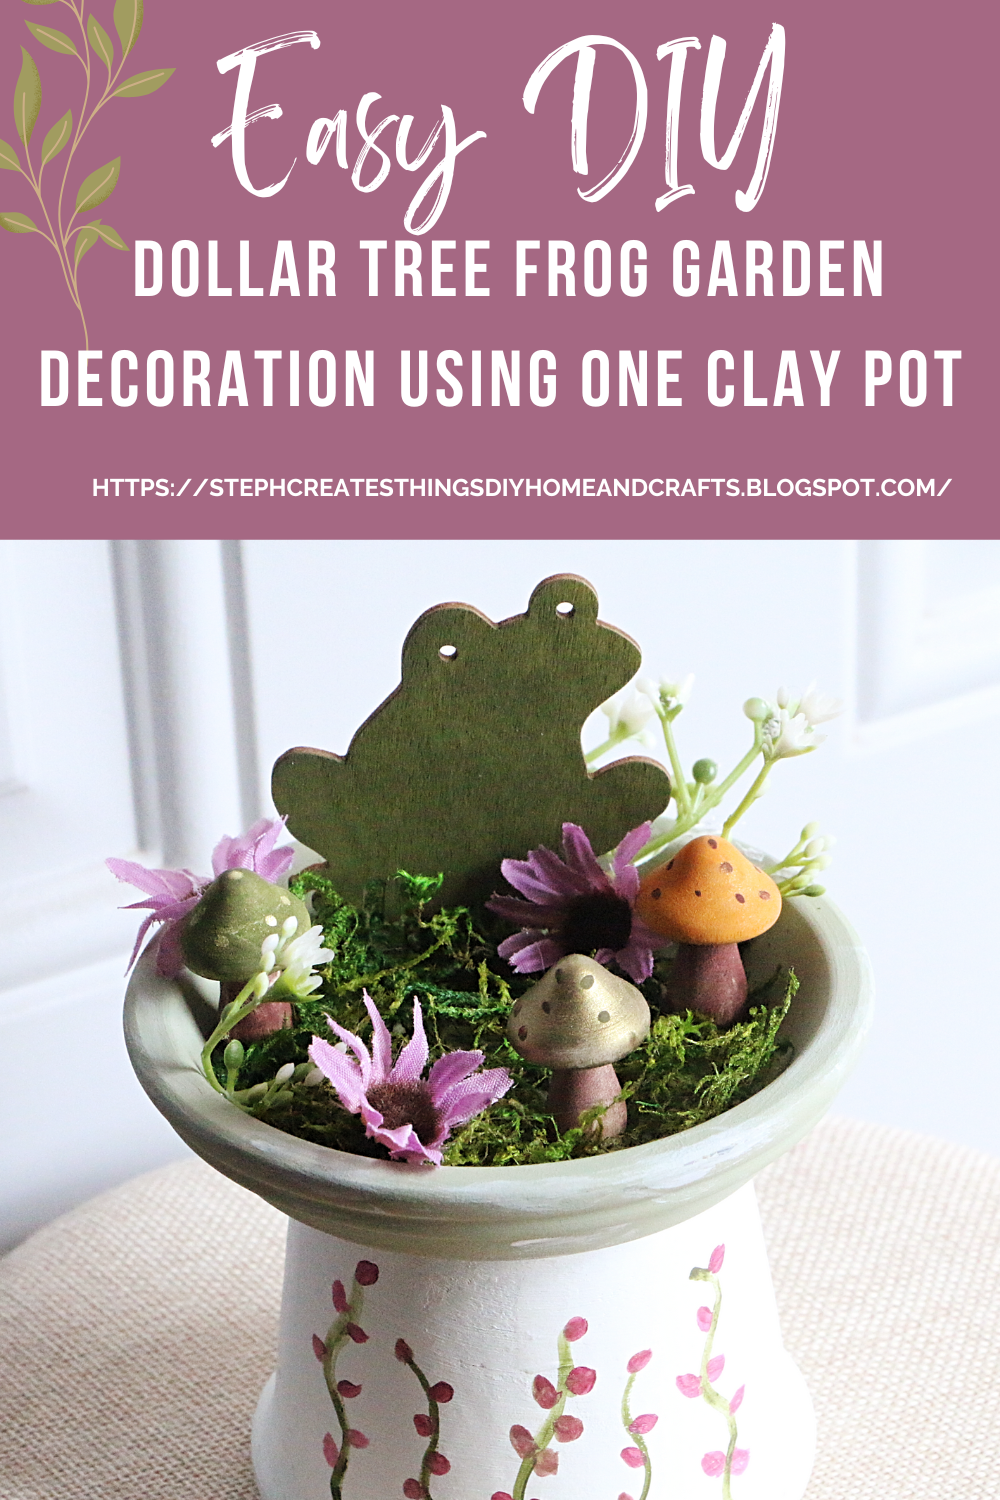
There's something truly magical about transforming everyday items into enchanting décor, and today, we're bringing a touch of whimsy to your garden! Using a simple clay pot, a charming wooden frog decoration, vibrant faux flowers, and mini mushrooms from Dollar Tree, you can craft an enchanted frog garden decoration that feels like it belongs in a fairy tale.


Video tutorial


What You'll Need:

  • 1 Clay pot (any size)

  • 1 Wooden frog decoration (available at Dollar Tree)

  • Faux flowers in assorted colors

  • Mini mushrooms (available at Dollar Tree)

  • Acrylic paints & brushes

  • Hot glue gun & glue sticks

  • Moss or faux greenery (optional)

1. Prep Your Clay Pot

I repurposed a clay pot and saucer from previous craft endeavors for this project. The saucer was pre-painted, with craft moss attached for texture. If you're starting fresh, use adhesive to secure the saucer to the pot's base. Once flipped upside down, the saucer sits on top while the pot’s opening faces downward. Paint both pieces, and once they’re dry, add craft moss to the saucer for a natural feel.

2. Paint the Wooden Frog

I used floral cutters to remove the wooden stick attached to the frog, as I wanted only the frog itself. Using a small sponge brush, I applied dark green paint to give the frog a lively and natural look.


3. Decorate the Mini Mushrooms

I incorporated three wooden mushrooms into the design, painting them in warm, earthy tones: orange, brown, green, and bronze for a woodland-inspired effect.


4. Add Decorative Details

I painted delicate green vines on the pot to enhance the garden aesthetic and accented them with small purple flower blossoms. Then, I attached the frog, mushrooms, and artificial flowers to the saucer using hot glue to ensure they stay securely in place.


Final Thoughts

Your frog garden decoration is ready to shine! Display it in a cozy corner, a tiered tray, or as a charming accent on your mantel. This delightful DIY is affordable and simple to create and brimming with charm!


Pin Share Save


Comments

  1. This is so adorable! I love the frog and the tiny mushrooms!

    ReplyDelete
    Replies
    1. Susan, thank you. I'm glad you enjoyed it. 😊

      Delete
  2. Adorable! I love seeing what you come up with from DT. Our home away from home, right? Featuring when my link party opens.

    ReplyDelete
    Replies
    1. Carol, thank you! I enjoy sharing at your party. :) Have a great weekend.

      Delete
  3. This is so clever and fun! You did a lovely job on the flowers. Thank you for sharing this with us at the Will Blog for Comments #61 linkup! Looking forward to see what you'll share next week at #62. Have a great week.

    ReplyDelete
    Replies
    1. Jennifer, thank you! Happy that you enjoyed this craft. :)

      Delete
  4. This is so cute! You are so creative.
    Thanks bunches for sharing with Sweet Tea & Friends this month my friend.

    ReplyDelete
  5. This little mini forest in a plant pot is positively enchanting! Way to work simple dollar store items to elevate them to this! Adorable.

    ReplyDelete
    Replies
    1. Donna, thank you! I'm so glad that you enjoyed it. 😊

      Delete

Post a Comment

I love hearing from you! Your comments and creative ideas truly brighten my day. I do my best to respond to everyone, so if you have a question or just want to say hello, please leave a note below. To keep our community a positive and inspiring space, spam or off-topic comments will be removed. Happy crafting!

Popular posts from this blog

Easy Breezy DIY: How To Make Summer Coasters

Happy Summer! I'm excited to share this simple DIY craft with you. I found some cute summery napkins at my local Dollar Tree and knew I wanted to create another summer craft, but I wasn't sure what I wanted to create. Today I will show you how to create these simple summer coasters that are perfect for the season. Video tutorial Easy Breezy DIY: How To Make Summer Coasters Materials: - Round wood circles - Napkins - Mod Podge (I'm using the dishwasher-safe one) - Acrylic paint - Paintbrush - One cork sheet (I'm using the adhesive cork sheet from Dollar Tree) Begin by taking your adhesive cork sheet and flipping it over so that the adhesive backing is facing up. Next, take a pencil and start to trace each of your round wooden circles. Then, take your scissors and cut out each of the traced circles. You can use a craft knife to make any necessary adjustments.  After that, take your circles and begin to remove the back of each of the cork circles exposing the sticky backin...

DIY Budget-Friendly Succulent Plant Hanger Design

 Hi everyone! I hope that you are doing well. Today I am sharing an easy DIY craft that is budget-friendly, and easy to create. A material list will be provided, along with step-by-step instructions on creating your very own. Be sure to check out the video tutorial below. Video tutorial Materials One 4x4 framed art Acrylic paint Faux succulents Hot glue and any other heavy-duty adhesive Twine Scissors  Floral cutters Paintbrush You can find most of these materials at your local Dollar Tree This project costs under five dollars If your frame comes with beads as shown in the picture above, take your scissors and remove the beads. You will actually reuse the beads later on in this craft. Take the inner section of your out and set it aside. Next, take your acrylic paint and paintbrush, and begin to apply your paint to your frame. I applied three coats of my paint to my frame. Next, use your paintbrush you apply paint over the inner section of the frame we removed earlier. I applie...

Eco-Friendly Crafting: How to Make a Beautiful Flower Holder from Cardboard

Discover how to create a beautiful flower holder from cardboard in an eco-friendly way. Hello everyone, today I'm excited to share an eco-friendly crafting project with you.  While cleaning up my wrapping paper collection, I noticed the paper roll had run out, leaving only the cardboard paper center. Instead of throwing it away, it would be a great opportunity to reuse the paper and create something beautiful.  Video tutorial Materials - Cardboard paper (preferably thicker wrapping paper) - Faux flowers (such as tulips and greenery) - Two fabric hearts and butterfly stickers - Two craft clothespins - Hot glue or glue stick - Twine -Hole puncher - Optional faux flexible flowers to wrap around the twine. Step one: Preparing the paper To get started, cut a piece of cardboard paper. Make sure to choose a size that will fit the flowers you plan to use later on in the craft. The size of the section should be large enough to accommodate the flowers in the center of the sleeve. For my...

🎄🌟Easy Christmas Gift Wrapping Ideas

Get creative this holiday season with these easy Christmas gift-wrapping ideas. From simple and elegant to fun and festive, find inspiration for wrapping your gifts in style. I’m going to share some quick gift-wrapping decorating ideas with all of you. I grabbed a few empty boxes and my red and brown gift paper. Although I’m not a professional when it comes to wrapping paper, I thought I would share some decoration ideas with all of you. I had all of my materials on hand, but a lot of these are fairly cheap when purchased at a craft store. Let’s decorate! Check out the video tutorial   Materials Wrapping paper Mini garland Acrylic paint Paintbrush Decorative gems Twine or craft rope Decorative tape Tape Hot glue Scissors Wooden Christmas mini decorations (such as a mini wood wreath and an ornament) Gift wrap decoration number one For the first design, I am using brown wrapping paper, tape, red paint, green paint, white paint, two wooden Christmas decorations, hot glue, and twine to...

Simple DIY Autumn Floral And Bead Wreath

  Create a beautiful autumn wreath with this simple DIY tutorial. Learn how to incorporate floral elements and beads to make a stunning seasonal decoration for your home. Hello! I am delighted to have you here with me today. For this DIY project, I have a simple idea that I think you'll love. We will be creating an Autumn floral and bead wreath using just a few materials. If you're viewing this project, I'm sure you love Fall as much as I do. It is my favorite season, and I have been busy creating new crafts to share with all of you. Video tutorial How to create an Autumn floral and bead wreath Materials One wreath  $4.99  (I'm using a grapevine wreath, and I purchased it at Michael's. It is a 14'' wreath) Faux fall floral  (My flowers were purchased at Michael's, and it was actually a stem bundle)  $9.99 , but they are having a sale. I paid $4.99 Beads  $1.60  (Purchased at Michael's) Stretch cord  $2.88  (Purchased at Walmart) You will also...

Search This Blog

All content Copyright

Copyright 2021-2025 I ask that you do not take or use my photos or words without permission. If you have any questions, please feel free and contact me. Also, for more information on this blog, check out the disclosure policy tab above. Thank you