
Easy Dollar Tree Frog Garden Decoration Using One Clay Pot

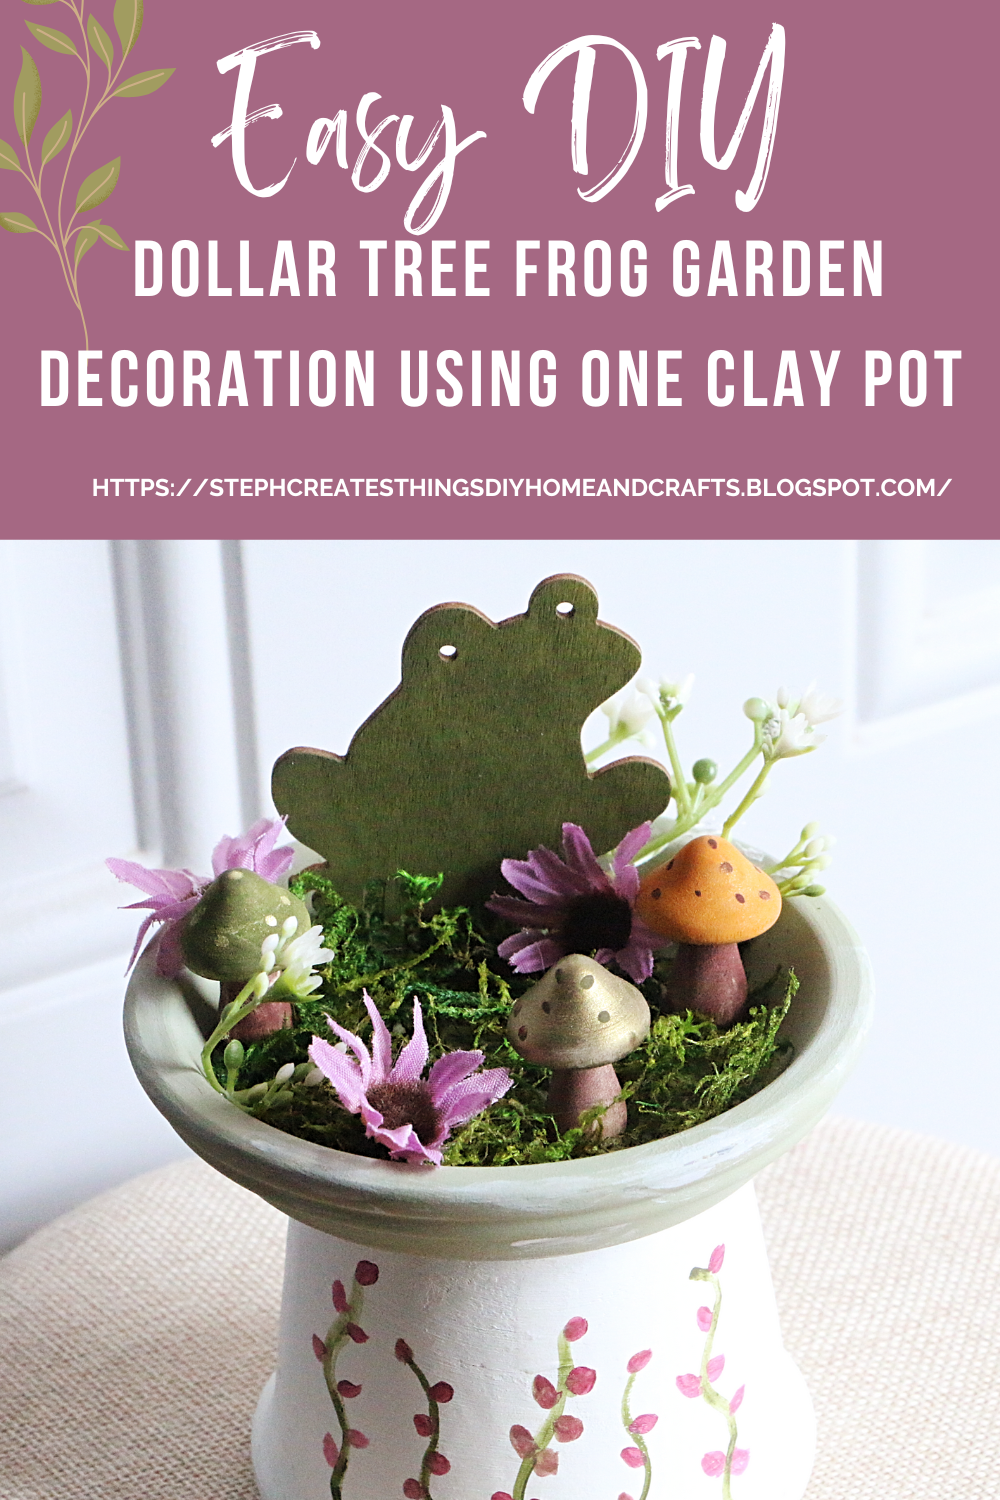
There's something truly magical about transforming everyday items into enchanting décor, and today, we're bringing a touch of whimsy to your garden! Using a simple clay pot, a charming wooden frog decoration, vibrant faux flowers, and mini mushrooms from Dollar Tree, you can craft an enchanted frog garden decoration that feels like it belongs in a fairy tale.


Video tutorial


What You'll Need:

  • 1 Clay pot (any size)

  • 1 Wooden frog decoration (available at Dollar Tree)

  • Faux flowers in assorted colors

  • Mini mushrooms (available at Dollar Tree)

  • Acrylic paints & brushes

  • Hot glue gun & glue sticks

  • Moss or faux greenery (optional)

1. Prep Your Clay Pot

I repurposed a clay pot and saucer from previous craft endeavors for this project. The saucer was pre-painted, with craft moss attached for texture. If you're starting fresh, use adhesive to secure the saucer to the pot's base. Once flipped upside down, the saucer sits on top while the pot’s opening faces downward. Paint both pieces, and once they’re dry, add craft moss to the saucer for a natural feel.

2. Paint the Wooden Frog

I used floral cutters to remove the wooden stick attached to the frog, as I wanted only the frog itself. Using a small sponge brush, I applied dark green paint to give the frog a lively and natural look.


3. Decorate the Mini Mushrooms

I incorporated three wooden mushrooms into the design, painting them in warm, earthy tones: orange, brown, green, and bronze for a woodland-inspired effect.


4. Add Decorative Details

I painted delicate green vines on the pot to enhance the garden aesthetic and accented them with small purple flower blossoms. Then, I attached the frog, mushrooms, and artificial flowers to the saucer using hot glue to ensure they stay securely in place.


Final Thoughts

Your frog garden decoration is ready to shine! Display it in a cozy corner, a tiered tray, or as a charming accent on your mantel. This delightful DIY is affordable and simple to create and brimming with charm!



Pin Share Save


Comments

  1. This is so adorable! I love the frog and the tiny mushrooms!

    ReplyDelete
    Replies
    1. Susan, thank you. I'm glad you enjoyed it. 😊

      Delete
  2. Adorable! I love seeing what you come up with from DT. Our home away from home, right? Featuring when my link party opens.

    ReplyDelete
    Replies
    1. Carol, thank you! I enjoy sharing at your party. :) Have a great weekend.

      Delete
  3. This is so clever and fun! You did a lovely job on the flowers. Thank you for sharing this with us at the Will Blog for Comments #61 linkup! Looking forward to see what you'll share next week at #62. Have a great week.

    ReplyDelete
    Replies
    1. Jennifer, thank you! Happy that you enjoyed this craft. :)

      Delete
  4. This is so cute! You are so creative.
    Thanks bunches for sharing with Sweet Tea & Friends this month my friend.

    ReplyDelete
  5. This little mini forest in a plant pot is positively enchanting! Way to work simple dollar store items to elevate them to this! Adorable.

    ReplyDelete
    Replies
    1. Donna, thank you! I'm so glad that you enjoyed it. 😊

      Delete

Post a Comment

I love hearing from you! Your comments and creative ideas truly brighten my day. I do my best to respond to everyone, so if you have a question or just want to say hello, please leave a note below. To keep our community a positive and inspiring space, spam or off-topic comments will be removed. Happy crafting!

Popular posts from this blog

DIY Magnetic Faux Succulent & Floral Lids — Upcycled Fridge Accent

I created these magnetic faux succulent and floral lids using some metal jar tops that I had saved. With a little creativity, they transformed into charming, lightweight accents that add a pop of color and personality to the fridge. Each lid features its own tiny arrangement—part succulent and part floral—all crafted with intention and charm. This project is easy and budget-friendly, allowing you to use items you already have while adding a lovely touch to your home. Quick Video Tutorial Materials Metal jar lids (one large, one small) Letter beads (to spell LOVE ) Faux moss Faux succulents Faux vines Faux flowers (pink, green foliage, white accents) Hot glue gun and glue sticks Magnets I began with the larger metal lid, attaching small letter beads to spell out LOVE . This created a meaningful little focal point and set the tone for the rest of the design. Next, I glued a layer of faux moss along the bottom of the lid. The moss added softness and helped anchor the colorful...

Transforming Oui Yogurt Jars: Creating a Window Hanging Flower Display

Transforming Oui Yogurt jars into a hanging flower display is a simple way to add charm to any space. In this post, you'll learn how to customize and hang these jars with flowers. Get ready to create a beautiful, eco-friendly display that brightens up your home or garden. Whether you're new to upcycling or just itching for a quick creative fix, this easy and budget-friendly project will brighten up any window in your home with elegance and charm. Video tutorial What You’ll Need: 3 Oui yogurt jars (or any small glass jars you have on hand) Transfer stickers of your choice — I used cold transfer stickers I snagged on sale at my local Michaels Artificial flowers Scissors Floral cutters Twine Spring tension rod (or clear sturdy command hooks) 1. Prep Your Jars and Add a Personal Touch Begin with clean, dry jars. These little glass containers serve as the perfect blank canvas. Select your transfer stickers—I opted for a floral theme because who doesn’t love more blooms? I trimmed th...

Easy DIY Wood Pumpkin Display: Floral Fall Decor with a Decoupage Twist

  Create a stunning fall-inspired display with this budget-friendly DIY craft. Learn how to decoupage wood pumpkins and incorporate floral accents for a charming and seasonal decoration. Video tutorial Hello everyone! I hope you're having a wonderful autumn season so far. How's the weather in your area? Today, it's breezy outside, with a high of 72 degrees, and the sun is shining. I feel grateful to be able to enjoy such a beautiful day, and I hope you do too.   I'd like to share a fun crafting project with you. We'll be decorating wooden pumpkin ornaments from Dollar Tree using decoupage and wooden tumbling blocks to create a pumpkin floral design.  Here are the materials you'll need: - Two wooden pumpkin ornaments (I bought mine from Dollar Tree) - Six wooden tumbling blocks (also from Dollar Tree, but other craft stores may carry them) - Adhesive - Faux floral and greenery - Acrylic paint (I'm using brown) - Foam block - Craft knife - Decorative fall napk...

Fall Floral Display Using Glass Yogurt Jars

 Hi everyone. I hope that you are all doing well. I am patiently waiting for Fall to arrive. Fall is my favorite season of them all. I love the golden leaves, hot apple cider by the fire pit, sitting out in the evenings roasting marshmallows. It is simply the best for me. Do you have a favorite season? What do you enjoy about it?  Today I am sharing a quick upcycle craft. I decided to use my glass Oui yogurt jars. I love these little jars and what a perfect way to reuse them. I will show you how to decorate these jars using mod podge, and acrylic paint. We will add faux flowers to each glass jar as well. Video tutorial Materials  Three small glass jars I'm reusing my Oui glass yogurt jars Twine Acrylic paint Paintbrushes Mod podge Decorative napkin Faux floral and foliage Decorative tape/Washi tape Scissors Applying paint to glass yogurt jars Begin by applying your paint to two of your glass jars. Each jar needed around three coats of paint.  I used acrylic chalk pai...

Three Easy Candle Jar Ideas for Cozy Porch Décor

I've always thought there was something so comforting about soft candlelight, especially when it’s paired with a few simple faux florals and greenery. Today, I’m sharing a sweet little project in which I decorated a glass jar in three different ways. Each jar has its own personality, glow, and gentle charm. These pieces are perfect for porch décor, but they work beautifully anywhere you want to add a touch of warmth. I love projects like this—simple materials, quiet moments, and a finished piece that feels peaceful and handmade. Video tutorial  Materials I Used Clear glass jar Battery‑operated candle Faux string of pearls Faux succulents Faux vine Bright pink faux flowers (tops removed from stems) Yellow faux flowers Faux foliage Optional: woven mat or tray for display Jar 1: Succulents & String of Pearls For the first jar, I wanted something earthy and calming. I placed a faux string of pearls inside the jar and let it settle naturally. Around it, I tucked in a few faux succul...

Search This Blog

All content Copyright

Copyright 2021-2026 I ask that you do not take or use my photos or words without permission. If you have any questions, please feel free and contact me. Also, for more information on this blog, check out the disclosure policy tab above. Thank you