
Cozy Corner Kitchen Tray Styling with Mini Lamp Inspiration

Hello everyone! Join me as I style a cozy corner in my kitchen using a tray in various ways. I recently purchased a mini lamp for the kitchen and wanted to create a low-light area with some decorations. I took my wooden tray and arranged a few decorative items on it. I can't wait to share my ideas with you. Let’s work together to create a warm and inviting kitchen corner!


Video tutorial


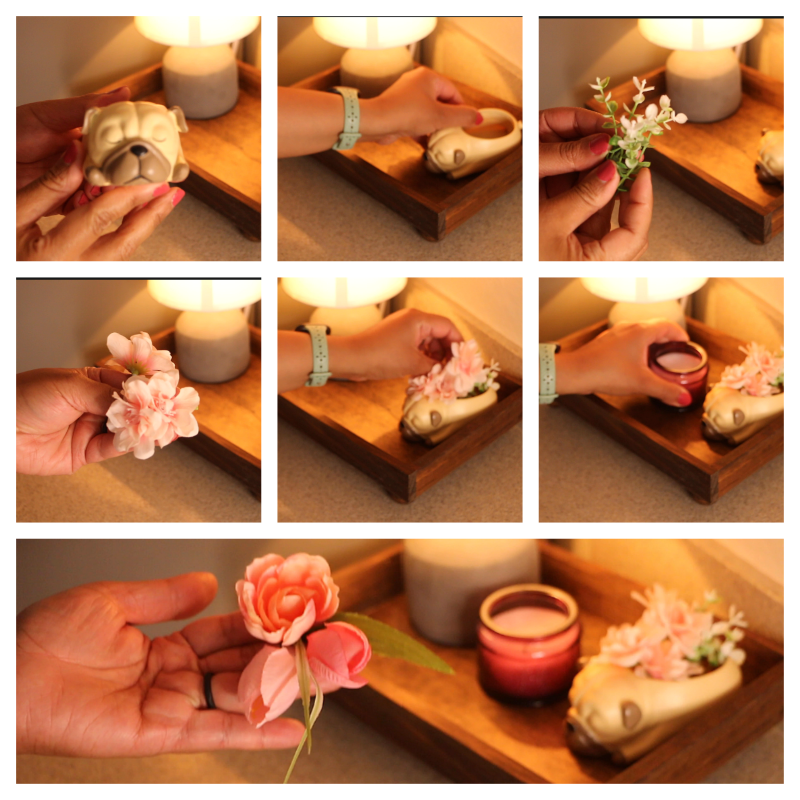
I prefer to keep my tray styling simple. For my first tray design, I wanted to incorporate my pug planter. I used pink faux flowers and various types of foliage to enhance the planter. I placed the planter in one corner of the tray and arranged the foliage around it before adding the pink flowers into the planter. Additionally, I included my purple textured candle jar. To complete the design, I arranged a selection of pink faux flowers directly on the tray near the lamp.


For my second cozy tray design, I decided to include a clay pot decoration filled with craft moss. This is one of my favorite designs because it allows for the addition of various flowers and accessories. I positioned the clay pot in the corner of the tray and placed artificial foliage on top of the moss, adding a lovebird embellishment to the center of the foliage. I also enjoy reusing glass jars of different styles, shapes, and sizes. To complete the tray, I used a smaller glass jar to hold my artificial wildflowers.
For my second cozy tray design, I decided to incorporate a clay pot decoration filled with craft moss. This is one of my favorites because I can decorate it with various flowers and additional accessories. I positioned the pot in the corner of the tray and arranged my artificial foliage on top of the moss, adding a lovebird embellishment at the center of the foliage. I love reusing glass jars of different styles, shapes, and sizes. To complete the tray, I used a smaller glass jar to hold my artificial wildflowers.


For my third tray, I aimed for a simple design. I enjoy decorating with artificial plants, so I chose to include my faux eucalyptus potted plant. I kept the tray minimalist, featuring just the lamp, the plant, and a candle.


For my fourth tray, I decided to add my mini pot and fill it with faux succulent flowers. To finish off the tray, I included my succulent candle display. Again, something simple but pretty.


For the fifth tray, I wanted to use a few of my leaf branches. Although my branches were already placed in a jar, I decided to showcase them in my textured pot, as I think the peach color complements the dark wood of the tray. I placed the branches into the textured pot before adding them to the tray. I love reusing items I have at home, so I added the candle jar back to the tray to complete the look.


For my final tray, I reused most of the items from the first tray: the pug planter, artificial flowers, and the candle. The only new addition is a mini magnet that reads, "With you, I am home," which I placed just in front of the lamp.


I love having a cozy corner in my kitchen. In the evenings, I turn on my lamp and enjoy a nice cup of herbal tea. The soft lighting creates a relaxing atmosphere. You can also display your favorite cookbook to enhance the space. I hope you enjoyed my tutorial on creating a cozy corner. Thank you for visiting, and I look forward to seeing you again soon!
 
Pin Share Save


Comments

  1. "Cozy" is definitely the right word for it. It looks so warm and inviting.

    ReplyDelete
    Replies
    1. Amy, thank you so much. Adding this corner has been nice to have in the kitchen.

      Delete
  2. Ohhhhhh, I need to do this! This is beautiful, and so versatile. I have a lovely wooden tray that was gifted to me, and I haven't ever figured out exactly what to do with it. This will be perfect! Thank you for sharing this post with all of us at the Will Blog for Comments #60 linkup! Looking forward to seeing what you'll share at #61, too--it opens next week. Hope your week is a great one. :)

    ReplyDelete
    Replies
    1. Jennifer, thank you! Yes, those wooden trays are perfect for creating a cozy corner. I knew, after buying my mini lamp, that I needed to do something with my wooden tray. Give it a try! Thank you for visiting. And as always thank you for your wonderful link party.

      Delete
  3. All nice and pretty ideas. My fave would be the tray with the succulents!

    ReplyDelete
    Replies
    1. Thank you! That's one of my favorites, as well.

      Delete
  4. Very pretty. At this time of year it's so nice to have a little light in a dark corner.

    ReplyDelete
  5. Oh Wow these are awesome. Love these.
    Thanks so much for sharing with Sweet Tea & Friends this month dear friend.

    ReplyDelete
  6. Happy May Steph! Just popping back over to let you know I'll be featuring your post at our Sweet Tea & Friend's May Link Up.
    {{Hugs}}

    ReplyDelete

Post a Comment

I love hearing from you! Your comments and creative ideas truly brighten my day. I do my best to respond to everyone, so if you have a question or just want to say hello, please leave a note below. To keep our community a positive and inspiring space, spam or off-topic comments will be removed. Happy crafting!

Popular posts from this blog

DIY Budget-Friendly Succulent Plant Hanger Design

 Hi everyone! I hope that you are doing well. Today I am sharing an easy DIY craft that is budget-friendly, and easy to create. A material list will be provided, along with step-by-step instructions on creating your very own. Be sure to check out the video tutorial below. Video tutorial Materials One 4x4 framed art Acrylic paint Faux succulents Hot glue and any other heavy-duty adhesive Twine Scissors  Floral cutters Paintbrush You can find most of these materials at your local Dollar Tree This project costs under five dollars If your frame comes with beads as shown in the picture above, take your scissors and remove the beads. You will actually reuse the beads later on in this craft. Take the inner section of your out and set it aside. Next, take your acrylic paint and paintbrush, and begin to apply your paint to your frame. I applied three coats of my paint to my frame. Next, use your paintbrush you apply paint over the inner section of the frame we removed earlier. I applie...

Summer Craft: DIY Paper Plate Watermelon Flower Hanger

Hey everyone! I'm excited to show you a fun and easy craft. Today, we will be making a summer watermelon floral hanging design using a paper plate. This DIY project is easy to create and fun to welcome the summer season. You'll make this watermelon floral hanging design to display your artificial flowers creatively. It's also a great way to use any extra paper plates you may have lying around and aren't sure what to do with. You may have extras from a birthday party or a BBQ. If you're ready, let's get started creating your floral hanging design! Video tutorial Summer Craft: DIY Paper Plate Watermelon Flower Hanger Materials: - Paintbrush - Artificial flowers - Paper plate (any size you prefer) - String or craft twine - Scissors - Hot glue Optional-Hole Puncher Start by cutting the paper plate in half. Use a darker green paint to cover the bottom area of the plate. Let it dry between each coat of paint. Continue applying paint to each area of the plate. Then, ad...

Easy DIY Summer Serving Tray

Hello everyone! How's everyone doing? I hope all is well. Today I am bringing you a quick and easy design. We're going to create a summer serving tray. You could also use this tray as a decor element as well. I am reusing a wooden crate I purchased a few years back for $3 at my local Target store. I figured it would be perfect to repaint and add a few other embellishments. If you're ready, let's create a cute summer tray. Video tutorial Materials One wooden crate I am reusing an old wooden crate I purchased at Target for $3.  Acrylic paint Optional mod podge-If you decide to seal your paint One paintbrush Scissors Fruit stickers or other summer embellishments  I found a pack of clear fruit stickers at Dollar Tree One wooden summer word sign E6000 or hot glue Begin by applying your acrylic paint to your wooden tray. I am using multisurface acrylic paint for the main tray. Be sure to allow your tray to fully dry. Between each coat of paint, I used my blow dryer to help wi...

Upcycled Plastic Bowl Hanging Planter

  Hi everyone! I hope that you are doing well. I had a few microwavable noodle bowls that I washed out and put away. I took a few days to think about what I could create using these bowls. It finally came to me, and I decided I would take one of the plastic bowls, and upcycle it. We will take this plastic bowl, and create a hanging planter. I will take you through each step, and as always I will provide a video tutorial. If you're ready, create with me! Hanging planter video tutorial Materials One Plastic Bowl  I'm reusing a plastic noodle bowl One hole puncher Twine You will need four sections of twine, of the same length. River pebbles, or craft rocks  I purchased river pebbles at my local Dollar Tree. Medium size wood beads (optional) Paint I'm using Acrylic chalk paint. Color is called mineral.l Hot glue Faux succulents, and vines Craft foam blocks Paintbrush or sponge brush Scissors Floral snips Begin by taking your hole puncher, and punching out four holes in your ...

Decoupaged Glass Jar Candle Holders with Faux Leaves and Gold Wire

  Learn how to create beautiful decoupaged glass jar candle holders using leaves and gold wire. This DIY project is a perfect way to upcycle old glass jars and create unique candle holders for your home decor.  I hope you're all doing well. The weather has cooled down, and we're enjoying the change. I'd like to share a quick upcycling decoupage project with you all today.  I had some extra glass yogurt jars and bought two taper candle holders from Target's dollar section. I wasn't sure what to do with them at first. In today's project, I will show you how to decorate small glass jars using faux fall leaves and gold wire. Video tutorial Materials Needed: - Two taper candle holders - A paintbrush - Mod Podge - Faux fall leaves or a decorative napkin - Hot glue - Two battery-operated tealight candles - Gold wire Applying Mod Podge and faux leaves to glass jars To start with, grab a paintbrush and use it to apply Mod Podge on your glass jar. Apply a small amount of ...

Search This Blog

All content Copyright

Copyright 2021-2026 I ask that you do not take or use my photos or words without permission. If you have any questions, please feel free and contact me. Also, for more information on this blog, check out the disclosure policy tab above. Thank you