
Floral and Embellished Heart Wreath DIY

Hi everyone! Today, I'm excited to share a simple and quick decorating project that's perfect as we approach Valentine's Day next month. I will decorate my heart wreath and would love for you to join me in this fun hands-on craft. Below, you'll find each step along with a complete materials list.

Heart-shaped wreath with floral and greenery

Video tutorial Create a floral and  embellished wreath


Materials for floral heart wreath

Materials needed:

- One grapevine heart wreath (I'm using a 12-inch wreath)

- Wire

- Faux flowers and greenery

- Floral cutters or wire cutters

- Ribbon and embellishments (optional)


Greenery, heart wreath, wire, and floral cutters

Step 1: Adding the Greenery

I started by adding the greenery cut to one side of the wreath. I chose to use wire because it helps secure the floral in place. Using wire cutters or floral cutters, cut a few sections of wire. Make sure to cut the wire long enough to pull it through the branches, loop it around the greenery, and twist it off at the back.

Floral, floral cutters, and heart wreath

Step 2: Adding the Floral

Next, I repeated the same steps for adding the flowers. I used floral cutters to cut a few shorter sections of my faux flowers before attaching them to the wreath. Again, I used wire to twist around each flower section to secure them in place.

Ribbon and birdhouse embellishment

Step 3: Adding Ribbon and Embellishments

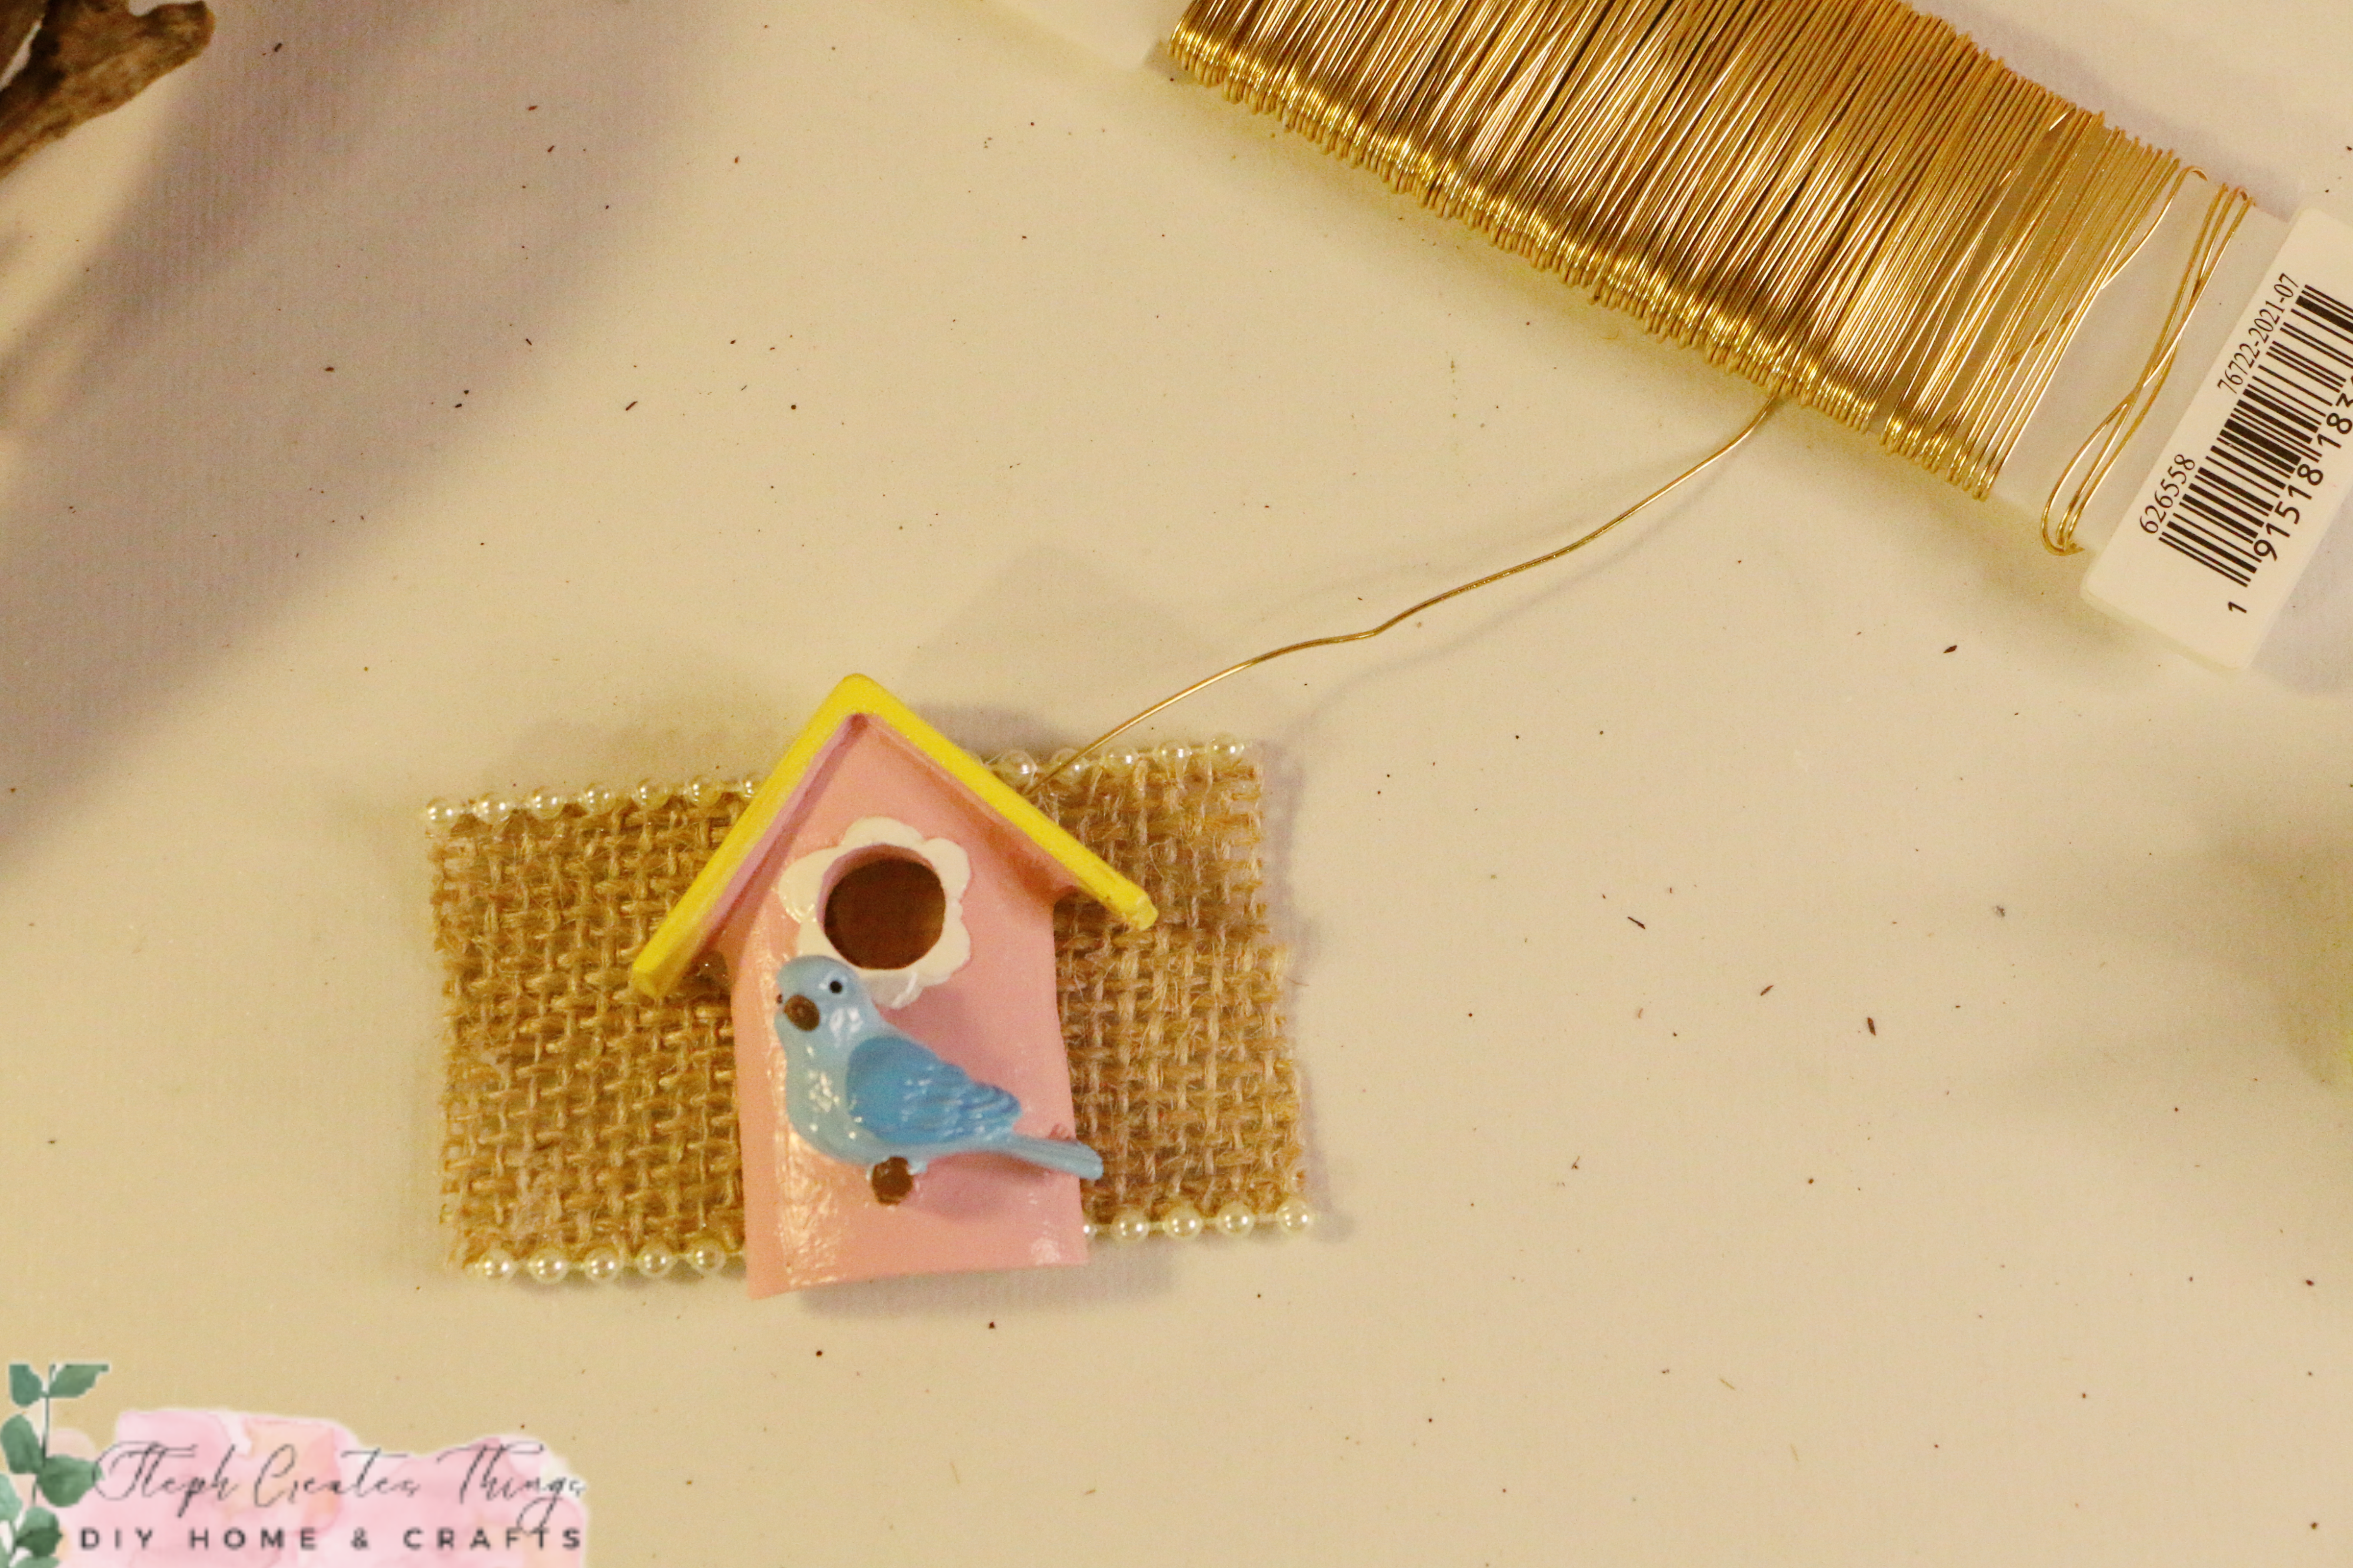
I had a piece of ribbon that I decided to reuse for this project. I wanted to easily add my birdhouse embellishment and remove it later when I redecorate my wreath. I used hot glue to attach the birdhouse to the ribbon section. After that, I took two pieces of wire that I had cut and inserted them at each end of the ribbon. This allowed me to twist the ends together at the back after adding the ribbon and birdhouse to the wreath.

Floral and embellished heart wreath

And that completes your floral and embellished heart wreath! I'm thrilled with how my heart wreath turned out using just a few materials. If you have a wreath sitting around, grab it and start decorating. It's simple, and it adds a beautiful touch to your Valentine's and even spring decor! Thank you for visiting and creating with me.

I look forward to seeing you soon!


Pinterest pin floral and embellished heart

Featured at Busy Monday 653

Comments

  1. I really love these colors, Steph. This turned out so beautifully. :) Visiting from The Crazy Little Lovebirds linkup.

    ReplyDelete
    Replies
    1. Jennifer, thank you! You are so kind, and I appreciate you visiting. :)

      Delete
  2. This is so pretty Stephanie! Also gives me spring vibes, which I'm really looking forward to. :) #MMBC

    ReplyDelete
    Replies
    1. Thank you! Yes, it can be displayed in spring as well. 😊

      Delete
  3. This is so, so pretty! What a lovely decoration for Valentine's Day or even spring.

    ReplyDelete
    Replies
    1. Kim, thank you! Yes, I love that it can be displayed in the springtime as well.

      Delete

Post a Comment

I love hearing from you! Your comments and creative ideas truly brighten my day. I do my best to respond to everyone, so if you have a question or just want to say hello, please leave a note below. To keep our community a positive and inspiring space, spam or off-topic comments will be removed. Happy crafting!

Popular posts from this blog

A Touch of Spring: Faux Rose & Wildflower Beaded Wreath Tutorial

Today I’m sharing a soft and delicate spring wreath that comes together beautifully with just a few simple supplies. I’m using a beaded wood wreath as my base, along with faux yellow roses, pink artificial wildflowers, and a bit of foliage to bring everything to life. This project is perfect if you’re looking to add a gentle pop of color and a touch of spring charm to your home. Video tutorial  Supplies You’ll Need Beaded wood wreath Faux yellow roses Pink artificial wildflowers Faux foliage Floral/wire cutters Craft wire Trim Your Florals I started by using my floral cutters to trim the stems of each flower. Make sure the stems are short enough to fit nicely against the wreath, but long enough to secure them with wire. Adjust the length to suit your design and the level of fullness you want in your wreath. I began by cutting my yellow roses first. Prepare Your Craft Wire and  Attach the Roses After I trimmed the roses, I cut small sections of craft wire. These will be u...

Fall Floral Display Using Glass Yogurt Jars

 Hi everyone. I hope that you are all doing well. I am patiently waiting for Fall to arrive. Fall is my favorite season of them all. I love the golden leaves, hot apple cider by the fire pit, sitting out in the evenings roasting marshmallows. It is simply the best for me. Do you have a favorite season? What do you enjoy about it?  Today I am sharing a quick upcycle craft. I decided to use my glass Oui yogurt jars. I love these little jars and what a perfect way to reuse them. I will show you how to decorate these jars using mod podge, and acrylic paint. We will add faux flowers to each glass jar as well. Video tutorial Materials  Three small glass jars I'm reusing my Oui glass yogurt jars Twine Acrylic paint Paintbrushes Mod podge Decorative napkin Faux floral and foliage Decorative tape/Washi tape Scissors Applying paint to glass yogurt jars Begin by applying your paint to two of your glass jars. Each jar needed around three coats of paint.  I used acrylic chalk pai...

DIY Faux Blossom Branch Tree

Are you looking to add some charm to your living space on a budget? Try making your own DIY Faux Blossom Branch Tree. In this tutorial, I will guide you through the process of creating your blossom branch tree. The best part is that this project requires just a few simple materials, and you can even repurpose a section of a tree branch. Alternatively, you can use a smaller section of a tree branch or one similar to the one I am using. So, if you're ready to start, come along and create your blossom branch tree with me. DIY Faux Blossom Branch Tree video tutorial Materials  Section of branches from a tree in my yard faux florals and leaves hot glue  A planter pot Floral cutters  A foam floral block, and optional rocks After inserting your tree branch into the foam block, you can add rocks on top. This will provide additional weight to your pot and prevent the tree branch from shifting or moving around. Cutting the flowers and leaves To create a beautiful blossom tree, foll...

4 Easy Floral Gift Wrapping Ideas

 Hello everyone! Today, I am sharing four simple ideas to gift wrap using faux floral, embellishments, craft clips, twine, and a few other materials. It's a fun and personalized way to wrap a gift and a great way to utilize any leftover materials you have from a previous craft or project. If you're ready, I would love it if you join me in decorating! Video tutorial Materials for Box Number One Wrapping paper mini flower decorations Paintbrush Acrylic paint Scissors Start by wrapping your box using your wrapping paper and tape. I purchased this brown wrapping paper at my local Dollar Tree.  Next, using your paintbrush begin to add a few dots of paint to your wrapping paper.  After, take your twine and begin to wrap it around your box. I decided to wrap a section around the middle going across and a section going from the top to the bottom of my box. Once you have done this, tie your twine off into a knot and remove any of the remaining twine. You are ready to begin attachi...

Fall Fox Garland: Easy and Affordable DIY Decor with Dollar Tree Items

Create a beautiful fall-themed fox garland using affordable Dollar Tree items. This easy and inexpensive DIY decor project will add a touch of seasonal charm to your home. Follow our step-by-step guide to make your own fall fox garland today. Hello everyone! I'm excited to share an effortless garland design with you all. Our project today involves creating a garland using fox ornaments purchased from Dollar Tree. We will also incorporate wooden mini-leaf embellishments and faux floral to add a wonderful touch. You can find a complete list of materials below. Video tutorial Creating your fall fox garland Materials  Mod Podge Paintbrush Acrylic paint Mini wood leaf embellishments Fox ornaments  Decorative napkin I'm also using a mini-craft iron  Parchment paper Hot glue Craft knife Sandpaper Adding the decorative napkin to the wooden foxes using Mod Podge To prepare the wooden fox for decorating, start by removing the bottom layer of the napkin. If you have a mini craft iro...

Search This Blog

All content Copyright

Copyright 2021-2025 I ask that you do not take or use my photos or words without permission. If you have any questions, please feel free and contact me. Also, for more information on this blog, check out the disclosure policy tab above. Thank you