
Fourth of July Wooden Hanging Sign

 Hi everyone. I hope that you are all doing well. This week we encountered floods and tornado warnings in our area. We are all fine, but it worried a lot of us. The sun decided to finally make an appearance. Perfect timing to create another quick and easy Fourth of July craft. 

 I am sharing a quick Fourth of July wooden sign craft. I still have a few festive decorations lying around my craft room. 

I am also reusing my wooden sign from an older project. So if you have an older wooden sign that you would love to give a quick transformation to, this craft is perfect for you!

Wooden plaque painted red, white and blue, with tulle, and foam stars


Video tutorial


Craft materials such as wooden sign, tulle, paintbrushes, foam stars, twine and paint

Materials


One wooden sign- I am reusing my wooden sign from an older project
 The sign size is 11 x 8
Foam scatter stars- I purchased a bag at my local Dollar Tree store
Tulle or ribbon
Paintbrushes
Acrylic paint- Red, white and blue
Adhesive- I am using both E6000 and hot glue
Scissors

Applying paint to a wooden sign

Wooden sign with with paintbrush and acrylic paint on a table


Begin by adding your acrylic paints to your wooden board.
 I decided to reuse a wooden board from an older project.
 I sanded off the previous design before applying acrylic paint to my board. 
I used my blow dryer to help with the drying process.

Attaching foam stars to wooden sign

Painted wooden sign with foam stars and adhesive on a table


Next,  add your foam stars; take adhesive to attach your star decorations to your board. 
I added three stars on each section of my wooden sign. 
I ended up using a total of nine stars.

Adding tulle to wooden sign

Painted wooden sign with foam stars attached with tulle and scissors nearby on a table

Tulle in blue, red, and white scissors nearby


After, take your tulle or ribbon and cut sections to create a bow. 
 I cut three sections. Next, I folded each section and pinched off the middle of each one. I used twine and wrapped it around the middle of the tulle. Tie it off and cut any of the remaining twine.
 Feel free and create your bow how you would like. You can also use ribbon if you choose.

Completed Fourth of July wooden sign

Lastly, take your bow and add it to your wooden sign. I used both E6000 and hot glue when attaching my bow.  I do this because where I hang it gets very hot and I wanted to make sure there was zero chance of my embellishments falling off. 

Completed Fourth of July wooden sign hanging on a door

Close-up of Fourth of July wooden sign

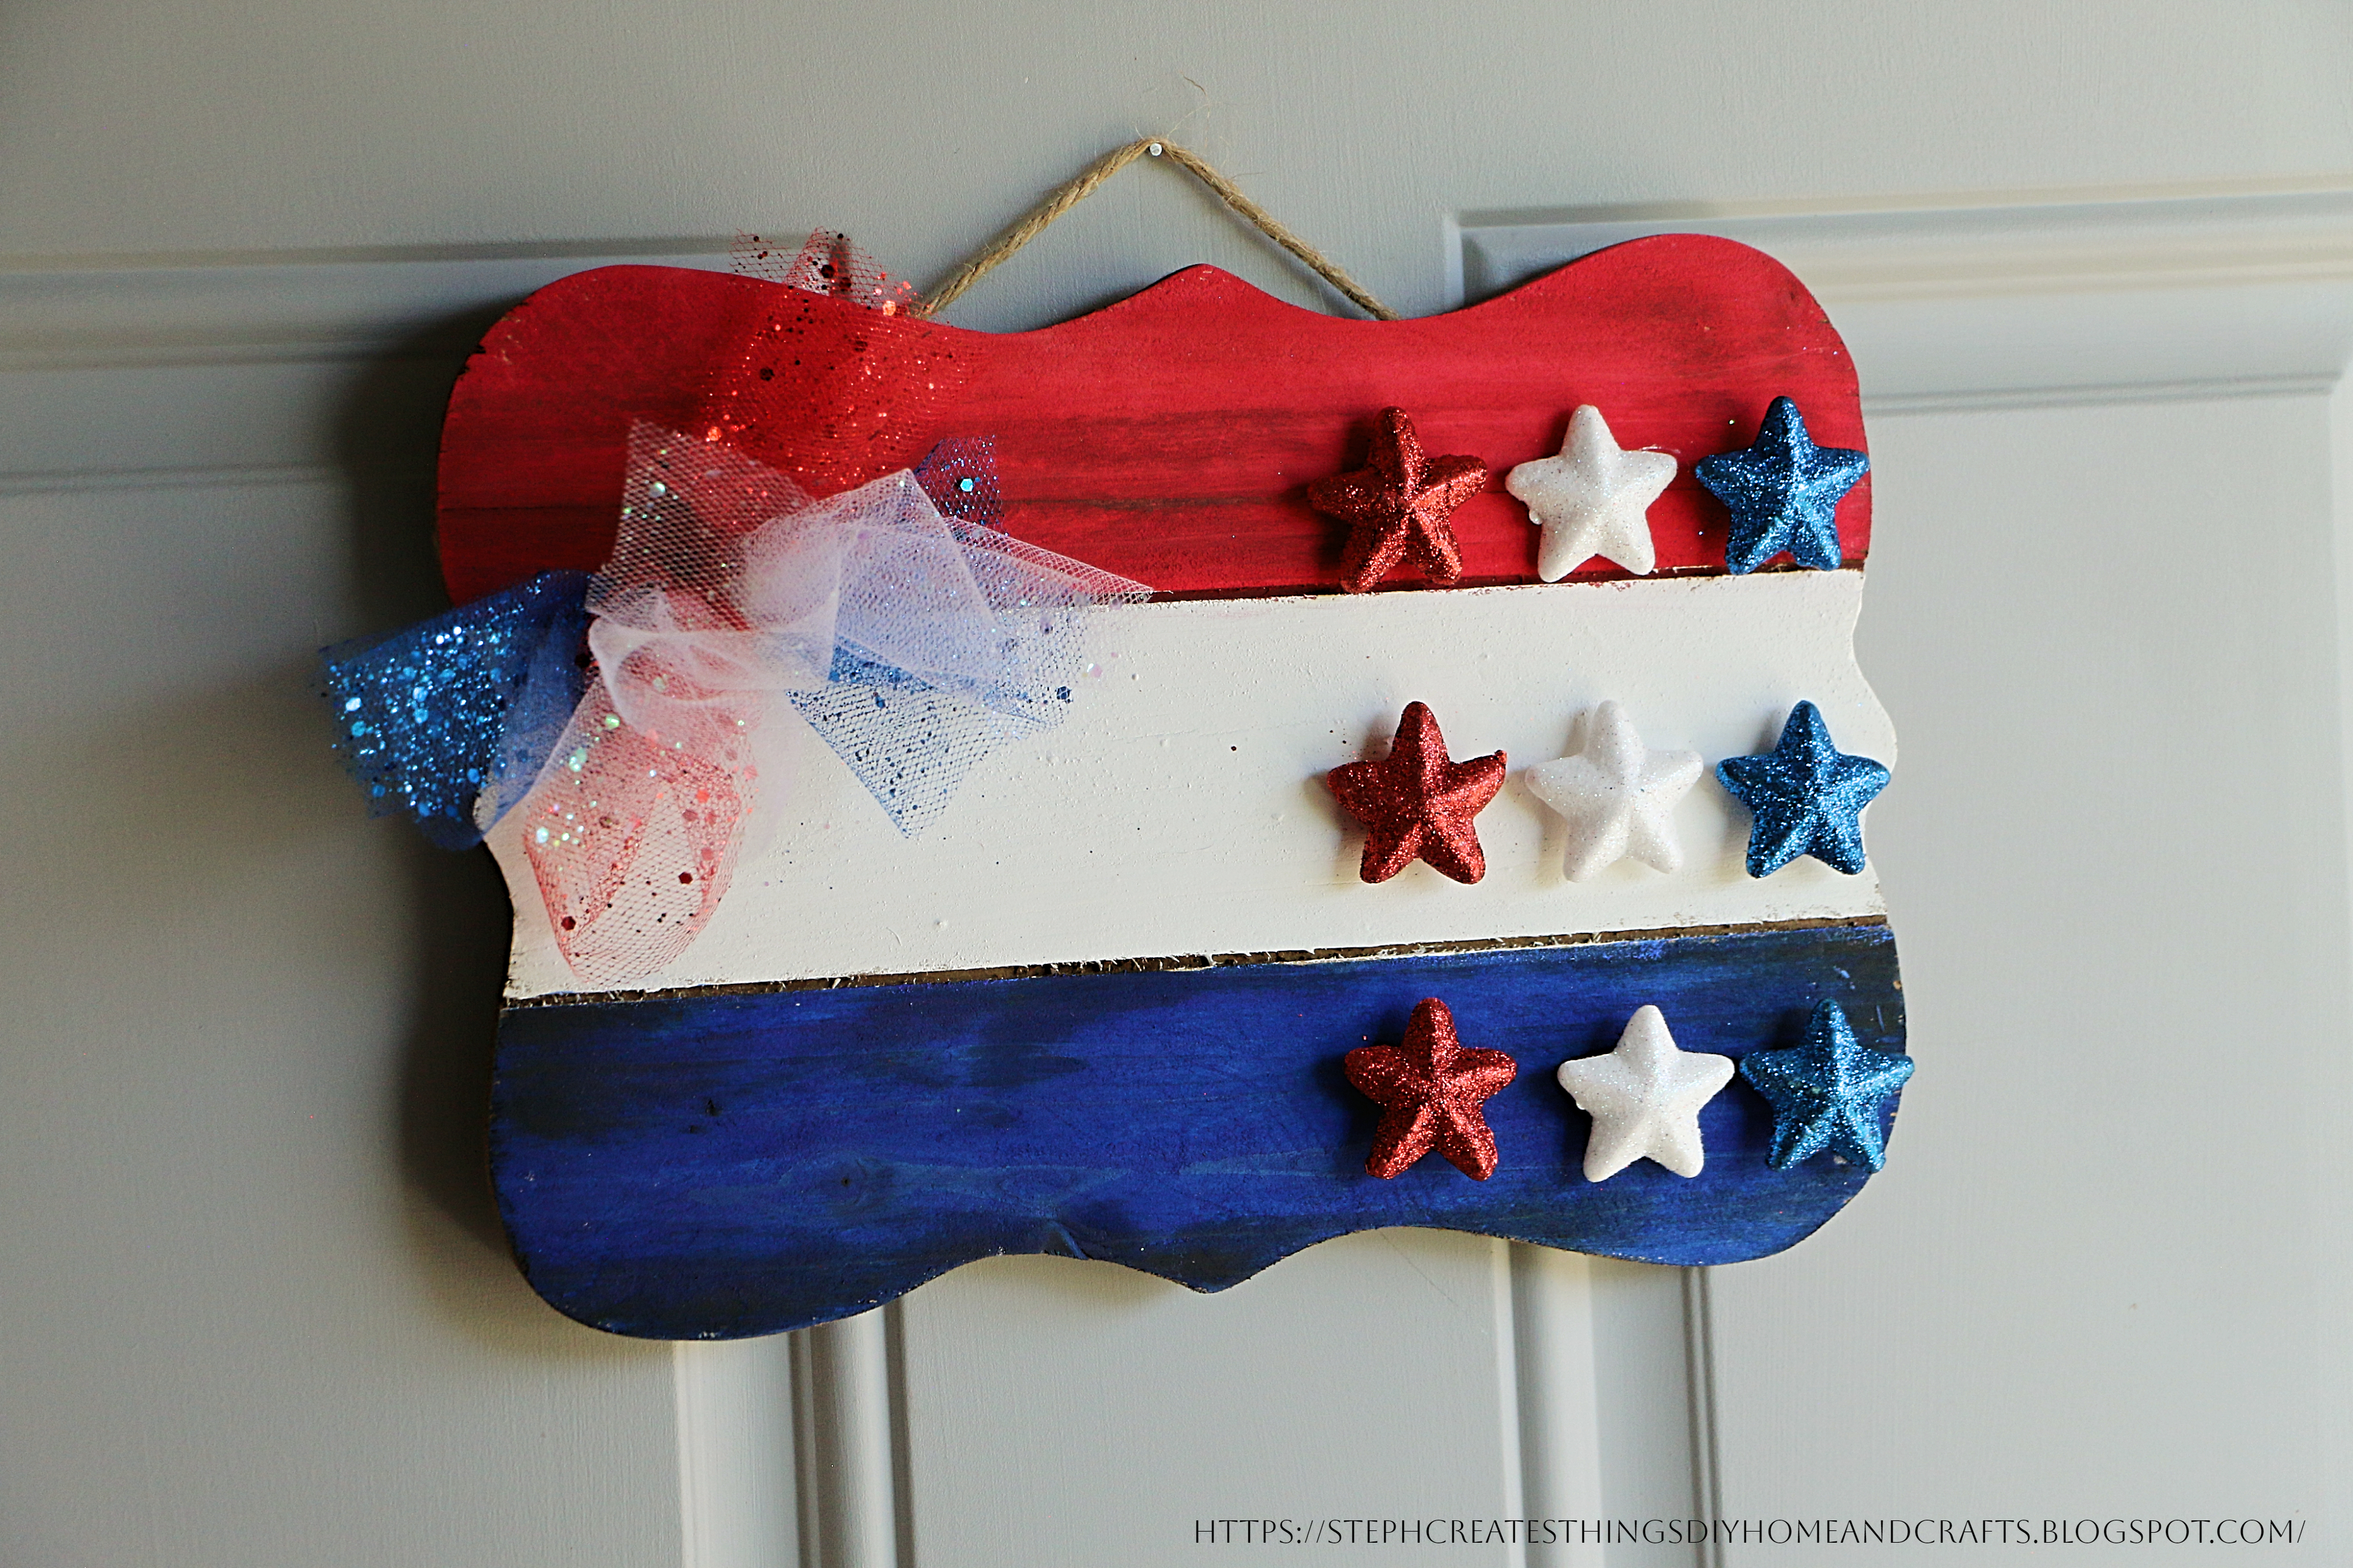
Your Fourth of July wooden sign is complete. I love how easy it was to create this simple decoration. You could also add a mini grapevine wreath just below your bow. Also, a quick way to customize your sign is to add wooden letters or vinyl letters, or you could leave it as is. As always, thank you so much for stopping by and creating with me. I appreciate every single one of you.

Pin Save Share

Pinterest pin with title and picture of completed wooden sign

Comments

  1. This is so cute! I have to check my craft stash right now and see what I have on hand. Thanks so much for the inspiration! Visiting from BFF Open House Party

    ReplyDelete
    Replies
    1. Maria, I'm so happy to hear that this inspired you. ✨️ Thank you so much for visiting. 😊

      Delete
  2. You are always so full of so many wonderful ideas Stephanie! Great inspiration! Thank you for sharing with Whimsy Home Wednesday!

    ReplyDelete
    Replies
    1. Thank you. I always appreciate your feedback. :)

      Delete
  3. Your 4th of July sign is so cute and festive! I had a patriotic sign on my list this year, but it's now rescheduled to next year. I'm running way behind. I love yours! Thanks for sharing at the #HomeMattersParty.

    ReplyDelete
    Replies
    1. Allyson, thank you! I wish I would have been able to create more for 4th of July, but I guess I will next year. Thanks so much for stopping by.

      Delete
  4. Love it, looks great! Thanks so much for linking up at the #UnlimitedLinkParty 117. Pinned.

    ReplyDelete
  5. Visiting again to say thanks so much for linking up at #AThemedLinkup 154 for All Things American and Patriotic. Pinned.

    ReplyDelete
  6. Stephanie, CONGRATS! Your post is FEATURED at the #UnlimitedLinkParty 118!

    ReplyDelete
  7. CONGRATS, Stephanie! Your post is FEATURED at #AThemedLinkup 155 for Coastal Crafts and Décor from the previous linkup for All Things American and Patriotic!

    ReplyDelete

Post a Comment

Thank you so much for taking the time to leave a comment. Your comments brighten my day. I hope that you know that it is appreciated. I do my best to respond to every comment. If you have a question, please feel free and ask away!

Popular posts from this blog

DIY Wood Riser with Floral Design

 Hello everyone! I hope you're doing well. Today, I'm excited to share a beautiful wood riser you can use to decorate your home. We'll be creating it using only a few materials, and for this project specifically, I'll be using the unfinished rectangle natural wood box from Walmart. I'll provide a detailed list of all required materials and step-by-step instructions. Video tutorial DIY Wood Riser with Floral Design Materials Unfinished rectangle natural wood box -6" x 8" x .75" 3" peg people (these are used for the legs on the wooden riser) Adhesive (I'm using Hot glue) You can also use E6000 Decorative floral napkin Mod Podge 7" One unpainted wood home word sign Scissors Paintbrush Applying paint to wood frame and home sign Begin by applying paint to the wooden box and the home word sign. Mix two paint colors together and use them for the wooden box and home sign. Adding the decorative napkin and Mod Podge Next, use scissors to cut out d

DIY Dollar Tree Nail Polish Organizer

  Hello there! I'm delighted to have you on the blog today. Are you seeking a creative DIY idea to organize your nail polish collection? If yes, then you have come to the right place.  Today, I will share a simple and functional method to organize your nail polish collection using only three main materials. You will need stock paper, gem strips, and a three-compartment plastic organizer, all of which can be purchased from your local Dollar Tree or craft store. Video tutorial  DIY Dollar Tree Nail Polish Organizer These are the things you'll need:  A plastic three-compartment organizer  Gem strips  Shimmery cardstock (found a pack at Dollar Tree)  Hot glue  Scissors and a pencil Tracing the organizer onto cardstock  To create your nail polish organizer, first, place the plastic organizer on top of the cardstock, and trace the shape of the organizer on the cardstock using a pencil. Don't worry if it could be better, just focus on tracing the shape as accurately as possible. C

DIY Mini Wood Lantern

  Hello everyone. I'm so excited to share this mini wood lantern craft with you all. I recently bought a box of wood tumbling blocks from Dollar Tree, and I wasn't sure what I was going to create with them. I decided since I also had some wood craft popsicle sticks on hand that I would use those with the blocks, and create a mini wood lantern. This project took around 30 minutes, but I promise you, you will just love how it all comes together with just a few materials. If you're ready, I'd love it if you created it with me!  Video tutorial Materials One pack of wood tumbling blocks  I purchased mine at my local Dollar Tree Ten wood craft popsicle sticks Paint  I'm using black paint, I also had some antique white paint on hand, but I went with black paint Hot glue Twine Faux floral, and greenery One medium-sized bead One battery-operated candle Floral snips Scissors Building the top and bottom sections of the lantern Start by taking five of your tumbling blocks. Usin

Three Easy Mason Jar Designs

 Hello! Today we'll be making three designs for mason jars. This project is quite simple and requires only one mason jar. We'll create three themes - a star/4th of July theme, a succulent theme, and a summer floral theme. For this craft, I had everything except for my decorative buttons. I managed to find two packs of decorative buttons at my local Walmart - one had cacti designs, and the other had floral designs. I'll take you through each step of how I used these buttons for the project.   Video tutorial Materials  One mason jar- You will only need one jar for this project Foam block- We are using three sections from the foam block.  Craft knife- Used for cutting the foam block if not already cut into sections Hot glue Paint brushes Decorative buttons, or any other decorative item Floral Paint- I'm using chalk paint on my mason jar. You will also need paint for your wooden stars if you are using them. Twine Optional-Foam stars Creating your Star/4th of July design Sta

Dollar Tree Mini Bead Floral Spring Wreaths

Transform Dollar Tree's mini bead wreaths into beautiful spring floral bead wreaths with this easy DIY tutorial. Add a touch of spring to your home decor with this creative and budget-friendly project.  I'm excited to share a quick and simple DIY project with you today. Last year, I purchased two mini bead hanging decorations displayed with the fall decor. I decided to add them to my craft stash and use them in the springtime. In this tutorial, I will show you how to create mini bead floral wreaths and provide a full list of materials needed for each step.  Dollar Tree Mini Bead Floral Spring Wreaths Video tutorial Materials Round mini beaded hanging decorations Artificial floral accents One large craft/popsicle stick Paintbrush Acrylic paint Floral cutters Hot glue/Adhesive Step one: Applying paint Before painting, remove any previous decorations such as the plaid autumn leaves that were attached to the wreaths I'm using. To start with, apply paint to your beaded wreath. Y

Transforming Ice Cream Cups: DIY Spring Tea Cup Floral Arrangements

  Today, we'll explore a fun and easy DIY project involving repurposing plastic mini ice cream cups into beautiful spring tea cup floral arrangements. This project is a great way to add a touch of spring to your home decor.  Before throwing away those plastic cups, consider the many possibilities in creating something new.  For this project, you will only need a few materials. Our main materials for creating the faux tea cup will be the ice cream cup and air-dry clay. So, if you're ready to create this adorable and creative springtime tea cup floral decoration, let's begin! VIDEO TUTORIAL Materials Plastic ice cream cups (I am reusing two plastic ice cream cups) Spanish moss Floral Mod Podge Decorative floral napkin Artificial spring flowers Acrylic paint (I'm using white) Paintbrush  Optional- Bumblebee button and small dowel rod- Dimensions : 0.1 inches x 6 inches. Air dry clay Scissors Foam block Preparing your cups After washing your ice cream cups and drying them c

Dollar Tree Wood Crate Floral Design

Create a beautiful floral arrangement in a wood crate from Dollar Tree! With this DIY tutorial, you'll learn how to design stunning floral creations using affordable supplies from Dollar Tree. Perfect for home decor or special occasions. Video tutorial Materials One wood house decoration One wood crate Paint Faux floral Mod Podge Decorative napkin Floral cutters Scissors Hot glue Paintbrush One pop-up sticker One craft block One craft knife (Most of my materials listed can be purchased at Dollar Tree)   Start by applying paint to your wooden house decoration. I only applied my paint on the outer and inside surfaces of the wood. Next, take your decorative napkin, and use a pencil to trace the shape of your wood house onto the napkin.  Be sure to remove the second layer of your napkin. Once you have traced out the shape, take your scissors, and cut out the shape. Afterward, take your Mod Podge, and apply a thin layer onto the inner surface of your wooden house. Place your napkin onto

DIY Christmas Faux Foliage Wooden Crate Decoration

Hello everyone! I hope you're doing well. Can you believe it's almost December? With the holidays around the corner, it's time to add a festive touch to your home. In this easy DIY project, you'll learn how to use faux foliage and a wooden crate to create a beautiful and personalized decoration. The inspiration for this craft came from a single gift tag, and I'm excited to share it with you. So, let's get crafting together! Here's the video tutorial to guide you through the process. Here is a list of materials you will need to create your wooden Christmas crate decoration One wooden arch decor- 5''x7'' One wooden crate-Dollar Tree Rectangular Wooden crate Christmas foliage One gift tag One sanding block Paintbrush Acrylic paint Optional: Mod Podge, mini bow, and faux snow Applying paint to arch wood decor and crate To start, apply acrylic paint to your arch wood. Begin with white paint and apply two coats, using a blow dryer to dry each coat.