
Spring Hanging Design Using Bamboo Serving Boards

 Today I am sharing an easy project. We are creating two Spring hanging designs using bamboo serving boards. I purchased these boards at my local Big Lots store. It was two for five dollars. I actually was not sure what I was going to do with them, but the other day I figured it out. I will provide a step-by-step tutorial, a material list, and a video tutorial will also be included. Happy crafting!


Video tutorial


Main materials
  • Hot glue or any adhesive of your choice
  • Floral cutters
  • Twine
  • Faux floral
  • Pencil
  • Scissors
  • Paintbrush
  • Acrylic paint

  • First design

  • One wooden serving board
  • One decorative napkin
  • Mod Podge

  • Second design

  • Ribbon
  • One craft chalkboard watering can
  • Floral sticker
Painting the serving board

Begin by applying your acrylic paint to your wooden serving board. 


Adding the decorative napkin

Next, take your decorative napkin and unfold it. Place your napkin on top of your painted board and begin to trace out the center of your board. If your napkin has a second layer be sure to remove it. Take your scissors and cut out your traced circle.


Take your Mod Podge and use your paintbrush to apply a thin layer of your Mod Podge to the center of your board. Place your traced circle over the Mod Podge and gently press it down. I always use my blow dryer between each coat of Mod Podge. Apply a second layer of your Mod Podge to the top of your napkin.

Adding the flowers and twine

Now you are ready to add your twine through the top hole and tie it off. This will be used for hanging your design. You can also add a bow, but that is entirely optional. Use your floral cutters and remove just the tops of your flowers. Add them to your board using your adhesive. 


For the following design, I decided to apply white acrylic paint.

Adding ribbon

I added a ribbon to this design. I cut it to size and added it across the center of my board.

Adding flowers

Next, use your floral cutters to cut your flowers. Begin to add your flowers to your board using your adhesive. I glued a few of my flowers just below my ribbon and I also slipped a few of my flowers into the ribbon.

Adding stickers and other decorations

I found these craft chalkboard watering cans at my local Dollar Tree. I wanted to add one to my design after adding my yellow paint to it. 


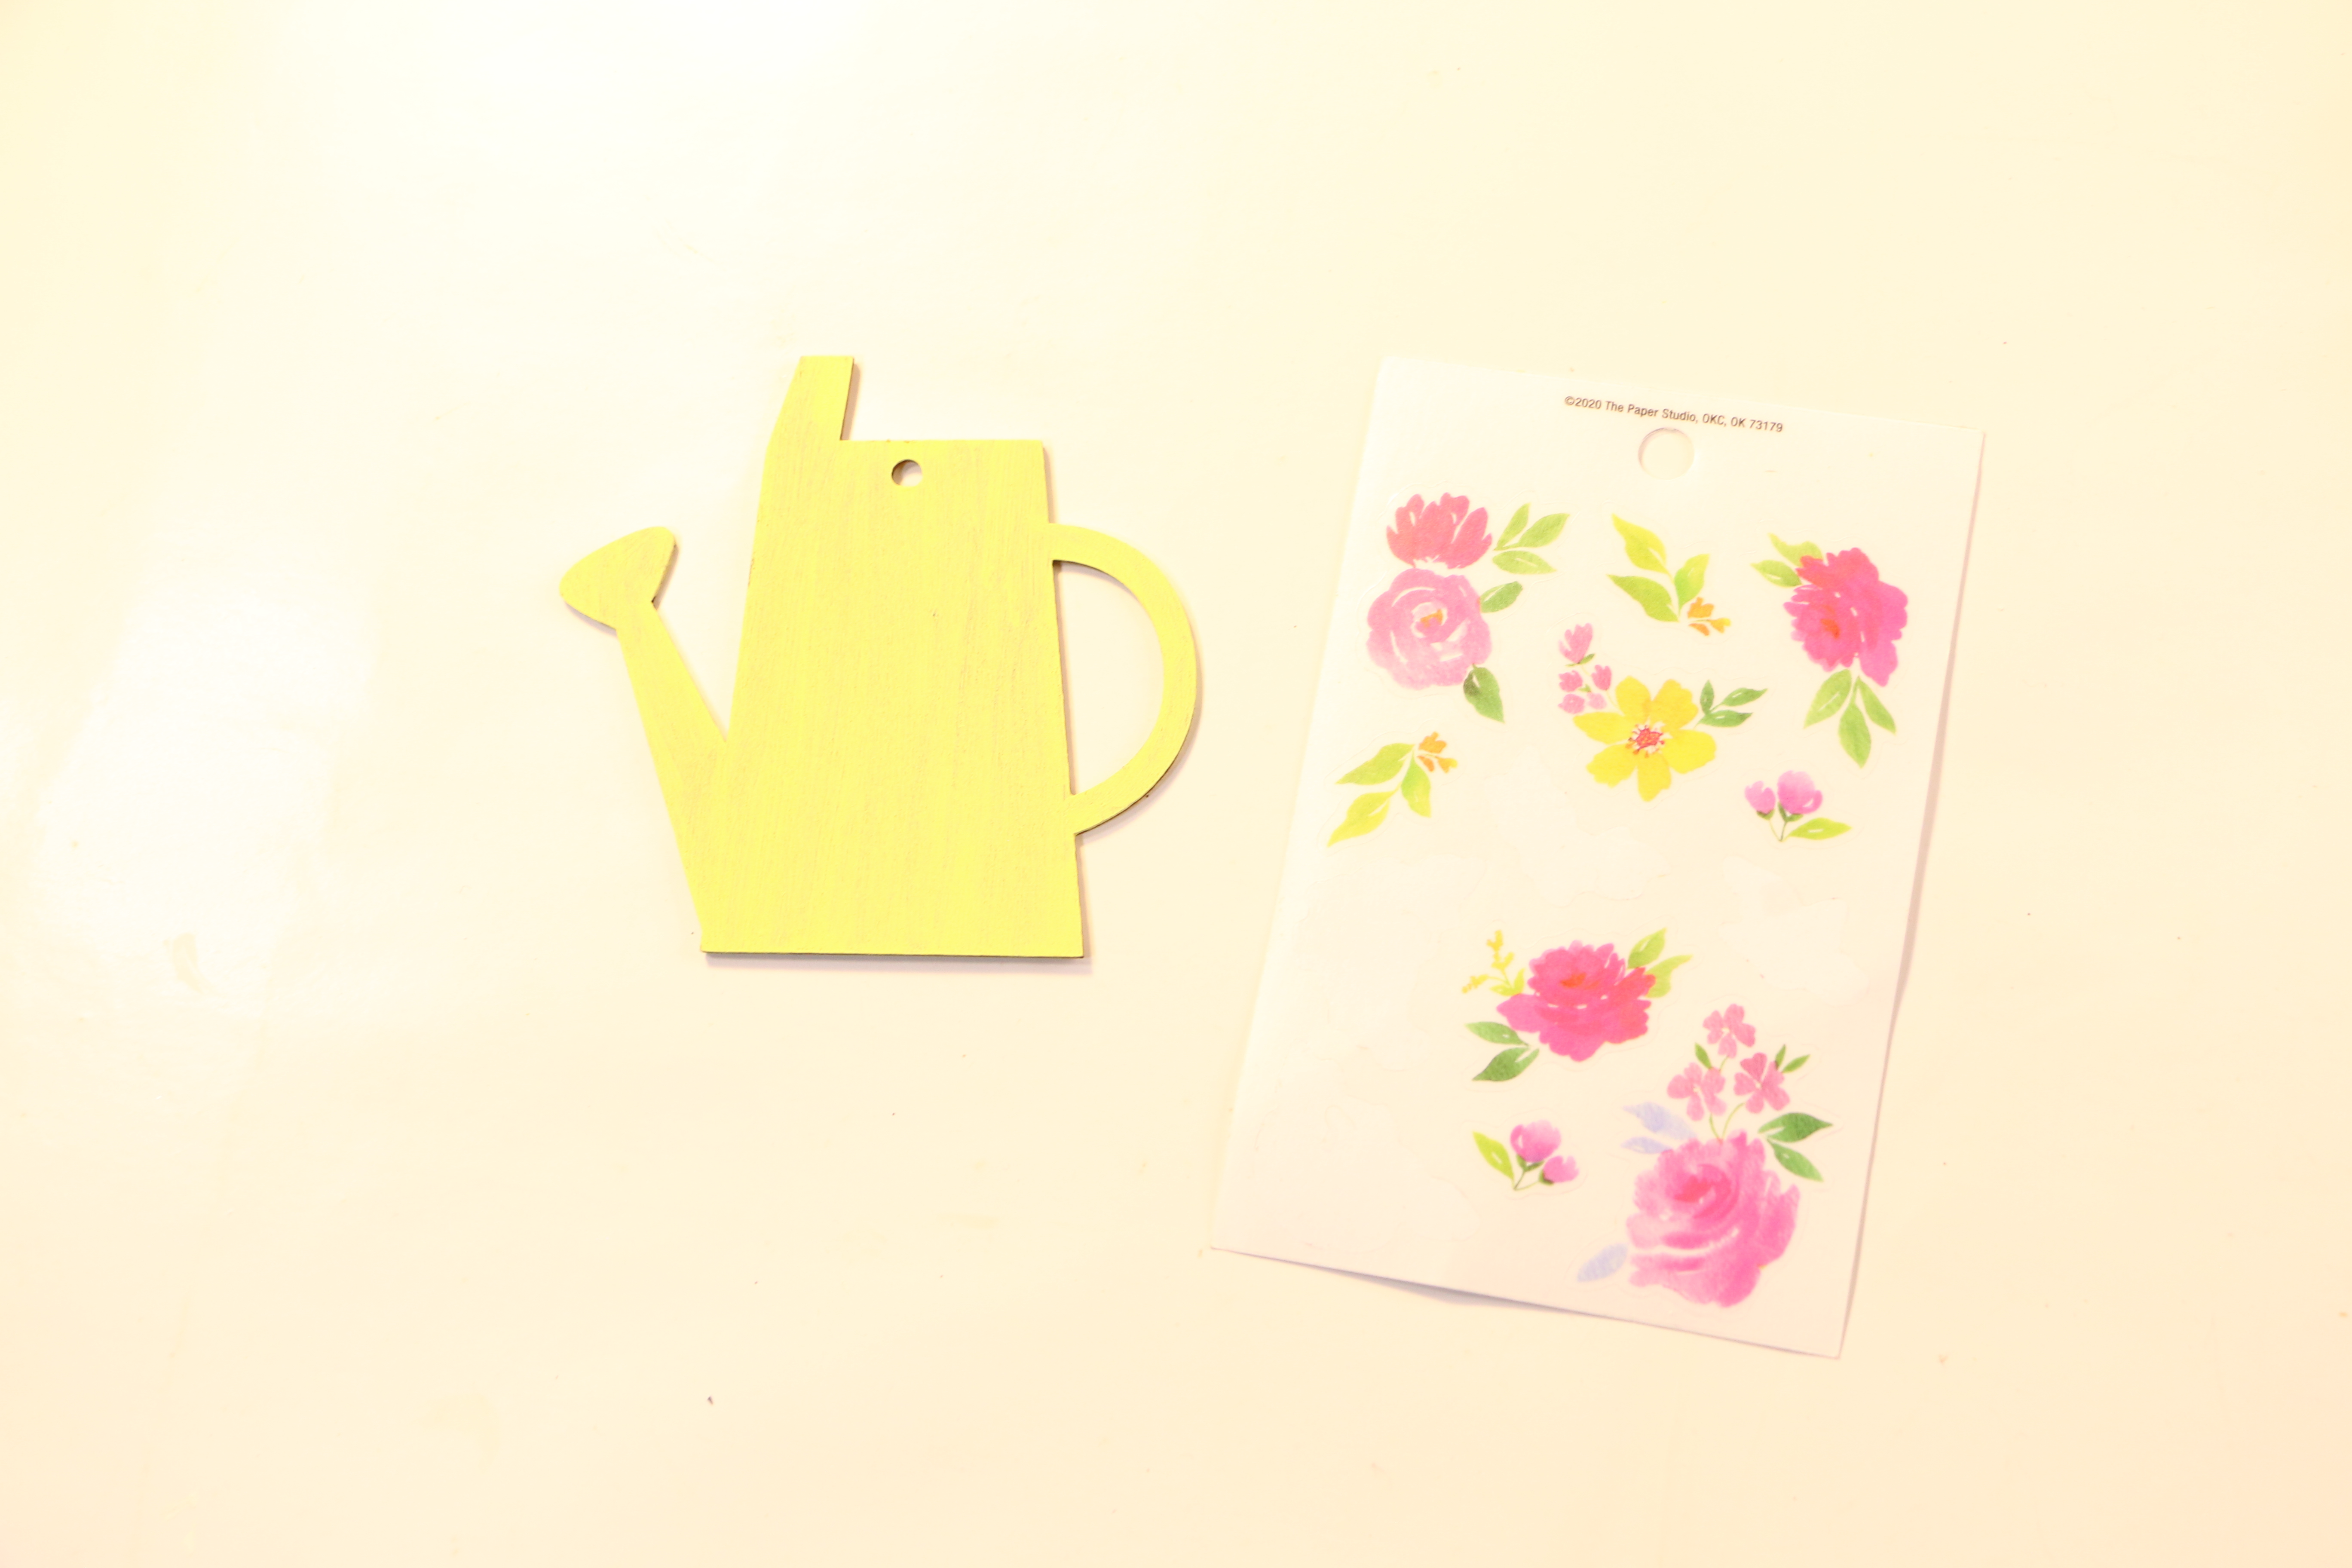
This is optional, but you can add a floral sticker to your watering can. I thought it was a pretty addition to it.


Finish off your design by adding your twine and adding a bow, which is optional.
Your Spring hanging decorations are complete. I love how simple this craft was to create. 
Be sure to let me know in the comments below if you decide to create your very own.


Pin Share Save


Comments

  1. You just keep coming up with cute ideas!! Thanks so much for linking up at the #UnlimitedLinkParty 103. Shared.

    ReplyDelete
    Replies
    1. Dee, aw thank you! I'm always so happy to share my creations with all of you. :)

      Delete
  2. What an adorable way to remind us spring is around the corner! I love the watering can, but that pink is way cute too! Thank you for sharing with Whimsy Home Wednesday!

    ReplyDelete
    Replies
    1. Thank you so much. I can't wait until Spring arrives. I thought the watering can was so cute! Thank you for stopping by. :)

      Delete
  3. So cute! Thanks for sharing on Crafty Creators!
    Niki | Life as a LEO Wife

    ReplyDelete
  4. Visiting again to say thanks so much for linking up at #AThemedLinkup 144 for Spring Crafts and Décor. Shared.

    ReplyDelete
    Replies
    1. You're welcome! Thank you for always hosting.

      Delete
  5. These are beautiful, what a lovely idea. These will be a feature at Handmade Monday this coming week. :-)

    ReplyDelete
    Replies
    1. Thank you so much. I'm so happy to hear that you enjoyed this craft. ❤️

      Delete
  6. Oh my gosh Stephanie! I absolutely love this. I'm putting this on my list of things I need to do this season. Pinned!

    ReplyDelete
    Replies
    1. Denise, thank you so much! I'm so happy to hear that you are putting on your list to make! --I love that!

      Delete
  7. I've got to tell you I really appreciate your videos. I love seeing how you make things come together.
    Thanks bunches and bunches for sharing this tutorial with Sweet Tea & Friends this month dear friend.

    ReplyDelete
    Replies
    1. Paula, you're so kind. Thank you. I'm happy to hear that my tutorials are helpful. Thank you for taking the time to visit 💕 😊

      Delete
  8. I love this idea! They are so cute and fun.

    (At Crafty Cottage)

    ReplyDelete
    Replies
    1. Kristen, thank you. 😊 I'm happy to hear you enjoyed this craft. Thank you for visiting.

      Delete

Post a Comment

Thank you so much for taking the time to leave a comment. Your comments brighten my day. I hope that you know that it is appreciated. I do my best to respond to every comment. If you have a question, please feel free and ask away!

Popular posts from this blog

Dollar Tree Mini Bead Floral Spring Wreaths

Transform Dollar Tree's mini bead wreaths into beautiful spring floral bead wreaths with this easy DIY tutorial. Add a touch of spring to your home decor with this creative and budget-friendly project.  I'm excited to share a quick and simple DIY project with you today. Last year, I purchased two mini bead hanging decorations displayed with the fall decor. I decided to add them to my craft stash and use them in the springtime. In this tutorial, I will show you how to create mini bead floral wreaths and provide a full list of materials needed for each step.  Dollar Tree Mini Bead Floral Spring Wreaths Video tutorial Materials Round mini beaded hanging decorations Artificial floral accents One large craft/popsicle stick Paintbrush Acrylic paint Floral cutters Hot glue/Adhesive Step one: Applying paint Before painting, remove any previous decorations such as the plaid autumn leaves that were attached to the wreaths I'm using. To start with, apply paint to your beaded wreath. Y

Transforming Ice Cream Cups: DIY Spring Tea Cup Floral Arrangements

  Today, we'll explore a fun and easy DIY project involving repurposing plastic mini ice cream cups into beautiful spring tea cup floral arrangements. This project is a great way to add a touch of spring to your home decor.  Before throwing away those plastic cups, consider the many possibilities in creating something new.  For this project, you will only need a few materials. Our main materials for creating the faux tea cup will be the ice cream cup and air-dry clay. So, if you're ready to create this adorable and creative springtime tea cup floral decoration, let's begin! VIDEO TUTORIAL Materials Plastic ice cream cups (I am reusing two plastic ice cream cups) Spanish moss Floral Mod Podge Decorative floral napkin Artificial spring flowers Acrylic paint (I'm using white) Paintbrush  Optional- Bumblebee button and small dowel rod- Dimensions : 0.1 inches x 6 inches. Air dry clay Scissors Foam block Preparing your cups After washing your ice cream cups and drying them c

DIY Spring Flower Terra Cotta Pot

Hello everyone! Today, I'm excited to share a simple re-do craft that will transform a plain terra cotta pot into a beautiful spring gift. I'm reusing one of my old terra cotta pots from a previous project for this craft.-  Spring Floral Clay Pot Design  With just a few easy steps, I'll show you how to create a stunning spring flower pot display that would make the perfect Mother's Day gift, or just to welcome Spring. Let's get started! DIY Spring Flower Terra Cotta Pot Video tutorial Materials Artificial flowers One terra cotta pot (I'm reusing a pot from a previous craft) Acrylic paint Craft stick Faux pearl embellishments Foam block Adding paint and other designs I used a pot that was previously painted and had some twine added to it. I decided to keep the existing paint and twine and add a few painted flowers to the pot. For the flowers, I used light purple and blue for the petals, and white for the center of each flower. Adding embellishments I decided to a

Eco-Friendly Crafting: How to Make a Beautiful Flower Holder from Cardboard

Discover how to create a beautiful flower holder from cardboard in an eco-friendly way. Hello everyone, today I'm excited to share an eco-friendly crafting project with you.  While cleaning up my wrapping paper collection, I noticed the paper roll had run out, leaving only the cardboard paper center. Instead of throwing it away, it would be a great opportunity to reuse the paper and create something beautiful.  Video tutorial Materials - Cardboard paper (preferably thicker wrapping paper) - Faux flowers (such as tulips and greenery) - Two fabric hearts and butterfly stickers - Two craft clothespins - Hot glue or glue stick - Twine -Hole puncher - Optional faux flexible flowers to wrap around the twine. Step one: Preparing the paper To get started, cut a piece of cardboard paper. Make sure to choose a size that will fit the flowers you plan to use later on in the craft. The size of the section should be large enough to accommodate the flowers in the center of the sleeve. For my proj

Decoupaged Glass Jar Candle Holders with Faux Leaves and Gold Wire

  Learn how to create beautiful decoupaged glass jar candle holders using leaves and gold wire. This DIY project is a perfect way to upcycle old glass jars and create unique candle holders for your home decor.  I hope you're all doing well. The weather has cooled down and we're enjoying the change. Today, I'd like to share a quick upcycling decoupage project with you all. I had some extra glass yogurt jars lying around and bought two taper candle holders from Target's dollar section. I wasn't sure what to do with them at first. In today's project, I will show you how to decorate small glass jars using faux fall leaves and gold wire. Video tutorial Materials You need two taper candle holders, a paintbrush, Mod Podge, faux fall leaves, or a decorative napkin, hot glue, two battery-operated tealight candles, and gold wire.  Applying Mod Podge and faux leaves to glass jars To start with, grab a paintbrush and use it to apply Mod Podge on your glass jar. I suggest ap

Wood Box With Glass Bottles Decorative Centerpiece

Hi everyone! I hope that you are all doing well. It has been pretty rainy these past few days. I'm enjoying the rainy weather compared to the really hot days we were getting before.  Today we are working on building a wood box centerpiece. Instead of using the wood crate boxes from Dollar Tree, I wanted to build my own box. For this project, we're using a wood fence picket. I paid $1.48 for one picket, and you can create two boxes with just this one picket. I'm also going to reuse my glass Frappuccino bottles. I will provide a video tutorial as well.  Video tutorial Materials   One wood fence picket- I purchased mine at my local Lowe's for $1.48 Two glass bottles-I am reusing my Starbucks glass bottles Paint Paintbrush Faux greenery Rub-on transfers Wood glue Corner clamps Hot glue One round wooden circle Floral snips Scissors Begin by cutting your wood fence picket. Cut the short ends of your wood 2½ inches. Next, cut the front, back, and bottom of your wood 6¼ inches.

Decorative Wooden Cutting Board

 Hello everyone!  Today we are creating a simple design. I am taking a wooden cutting board, and adding a few design elements to it. I thought this would be a great addition to a tray, or just to add along with my existing decor. I will include a materials list below and also there will be one within the video. Thank you so much for coming along and creating with me. Video tutorial Materials One small wooden cutting board Decorative wrapping paper or tissue paper Acrylic paint Paintbrush Twine or rope Hot glue One heart decoration Scissors Wooden letters Mod podge Optional- Faux greenery One pencil for tracing Tracing and cutting the wrapping paper To begin, place your wrapping paper on a flat surface. Take your wooden cutting board and put it on top of your paper. With a pencil, trace around the board onto the wrapping paper. After tracing, use scissors to cut out the traced shape. Next, lay your cut-out wrapping paper on top of your wooden cutting board.  I decided that I only wanted

Mini Picket Fence Hanging Decoration

Add a charming touch to your spring décor with this DIY mini picket fence hanging decoration. Learn how to create this cute and easy project to brighten up any space. Today I am sharing a simple craft that anyone can do. This craft is simple, and it doesn't take many materials. I'd love it if you joined me in creating this craft!  Mini Picket Fence Hanging Decoration  Video tutorial Materials Needed One wooden fence decoration- purchased at Dollar Tree Mod Podge One decorative napkin-purchased one pack at Dollar Tree Paint- I'm using chalk paint.-White and Misty pink One mini watering can decoration-I found this in the gardening section at Dollar Tree One paint brush Floral Hot glue  Scissors One pencil for tracing Floral snips Optional- butterfly sticker Step 1: Adding paint to the mini fence Start off by, applying a layer of white chalk paint onto your picket fence. You can also apply the white chalk paint to the spaces between the pickets using a smaller paintbrush. Set