
Three Easy Mason Jar Designs

 Hello! Today we'll be making three designs for mason jars. This project is quite simple and requires only one mason jar. We'll create three themes - a star/4th of July theme, a succulent theme, and a summer floral theme. For this craft, I had everything except for my decorative buttons. I managed to find two packs of decorative buttons at my local Walmart - one had cacti designs, and the other had floral designs. I'll take you through each step of how I used these buttons for the project.


Video tutorial


Materials 

One mason jar- You will only need one jar for this project

Foam block- We are using three sections from the foam block. 

Craft knife- Used for cutting the foam block if not already cut into sections

Hot glue

Paint brushes

Decorative buttons, or any other decorative item

Floral

Paint- I'm using chalk paint on my mason jar. You will also need paint for your wooden stars if you are using them.

Twine

Optional-Foam stars

Creating your Star/4th of July design


Start by applying your paint onto your glass jar. I decided to use chalk paint since I always have better luck applying it to glass surfaces.  Apply a few coats, and allow it to fully dry.


Next, take your wooden stars, and apply your paint onto each star. I decided to go with red, white, and blue.


After, take your twine, and begin to glue your stars onto your twine. I spaced them just a little, and once I was done, I took my twine and tied it around my glass jar.  Be sure to not tie your twine too tight. 


Next, take your foam block, and cut a section of your block off. I used a longer foam block. Add your foam block into your jar, and begin to add your floral. For this, I used some red, and white faux floral. I also added some foam stars.

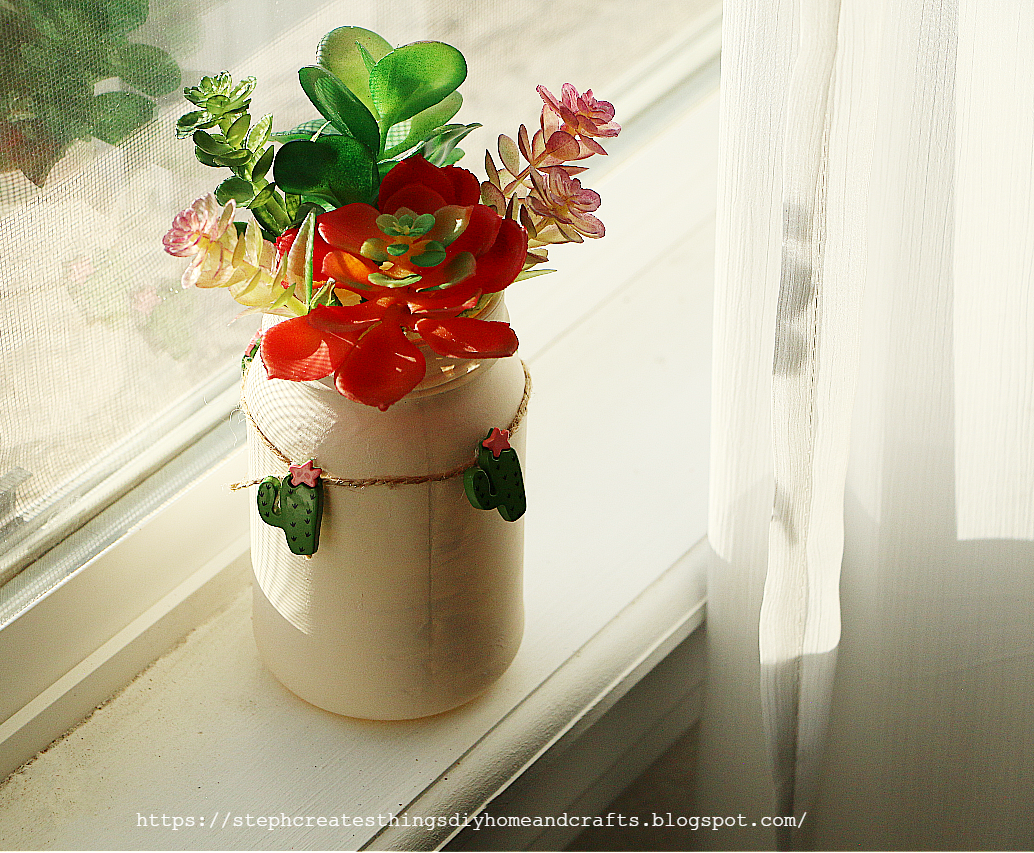
Creating your summer floral theme and succulent theme


Take each of your buttons, and begin to add them to your twine. You will do this for both your floral, and cacti. I used hot glue to add them onto my twine. Repeat the steps we previously did when tying the twine around the glass jar. Be sure to not tie it too tight. You want to be able to change the design, and easily slip each decoration off of your glass jar. 


Once you have added your buttons, take your floral snips, and begin to cut your floral, and succulents. Now you can take two new foam blocks, and begin to add in your floral, and succulents. I decided to use three foam blocks, one for each design because I found that it was easy to just remove the floral, and add the new floral in when it was already in place inside of the foam block. 


Your mason jar designs are now complete. I love the fact that you can easily switch to the next design. Please let me know which one is your favorite. Personally, I think the summer design is the best. Thank you so much for visiting and creating with me! I look forward to seeing you soon.

Pin Share Save


Comments

  1. This comment has been removed by the author.

    ReplyDelete
    Replies
    1. Dee, I do too! I love that there are so many different ways to upcycle using jars. :)

      Delete
  2. Visiting again to say thanks so much for linking up at #AThemedLinkup 148 for Crafting with Bottles and Jars. Shared.

    ReplyDelete
  3. CONGRATS! Your post is FEATURED at #AThemedLinkup 149 for Gardening from the previous linkup for Crafting with Bottles and Jars.

    ReplyDelete
  4. What cute ideas Stephanie! I love all of the possibilities from just one jar. Thank you for sharing with Whimsy Home Wednesday.

    ReplyDelete
  5. This looks lovely. A simple craft I can make, all the better! Thank you for sharing.
    Take care and best wishes.

    ReplyDelete
    Replies
    1. Debra, thank you! Yes, give it a try. It was a fun little project to work on. Thank you for taking the time to visit. 😊

      Delete
  6. What a great idea. I think those little flowers are so sweet. Fun to change it up for the 4th of July, too. Thanks for sharing this post with all of us at the Will Blog for Comments #36!

    ReplyDelete
  7. I was born on July 4th, so I love the white mason jar with the red, and blue stars. I would make a few and add them as table decor for a 4th of July barbecue party. Thank you for sharing!

    ReplyDelete
    Replies
    1. Kristen, thank you! Yes, that jar would be great as a table decor for a 4th Of July barbecue. I love that idea. Thank you for visiting.

      Delete
  8. That is such a cute idea! I often find those shaped buttons totally irresistible but I never have any great ideas for actually using them.

    ReplyDelete
    Replies
    1. Joanne, thank you. Yes, I purchased a few of those buttons and I wasn't sure what I was going to do with it. I finally had figured it out. :) Thank you for visiting.

      Delete
  9. Steph, I love mason jar decorations. I just think these three you made are fabulous!
    Visiting today from Will Blog For Comments 36 #8&9

    ReplyDelete
    Replies
    1. Paula, thank you. You're always so kind. I appreciate you taking the time to visit and leave a comment.

      Delete
  10. They are all so pretty! You found some gorgeous buttons to use.

    ReplyDelete
    Replies
    1. Thank you. 😊 I appreciate you visiting ❤️

      Delete

Post a Comment

Thank you so much for taking the time to leave a comment. Your comments brighten my day. I hope that you know that it is appreciated. I do my best to respond to every comment. If you have a question, please feel free and ask away!

Popular posts from this blog

How to Make a Charming Tea Bag Holder Using a Garden Pot and Wood Circle

  Are you a tea lover looking for a creative DIY project? Learn to create a unique tea bag holder using a garden pot, wood circle, wooden bead, and paper floral decorations. Get inspired and add a personal touch to your tea time. Today, we will make a tea bag holder using a garden ceramic pot and a wooden circle. This holder is both functional and cute. Below, I will provide a list of materials and step-by-step instructions. Video tutorial How to Make a Charming Tea Bag Holder Using a Garden Pot and Wood Circle Materials  Garden pot- I'm using a white 4inch planter pot (The one I am using is a ceramic pot)  One wood circle- I picked up a pack of 6  3'' wood circles at my local Walmart store for $1.80 Mod Podge Decorative napkin Paintbrush One medium or large wooden bead Paper flowers and leaves Adhesive Scissors White acrylic paint Letter stamps Stamp ink Preparing your decorative napkin and Mod Podge Let's begin by taking a decorative napkin and removing the second lay

Easy 4th Of July Metal hanging design

 Hello everyone! How have you been? I hope all is well. My girls are enjoying the start of summer break, and this mama is busy. I wanted to share this super easy decoration with all of you. I created this simple metal hanging decoration for the 4th of July. I absolutely love how it turned out. I found this metal holder at my local Dollar Tree. I haven't seen it in the store before. I was excited to find this and brainstorm for my next project. As always, the material list is below. I will walk you through each step of creating your very own.  Video tutorial Materials One metal hanging holder Mod Podge  Tulle or ribbon Acrylic paint Craft foam block Foam scatter stars Faux flowers One decorative napkin Scissors Floral cutters Hot glue Three craft sticks Twine Applying paint to metal design Start by taking your paintbrush and applying your acrylic paint to your metal holder. I only used my paint on the metal surface. When applying the acrylic paint I noticed it does go on smoothly. Y

How to Create an Artificial Succulent Birdhouse Decoration

  Hello everyone! I have a quick and easy DIY craft project to share with you. I wasn't sure what to do with the second birdhouse I purchased at my local Dollar Tree a while back. If you follow me, you probably know how much I love succulents, especially faux ones. So, why not design a birdhouse with a faux succulent roof? I would love it if you could create one with me. The process is simple, and I'll take you through a full materials list. Video tutorial How to Create an Artificial Succulent Birdhouse Decoration To make the birdhouse design, you will need the following materials: - One craft birdhouse (you can buy it at Dollar Tree) - Assorted faux succulents - Craft moss - Artistic paint (Espresso in this case) - Paintbrush - Hot glue Applying paint to the birdhouse Start by applying acrylic paint to your birdhouse. Use Espresso color, and add a small amount of water to thin out the paint. This will result in a stained finish without having to use stain. After applying the p

Dollar Tree Tea Storage Tower

  Hi everyone! Today we're creating a tea storage tower. This craft is beginner friendly, and we are only using just a few materials to create it. Video tutorial Materials needed Two wooden crate boxes- Purchased at Dollar Tree Four large popsicle sticks Hot glue Paint Wooden craft hearts Wood tile letters-Purchased at Walmart Paintbrush Start with taking your wood crate boxes, and applying paint.  Once you have applied paint, set your wood boxes aside.  Take your four popsicle sticks, and apply paint to each of them. Be sure to apply the paint on the front, and back of each stick.  Next, take your wood craft hearts, and apply your paint onto each heart. After applying paint, set them aside and allow them to completely dry. You are now ready to start putting together your tower. Take your four popsicle sticks, and begin to glue them onto your boxes. Lay your box down, and have the sides of your box facing up. Start to add your popsicle sticks onto both ends of your box.  Once you h

Floral Painted Jewelry Dish using Plant Saucer

Learn how to make a beautiful floral-painted jewelry dish using a plant saucer with easy step-by-step instructions in this guide. Today, I'm excited to share a DIY tutorial with you. We'll be making a jewelry dish using plastic plant saucers. I had bought two plant saucers from Lowe's but had yet to use them. So, this would be a great way to make use of them. I made two jewelry dishes for my daughters. Video tutorial Floral Painted Jewelry Dish using Plant Saucer These are the materials I am using:  Plastic plant saucers that measure 4.17 x 4.17 x 1.01 inches  Acrylic paint in various colors Paintbrushes Mod Podge Painting flowers onto the plant saucer First, make sure your plant saucer is clean and dry. Then, use a small paintbrush to paint a few assorted flowers on it. Paint as many flowers as you like. Adding a painted background Once the paint has dried, paint the background of your plastic saucer with your choice of paint. I painted one dish a light blue, and the other

DIY Cute Tabletop Organizer Using Metal Cans

Hello there! If you're new here, welcome to my blog! In this post, I will be sharing an easy DIY tutorial on how to create a functional and adorable tabletop organizer using metal cans. With a few basic materials such as a round particle board, spray paint, and some other supplies, you can transform ordinary cans into a stylish and useful organizer to keep your desk or workspace tidy. I hope you enjoy this tutorial and find it helpful! Video tutorial  DIY Cute Tabletop Organizer Using Metal Cans     Materials needed: - One round wooden board - Four tin cans - Chalk spray paint - Acrylic paint - Mod Podge - Decorative napkin - Four wooden square pieces - Scissors - Wood glue - Paintbrush Optional: - Twine - Fabric hearts I found a color called Ella Rose at my local Lowe's store. This time, I decided to work with chalk spray paint instead of using regular paint and a paintbrush. I took four cans to my garage and sprayed around three coats of chalk paint on them. If you decide to

Dollar Tree Mini Bead Floral Spring Wreaths

Transform Dollar Tree's mini bead wreaths into beautiful spring floral bead wreaths with this easy DIY tutorial. Add a touch of spring to your home decor with this creative and budget-friendly project.  I'm excited to share a quick and simple DIY project with you today. Last year, I purchased two mini bead hanging decorations displayed with the fall decor. I decided to add them to my craft stash and use them in the springtime. In this tutorial, I will show you how to create mini bead floral wreaths and provide a full list of materials needed for each step.  Dollar Tree Mini Bead Floral Spring Wreaths Video tutorial Materials Round mini beaded hanging decorations Artificial floral accents One large craft/popsicle stick Paintbrush Acrylic paint Floral cutters Hot glue/Adhesive Step one: Applying paint Before painting, remove any previous decorations such as the plaid autumn leaves that were attached to the wreaths I'm using. To start with, apply paint to your beaded wreath. Y