
Easy DIY Dollar Tree 4th Of July Hanging Decoration


Hi everyone! I've been in between crafts lately. I started creating a few Summer crafts, and also some 4th of July-themed crafts as well. If you haven't yet checked out my Summer sign click here--DIY Fun Decorative Summer Sign

Today I am bringing you a quick DIY project that you can create in under 20 minutes. You will only need just a few materials, and all of my materials were purchased at my local Dollar Tree. If you're ready we will dive in, and begin creating your very own 4th of July Hanging decoration. 


Video tutorial


Materials

One Dollar Tree rectangle hanging décor

One Dollar Tree 3 piece 4th of July décor

Decorative napkin- 4th of July theme

Mod podge

Dollar Tree 4th of July foam stars

Twine

Hot glue

Scissors

One paint brush


First, take your three-piece 4th of July décor, and cut out the section that you will want to use for this craft.


Next, using your hot glue, add a little of your glue onto the back of your cut-out 4th of July décor. 

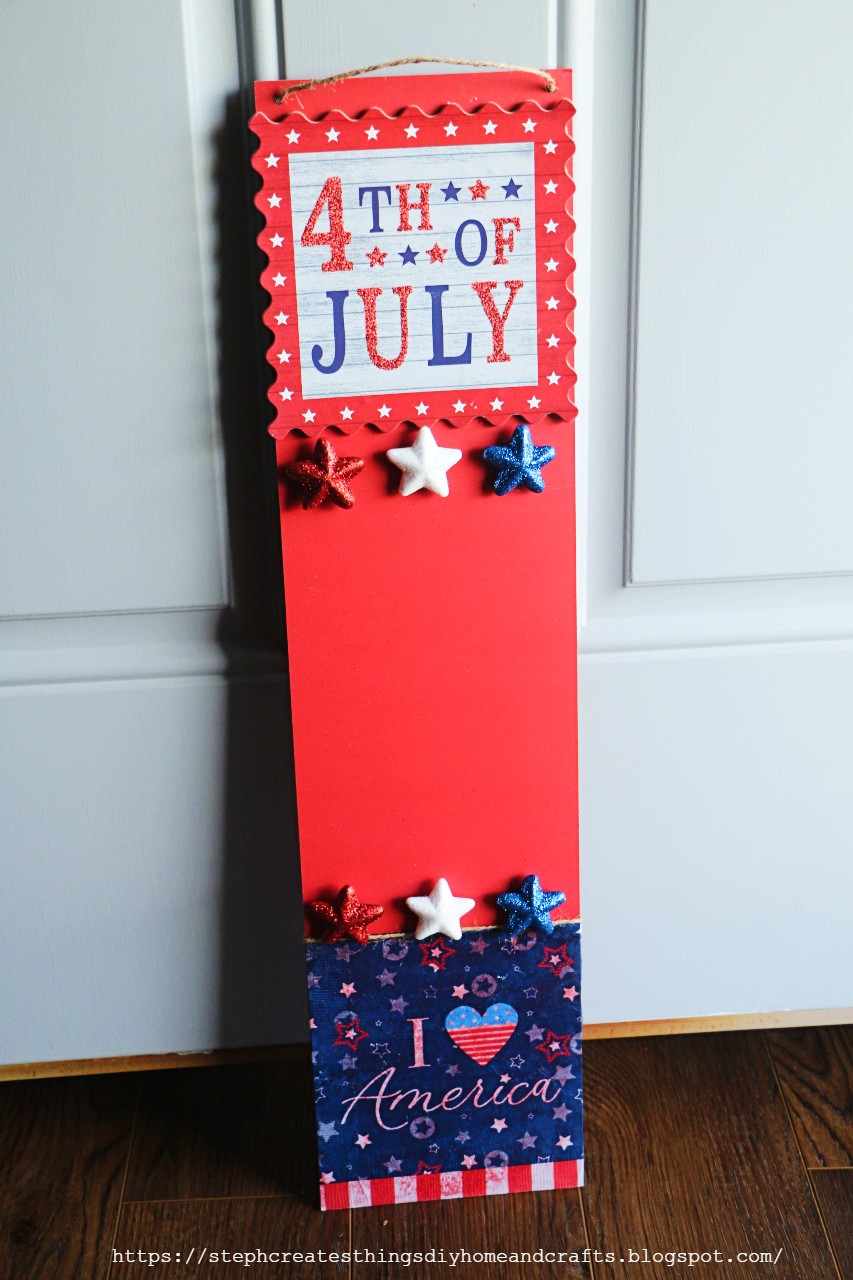
My rectangle sign originally came with a boat design. I took my cut-out décor piece and glued it over that original design. 


After, take your napkin, and remove the second layer of your napkin. Once you have done this, you can cut a square section out. Set your napkin aside.

Next, take your paintbrush, and apply a thin layer of mod podge to the bottom of your rectangle sign. You can use a blow dryer, or heat gun to help with drying. Using your paintbrush, apply a layer of mod podge to the top of your napkin design.  Repeat the previous step when drying.


Using your scissors, cut a strand of twine. Using your hot glue apply your twine just above the decorative napkin. Remove any remaining twine on both ends.

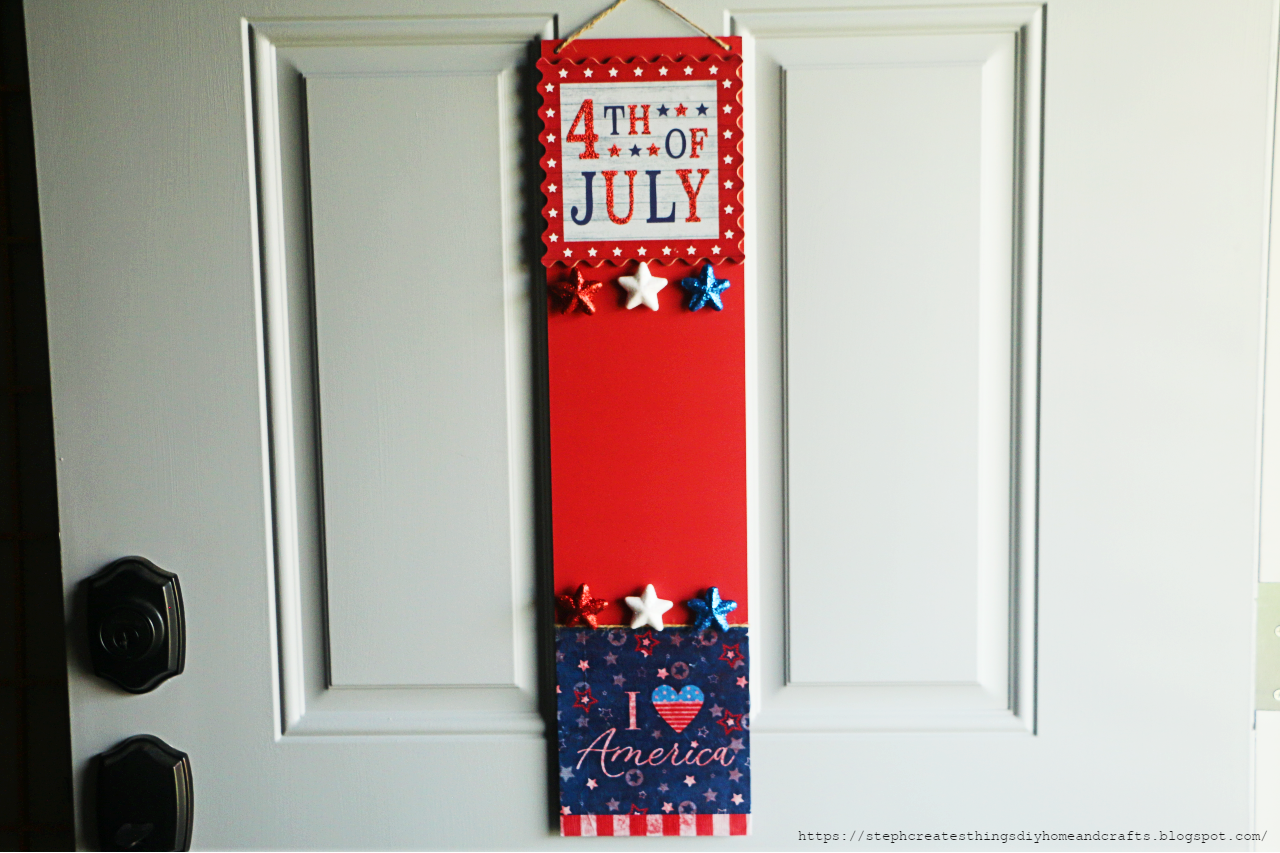
Next, using your hot glue, begin to attach your foam stars to your sign. I attached three stars just below the 4th of July décor sign, and three just above the twine. 


Your 4th of July hanging decoration is complete! If you would like, you could always add a bow right in the middle of your decoration as well. I hope you have enjoyed this DIY craft. Let me know in the comments below if you decide to create your very own.


Pin/Share/Save


Comments

  1. What a wonderful idea for a quick, easy to do craft. Thanks so much!

    ReplyDelete
  2. Debbie, thank you so much. 😊 Also, you're very welcome.

    ReplyDelete
  3. That looks nice! Thanks so much for linking up at #AThemedLinkup 154 for All Things American and Patriotic. Pinned.

    ReplyDelete

Post a Comment

Thank you so much for taking the time to leave a comment. Your comments brighten my day. I hope that you know that it is appreciated. I do my best to respond to every comment. If you have a question, please feel free and ask away!

Popular posts from this blog

Dollar Tree Mini Bead Floral Spring Wreaths

Transform Dollar Tree's mini bead wreaths into beautiful spring floral bead wreaths with this easy DIY tutorial. Add a touch of spring to your home decor with this creative and budget-friendly project.  I'm excited to share a quick and simple DIY project with you today. Last year, I purchased two mini bead hanging decorations displayed with the fall decor. I decided to add them to my craft stash and use them in the springtime. In this tutorial, I will show you how to create mini bead floral wreaths and provide a full list of materials needed for each step.  Dollar Tree Mini Bead Floral Spring Wreaths Video tutorial Materials Round mini beaded hanging decorations Artificial floral accents One large craft/popsicle stick Paintbrush Acrylic paint Floral cutters Hot glue/Adhesive Step one: Applying paint Before painting, remove any previous decorations such as the plaid autumn leaves that were attached to the wreaths I'm using. To start with, apply paint to your beaded wreath. Y

Transforming Ice Cream Cups: DIY Spring Tea Cup Floral Arrangements

  Today, we'll explore a fun and easy DIY project involving repurposing plastic mini ice cream cups into beautiful spring tea cup floral arrangements. This project is a great way to add a touch of spring to your home decor.  Before throwing away those plastic cups, consider the many possibilities in creating something new.  For this project, you will only need a few materials. Our main materials for creating the faux tea cup will be the ice cream cup and air-dry clay. So, if you're ready to create this adorable and creative springtime tea cup floral decoration, let's begin! VIDEO TUTORIAL Materials Plastic ice cream cups (I am reusing two plastic ice cream cups) Spanish moss Floral Mod Podge Decorative floral napkin Artificial spring flowers Acrylic paint (I'm using white) Paintbrush  Optional- Bumblebee button and small dowel rod- Dimensions : 0.1 inches x 6 inches. Air dry clay Scissors Foam block Preparing your cups After washing your ice cream cups and drying them c

DIY Wood Riser with Floral Design

 Hello everyone! I hope you're doing well. Today, I'm excited to share a beautiful wood riser you can use to decorate your home. We'll be creating it using only a few materials, and for this project specifically, I'll be using the unfinished rectangle natural wood box from Walmart. I'll provide a detailed list of all required materials and step-by-step instructions. Video tutorial DIY Wood Riser with Floral Design Materials Unfinished rectangle natural wood box -6" x 8" x .75" 3" peg people (these are used for the legs on the wooden riser) Adhesive (I'm using Hot glue) You can also use E6000 Decorative floral napkin Mod Podge 7" One unpainted wood home word sign Scissors Paintbrush Applying paint to wood frame and home sign Begin by applying paint to the wooden box and the home word sign. Mix two paint colors together and use them for the wooden box and home sign. Adding the decorative napkin and Mod Podge Next, use scissors to cut out d

DIY Spring Flower Terra Cotta Pot

Hello everyone! Today, I'm excited to share a simple re-do craft that will transform a plain terra cotta pot into a beautiful spring gift. I'm reusing one of my old terra cotta pots from a previous project for this craft.-  Spring Floral Clay Pot Design  With just a few easy steps, I'll show you how to create a stunning spring flower pot display that would make the perfect Mother's Day gift, or just to welcome Spring. Let's get started! DIY Spring Flower Terra Cotta Pot Video tutorial Materials Artificial flowers One terra cotta pot (I'm reusing a pot from a previous craft) Acrylic paint Craft stick Faux pearl embellishments Foam block Adding paint and other designs I used a pot that was previously painted and had some twine added to it. I decided to keep the existing paint and twine and add a few painted flowers to the pot. For the flowers, I used light purple and blue for the petals, and white for the center of each flower. Adding embellishments I decided to a

Upcycled Craft: Fall Floral Decoration Using A Metal Can

 Hello everyone! I hope you are doing well. Personally, I am tired of the heat we've been experiencing and I'm eagerly anticipating the arrival of fall weather here in Colorado. How is the weather where you are? Thank you all for joining me again to create some crafts today. Our project is a fall flower arrangement made from a metal can. I cleaned out a snack can and transformed it into a beautiful display of fall florals using materials I had at home. However, if you don't have these materials, you can find them at most craft stores. I will provide a list of materials below as always, so let's get started! Video Tutorial Materials One metal can Mod podge Decorative napkin Faux Fall Floral Acrylic paint Wooden beads Paintbrush Scissors Floral cutters Applying paint to the can The first step is to apply paint to your metal can. Make sure to let each coat of acrylic paint dry completely before applying the next coat. Apply a total of three coats of paint and use a blow dr

🎄🌟Easy Christmas Gift Wrapping Ideas

Get creative this holiday season with these easy Christmas gift-wrapping ideas. From simple and elegant to fun and festive, find inspiration for wrapping your gifts in style. I’m going to share some quick gift-wrapping decorating ideas with all of you. I grabbed a few empty boxes and my red and brown gift paper. Although I’m not a professional when it comes to wrapping paper, I thought I would share some decoration ideas with all of you. I had all of my materials on hand, but a lot of these are fairly cheap when purchased at a craft store. Let’s decorate! Check out the video tutorial   Materials Wrapping paper Mini garland Acrylic paint Paintbrush Decorative gems Twine or craft rope Decorative tape Tape Hot glue Scissors Wooden Christmas mini decorations (such as a mini wood wreath and an ornament) Gift wrap decoration number one For the first design, I am using brown wrapping paper, tape, red paint, green paint, white paint, two wooden Christmas decorations, hot glue, and twine to cre

How to Make a Charming Tea Bag Holder Using a Garden Pot and Wood Circle

  Are you a tea lover looking for a creative DIY project? Learn to create a unique tea bag holder using a garden pot, wood circle, wooden bead, and paper floral decorations. Get inspired and add a personal touch to your tea time. Today, we will make a tea bag holder using a garden ceramic pot and a wooden circle. This holder is both functional and cute. Below, I will provide a list of materials and step-by-step instructions. Video tutorial How to Make a Charming Tea Bag Holder Using a Garden Pot and Wood Circle Materials  Garden pot- I'm using a white 4inch planter pot (The one I am using is a ceramic pot)  One wood circle- I picked up a pack of 6  3'' wood circles at my local Walmart store for $1.80 Mod Podge Decorative napkin Paintbrush One medium or large wooden bead Paper flowers and leaves Adhesive Scissors White acrylic paint Letter stamps Stamp ink Preparing your decorative napkin and Mod Podge Let's begin by taking a decorative napkin and removing the second lay

Wood Box With Glass Bottles Decorative Centerpiece

Hi everyone! I hope that you are all doing well. It has been pretty rainy these past few days. I'm enjoying the rainy weather compared to the really hot days we were getting before.  Today we are working on building a wood box centerpiece. Instead of using the wood crate boxes from Dollar Tree, I wanted to build my own box. For this project, we're using a wood fence picket. I paid $1.48 for one picket, and you can create two boxes with just this one picket. I'm also going to reuse my glass Frappuccino bottles. I will provide a video tutorial as well.  Video tutorial Materials   One wood fence picket- I purchased mine at my local Lowe's for $1.48 Two glass bottles-I am reusing my Starbucks glass bottles Paint Paintbrush Faux greenery Rub-on transfers Wood glue Corner clamps Hot glue One round wooden circle Floral snips Scissors Begin by cutting your wood fence picket. Cut the short ends of your wood 2½ inches. Next, cut the front, back, and bottom of your wood 6¼ inches.