
DIY Love Grows Here Wood Decoration

 Hello to all you crafters out there! If this is your first time viewing one of my many crafts, I'd like to say hello, and send out a big welcome.

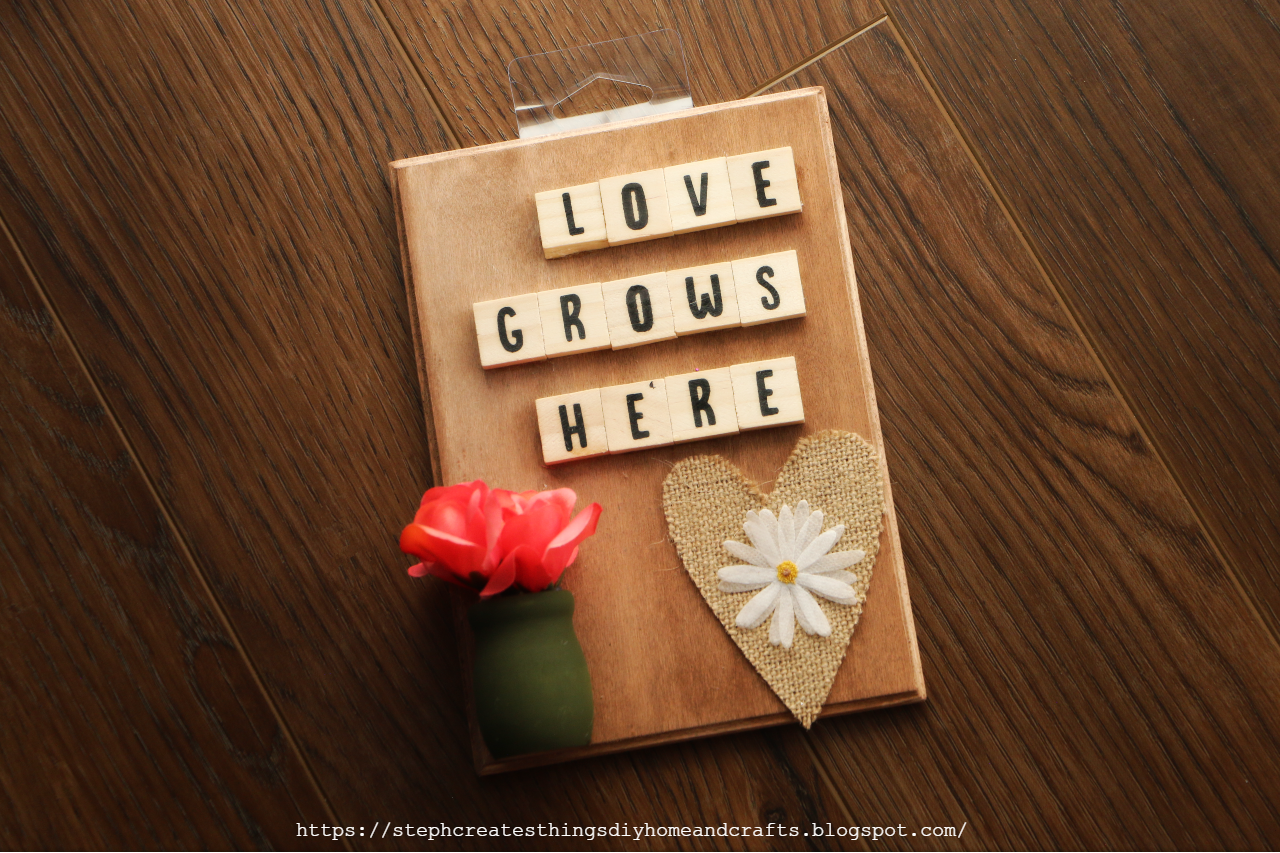
Today we're creating a wood decoration that reads, love grows here. I'm using just a few materials, and I will list them below. If you're ready we will begin creating our wood decoration together.

Video tutorial


Materials needed


One wooden candle cup -
Purchased one 8-pack from Joann's 

If you don't have this hand, you can use a smaller container, such  as a small jar

One fabric heart

Wood tile letters-Purchased at Walmart for $2.97 for a pack of 100

One wood plaque 5x7-Purchased at Walmart for $1.08

One flower embellishment -Purchased at Hobby Lobby

Paint- I'm using Espresso for the wood plaque, and a darker green for the candle cup

Paintbrush or sponge brush

Hot glue/or another strong adhesive

Floral

Floral snips


Start by taking your espresso paint, and applying the paint onto your wood plaque. I used a little water on my sponge brush before applying the paint to my wood plaque. This helped create thin, even layers, and the paint did not go on too dark. I applied around two coats of paint to my wood plaque. Once you have applied the paint, set it aside, and allow it to dry. 


After, take your candle cup, and start to add your paint to it.  I added two coats onto my candle cup. You don't need to paint the opening of the cup. 


Next, take your wood tile letters, and begin to place them where you would like your letters to go on the wood plaque. I started placing my letters on the top right side. I wanted to leave room on the bottom section for my pot, and fabric heart. 

Once you have found the placement for your letters, you can apply hot glue onto the back of each tile and attach it to your wood plaque.


Take your fabric heart, and apply a thin layer of adhesive to the back of it. Once you use the adhesive, place the heart in the bottom right corner. Next, take your flower embellishment, and add it to the center of the fabric heart.


Next, use your floral snips, and begin to cut your floral to size. I cut the stems short for this project. Using just a little hot glue, add the glue to each of the stems, and add them into the candle cup. Adding the glue will help to keep the flowers in place, and from falling out. 


Once you have glued in your floral, take your adhesive, and add some to the top, and bottom of your candle cup. I experimented with both a stronger adhesive and hot glue. I found that using a little E6000 adhesive worked the best for keeping the cup glued in place on the wood plaque. Add your candle cup to your wood plaque, and firmly press. Allow your candle jar to sit, and the glue to harden, and dry completely. 

Your wood decoration is complete. I think this wood decoration looks great hanging, or even on a tray placed with other home décor items. Let me know if you create your very own, and also be sure to check out my other DIY projects. 


Pin/Share/Save


Comments

  1. So sweet, what an adorable decoration. It would make such a lovely house warming gift.

    ReplyDelete
    Replies
    1. Thank you so much. I agree it would make a lovely house warming gift. :)

      Delete
  2. Your decor plaque looks so nice and I like the sentiment you used.

    ReplyDelete
    Replies
    1. Allyson, thank you so very much. I really appreciate you stopping by.

      Delete
  3. How cute! Love the wood plaque and burlap heart. I really like burlap with anything! Thanks so much for linking up at the Unlimited Link Party 75. Pinned.

    ReplyDelete
    Replies
    1. Dee, thank you so much! I love the burlap heart as well. :) Thanks so much for stopping by.

      Delete
  4. This is a delightful sign to go anywhere - kitchen, living room, porch, etc. It looks like a fairly simple craft project, too. Win-Win!

    ReplyDelete
  5. I absolutely love this! I will be pinning this, I want to put this in my entry way after I do the kids' spot.

    I would like to invite you to join my Tell It To Me Tuesday link party for the chance to be featured. This link party runs from Tuesday - Friday, and can be found at Perfectly Imperfect - Life with Lyndsey. Perfectlyimperfect-lwl.com/ > for you > tell it to me tuesday. I hope to see you there!

    ReplyDelete
    Replies
    1. Lyndsey, thank you so much! 😊 I'm so happy to hear that you enjoyed it. I'll be sure to check out your link party. Thank you so much for visiting.

      Delete
  6. Visiting again to say thanks so much for linking up at the #UnlimitedLinkParty 119. Pinned.

    ReplyDelete
  7. Steph, this is so pretty! You had me at burlap. Lol. I like to use scrabble tiles too.
    Thanks bunches for sharing this with Sweet Tea &: Friends this month dear friend.

    ReplyDelete
    Replies
    1. Paula, thank you! Burlap is so fun to work with. These little burlap hearts can be found at Dollar Tree. I also love using the wooden letter tiles that they have there. But you could also use the scrabble tiles! They are so fun to work with.

      Delete
  8. Visiting again to say thanks so much for linking up at #IMadeItMondayLinkParty 29. Pinned again.

    ReplyDelete
    Replies
    1. Dee, thank you. I appreciate you visiting again, and pinning. 😊

      Delete
  9. Love this - I'm featuring you this week when the next To Grandma's house we go link party starts! Thanks for sharing with us!

    ReplyDelete
    Replies
    1. Tarah, thank you so much! I'm happy to hear that you enjoyed this craft. Happy to be featured at your party. :)

      Delete

Post a Comment

I love hearing from you! Your comments and creative ideas truly brighten my day. I do my best to respond to everyone, so if you have a question or just want to say hello, please leave a note below. To keep our community a positive and inspiring space, spam or off-topic comments will be removed. Happy crafting!

Popular posts from this blog

A Touch of Spring: Faux Rose & Wildflower Beaded Wreath Tutorial

Today I’m sharing a soft and delicate spring wreath that comes together beautifully with just a few simple supplies. I’m using a beaded wood wreath as my base, along with faux yellow roses, pink artificial wildflowers, and a bit of foliage to bring everything to life. This project is perfect if you’re looking to add a gentle pop of color and a touch of spring charm to your home. Video tutorial  Supplies You’ll Need Beaded wood wreath Faux yellow roses Pink artificial wildflowers Faux foliage Floral/wire cutters Craft wire Trim Your Florals I started by using my floral cutters to trim the stems of each flower. Make sure the stems are short enough to fit nicely against the wreath, but long enough to secure them with wire. Adjust the length to suit your design and the level of fullness you want in your wreath. I began by cutting my yellow roses first. Prepare Your Craft Wire and  Attach the Roses After I trimmed the roses, I cut small sections of craft wire. These will be u...

Fall Floral Display Using Glass Yogurt Jars

 Hi everyone. I hope that you are all doing well. I am patiently waiting for Fall to arrive. Fall is my favorite season of them all. I love the golden leaves, hot apple cider by the fire pit, sitting out in the evenings roasting marshmallows. It is simply the best for me. Do you have a favorite season? What do you enjoy about it?  Today I am sharing a quick upcycle craft. I decided to use my glass Oui yogurt jars. I love these little jars and what a perfect way to reuse them. I will show you how to decorate these jars using mod podge, and acrylic paint. We will add faux flowers to each glass jar as well. Video tutorial Materials  Three small glass jars I'm reusing my Oui glass yogurt jars Twine Acrylic paint Paintbrushes Mod podge Decorative napkin Faux floral and foliage Decorative tape/Washi tape Scissors Applying paint to glass yogurt jars Begin by applying your paint to two of your glass jars. Each jar needed around three coats of paint.  I used acrylic chalk pai...

DIY Faux Blossom Branch Tree

Are you looking to add some charm to your living space on a budget? Try making your own DIY Faux Blossom Branch Tree. In this tutorial, I will guide you through the process of creating your blossom branch tree. The best part is that this project requires just a few simple materials, and you can even repurpose a section of a tree branch. Alternatively, you can use a smaller section of a tree branch or one similar to the one I am using. So, if you're ready to start, come along and create your blossom branch tree with me. DIY Faux Blossom Branch Tree video tutorial Materials  Section of branches from a tree in my yard faux florals and leaves hot glue  A planter pot Floral cutters  A foam floral block, and optional rocks After inserting your tree branch into the foam block, you can add rocks on top. This will provide additional weight to your pot and prevent the tree branch from shifting or moving around. Cutting the flowers and leaves To create a beautiful blossom tree, foll...

Easy Steps to Create a Cozy Autumn Tablescape at Home

Hello everyone! I’m excited that you decided to visit the blog today. I wanted to share how to create a cozy autumn tablescape at home. My goal was to design something warm and inviting, as our table is a space where we share conversations, drink coffee, tackle homework, and simply enjoy each other’s company.  I typically don’t go all out when decorating my dining table, but I wanted to show you how I styled it using decor pieces I already had. I would love for you to join me in this decorating adventure! Video tutorial Create a Cozy Autumn Tablescape at Home Items I'm adding to my table:  -White tablecloth runner - Battery-operated leaf lights  - Reusing glass jars  - Mini pumpkins and other fall decorations  - Small "Hello Fall" sign  - Faux flowers I began by spreading my white tablecloth down the center of the table. Around Halloween, I purchased this tablecloth a few years ago at my local Walmart. After laying it out, I realized that I could achieve th...

Create a Tissue Holder from a Plastic Container

Hi everyone! I hope you're all doing well. Do any of you have any plastic containers at home? I recently finished a product and after cleaning the container, I wondered what I could reuse it for. I decided to make a tissue holder. It's a simple project and a great way to reuse a plastic container with a lid. I'll guide you through each step and provide some suggestions. If you're ready, let's make your personalized tissue holder. Video tutorial Materials: - Plastic container - Decorative paper or paper bag - Acrylic paint - Scissors - Hot glue - Paintbrush - Craft knife (You may also need sandpaper and floral cutters or other snips) Begin by applying several coats of acrylic paint with a paintbrush, allowing each coat to dry. Next, use scissors to cut out the decorative sections you want for your container. I'm using a decorative paper bag I bought in a pack at my local Dollar Tree. After cutting out each decorative section, use a paintbrush to apply Mod Podge w...

Search This Blog

All content Copyright

Copyright 2021-2025 I ask that you do not take or use my photos or words without permission. If you have any questions, please feel free and contact me. Also, for more information on this blog, check out the disclosure policy tab above. Thank you