
Decorative Spring Wooden Stacked Books

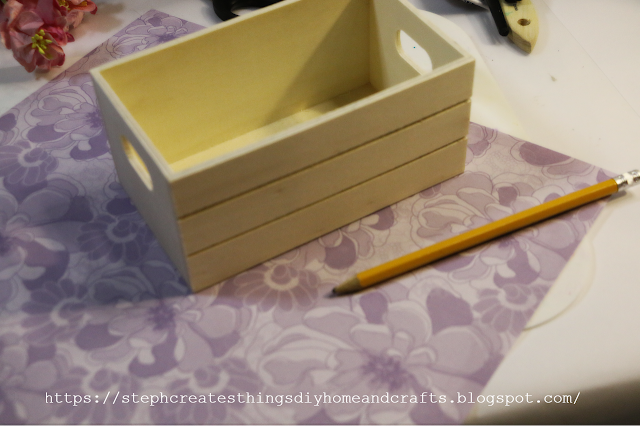
Hello, and welcome to my blogging space! I'm excited about the warmer weather that we are being told we will experience next week. This will be nice since it has been low temps and snowy weather. I've been creating a few Spring crafts, and this DIY project was a fun one. I created a Spring decorative wood book stack, and I'll admit it did not take much time to create, and my material list was simple. If you're ready, let's begin creating your very own wooden stacked books. 


Check out the video tutorial


Start with taking your wooden crate, and craft paper. Use your pencil, and trace out the shape of your wood crate onto your craft paper.


Next, use your scissors to cut out the traced shape. Once you have done this set your traced craft paper aside.


Take your wood crate, and using your paintbrush, add some of your Mod Podge onto the flat surface (which when flipped is the bottom side of the wood crate).  Spread a thin layer of Mod Podge until that surface is completely covered.

Once you have applied the Mod Podge, take the craft paper that you have cut to shape, and add that to the wood crate on top of the Mod Podge. Be sure to smooth out the craft paper. Once you have done that, take some mod podge, and add that to the craft paper. Be sure to spread it evenly, and remove any bubbles or wrinkles.

I used a heat gun to help speed up the drying process. 

Next, take your white paint, and paint around the sides, and front of the wood crate. I applied around three coats of white paint. 

Once you have applied your white paint, take your purple paint, and add just a little in with the white paint. 


After you have mixed the two colors, apply this mixture on top of the white paint. I did gentle brush strokes, and I also added some purple between the lines on the wooden crate.


Now you're ready to take your twine and add your twin around your box. Take a few strands of twine, and wrap it around. Tie off your twine, and you're done. 


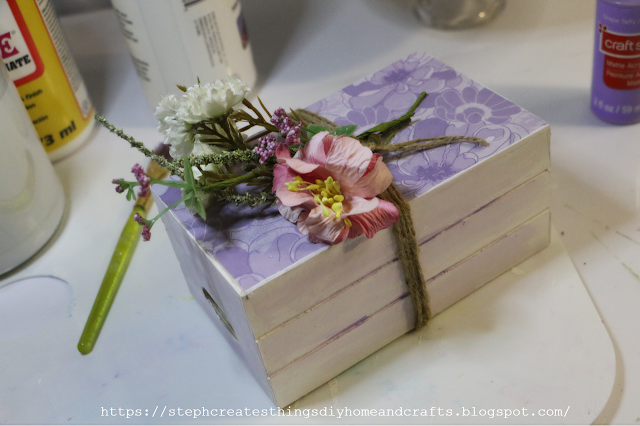
Next, take your assorted flowers, cut them to size, and add them on top of your book under the twine. 


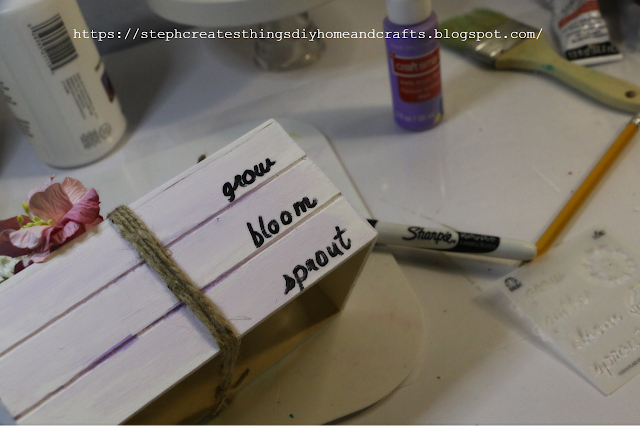
If you have a stencil on hand, take your stencil, and use your pencil to trace any letters or words on the front side of your box. I chose to add words on the right lower side of my box.  After, I used a permanent marker to trace my words.

This last step is optional, but if you have any stickers you can add them to your wood books as well. I added a few that I had on hand. 

And that's it. Your Spring wooden stacked books are complete. This looks adorable on a tiered tray, added along with other Spring home decor items. 


Be sure to check out my other Spring crafts here--- List of spring crafts. Happy crafting! I'll see you soon.

Also, be sure to check out my YouTube channel for more DIY and craft tutorials---Steph Creates-DIY Home & Crafts


Pin/Share/Save


Comments

  1. This is adorable. Can't wait to do this with my granddaughter. Thanks for sharing.

    ReplyDelete
    Replies
    1. Thank you so very much. I hope you and your granddaughter enjoy creating this. Thank you so much for stopping by.

      Delete
  2. This is adorable. Much easier than using the actual wood blocks like I do. I love the spring look. Great DIY. Thanks for sharing at OMHGWW. See you next week. Tweeted & Pinned.

    ReplyDelete
    Replies
    1. Clearissa, thank you so much. I agree, this is much easier than using wood blocks. Thank you so much for stopping by.

      Delete
  3. What a pretty craft! I admire your ability to see how to transform a crate into a popular decorative item. Thanks for sharing with us at Creatively Crafty #ccbg :)

    ReplyDelete
  4. What a great project! That turned out so cute. Thanks so much for sharing at the TFT party. :)

    ReplyDelete
    Replies
    1. Pam, thank you! And thank you for stopping by. :)

      Delete
  5. What a great idea and tutorial! Looks nice! Thanks so much for linking up at A Themed Linkup 100 for Spring Crafts and Décor. Pinned.

    ReplyDelete
  6. This is a cute craft for spring decor. I would love it if you would share this at my Friday With Friends link party: https://myhubbardhome.com/friday-with-friends-advancing-into-spring-link-party/

    Thanks,
    Rachelle

    ReplyDelete
    Replies
    1. Thank you for stopping by, and letting me know about the link party too! =)

      Delete
  7. CONGRATS Stephanie! Your post is FEATURED at A Themed Linkup 101 for Tablescapes from the previous linkup for Spring Crafts and Décor.

    ReplyDelete
  8. Thanks for sharing at the Friday with Friends link party, Stephanie.
    Your craft will be one of the features this week!

    hugs,
    Rachelle

    ReplyDelete
  9. That is such a creative way to use a small crate, so pretty and so clever.

    ReplyDelete
    Replies
    1. Thank you so much. I love how easy it was to create!

      Delete

Post a Comment

Thank you so much for taking the time to leave a comment. Your comments brighten my day. I hope that you know that it is appreciated. I do my best to respond to every comment. If you have a question, please feel free and ask away!

Popular posts from this blog

DIY Wood Riser with Floral Design

 Hello everyone! I hope you're doing well. Today, I'm excited to share a beautiful wood riser you can use to decorate your home. We'll be creating it using only a few materials, and for this project specifically, I'll be using the unfinished rectangle natural wood box from Walmart. I'll provide a detailed list of all required materials and step-by-step instructions. Video tutorial DIY Wood Riser with Floral Design Materials Unfinished rectangle natural wood box -6" x 8" x .75" 3" peg people (these are used for the legs on the wooden riser) Adhesive (I'm using Hot glue) You can also use E6000 Decorative floral napkin Mod Podge 7" One unpainted wood home word sign Scissors Paintbrush Applying paint to wood frame and home sign Begin by applying paint to the wooden box and the home word sign. Mix two paint colors together and use them for the wooden box and home sign. Adding the decorative napkin and Mod Podge Next, use scissors to cut out d

Transforming Ice Cream Cups: DIY Spring Tea Cup Floral Arrangements

  Today, we'll explore a fun and easy DIY project involving repurposing plastic mini ice cream cups into beautiful spring tea cup floral arrangements. This project is a great way to add a touch of spring to your home decor.  Before throwing away those plastic cups, consider the many possibilities in creating something new.  For this project, you will only need a few materials. Our main materials for creating the faux tea cup will be the ice cream cup and air-dry clay. So, if you're ready to create this adorable and creative springtime tea cup floral decoration, let's begin! VIDEO TUTORIAL Materials Plastic ice cream cups (I am reusing two plastic ice cream cups) Spanish moss Floral Mod Podge Decorative floral napkin Artificial spring flowers Acrylic paint (I'm using white) Paintbrush  Optional- Bumblebee button and small dowel rod- Dimensions : 0.1 inches x 6 inches. Air dry clay Scissors Foam block Preparing your cups After washing your ice cream cups and drying them c

Dollar Tree Mini Bead Floral Spring Wreaths

Transform Dollar Tree's mini bead wreaths into beautiful spring floral bead wreaths with this easy DIY tutorial. Add a touch of spring to your home decor with this creative and budget-friendly project.  I'm excited to share a quick and simple DIY project with you today. Last year, I purchased two mini bead hanging decorations displayed with the fall decor. I decided to add them to my craft stash and use them in the springtime. In this tutorial, I will show you how to create mini bead floral wreaths and provide a full list of materials needed for each step.  Dollar Tree Mini Bead Floral Spring Wreaths Video tutorial Materials Round mini beaded hanging decorations Artificial floral accents One large craft/popsicle stick Paintbrush Acrylic paint Floral cutters Hot glue/Adhesive Step one: Applying paint Before painting, remove any previous decorations such as the plaid autumn leaves that were attached to the wreaths I'm using. To start with, apply paint to your beaded wreath. Y

Three Easy Mason Jar Designs

 Hello! Today we'll be making three designs for mason jars. This project is quite simple and requires only one mason jar. We'll create three themes - a star/4th of July theme, a succulent theme, and a summer floral theme. For this craft, I had everything except for my decorative buttons. I managed to find two packs of decorative buttons at my local Walmart - one had cacti designs, and the other had floral designs. I'll take you through each step of how I used these buttons for the project.   Video tutorial Materials  One mason jar- You will only need one jar for this project Foam block- We are using three sections from the foam block.  Craft knife- Used for cutting the foam block if not already cut into sections Hot glue Paint brushes Decorative buttons, or any other decorative item Floral Paint- I'm using chalk paint on my mason jar. You will also need paint for your wooden stars if you are using them. Twine Optional-Foam stars Creating your Star/4th of July design Sta

Wood Box With Glass Bottles Decorative Centerpiece

Hi everyone! I hope that you are all doing well. It has been pretty rainy these past few days. I'm enjoying the rainy weather compared to the really hot days we were getting before.  Today we are working on building a wood box centerpiece. Instead of using the wood crate boxes from Dollar Tree, I wanted to build my own box. For this project, we're using a wood fence picket. I paid $1.48 for one picket, and you can create two boxes with just this one picket. I'm also going to reuse my glass Frappuccino bottles. I will provide a video tutorial as well.  Video tutorial Materials   One wood fence picket- I purchased mine at my local Lowe's for $1.48 Two glass bottles-I am reusing my Starbucks glass bottles Paint Paintbrush Faux greenery Rub-on transfers Wood glue Corner clamps Hot glue One round wooden circle Floral snips Scissors Begin by cutting your wood fence picket. Cut the short ends of your wood 2½ inches. Next, cut the front, back, and bottom of your wood 6¼ inches.

🎄🌟Easy Christmas Gift Wrapping Ideas

Get creative this holiday season with these easy Christmas gift-wrapping ideas. From simple and elegant to fun and festive, find inspiration for wrapping your gifts in style. I’m going to share some quick gift-wrapping decorating ideas with all of you. I grabbed a few empty boxes and my red and brown gift paper. Although I’m not a professional when it comes to wrapping paper, I thought I would share some decoration ideas with all of you. I had all of my materials on hand, but a lot of these are fairly cheap when purchased at a craft store. Let’s decorate! Check out the video tutorial   Materials Wrapping paper Mini garland Acrylic paint Paintbrush Decorative gems Twine or craft rope Decorative tape Tape Hot glue Scissors Wooden Christmas mini decorations (such as a mini wood wreath and an ornament) Gift wrap decoration number one For the first design, I am using brown wrapping paper, tape, red paint, green paint, white paint, two wooden Christmas decorations, hot glue, and twine to cre

Upcycled Craft: Fall Floral Decoration Using A Metal Can

 Hello everyone! I hope you are doing well. Personally, I am tired of the heat we've been experiencing and I'm eagerly anticipating the arrival of fall weather here in Colorado. How is the weather where you are? Thank you all for joining me again to create some crafts today. Our project is a fall flower arrangement made from a metal can. I cleaned out a snack can and transformed it into a beautiful display of fall florals using materials I had at home. However, if you don't have these materials, you can find them at most craft stores. I will provide a list of materials below as always, so let's get started! Video Tutorial Materials One metal can Mod podge Decorative napkin Faux Fall Floral Acrylic paint Wooden beads Paintbrush Scissors Floral cutters Applying paint to the can The first step is to apply paint to your metal can. Make sure to let each coat of acrylic paint dry completely before applying the next coat. Apply a total of three coats of paint and use a blow dr

DIY Spring Flower Terra Cotta Pot

Hello everyone! Today, I'm excited to share a simple re-do craft that will transform a plain terra cotta pot into a beautiful spring gift. I'm reusing one of my old terra cotta pots from a previous project for this craft.-  Spring Floral Clay Pot Design  With just a few easy steps, I'll show you how to create a stunning spring flower pot display that would make the perfect Mother's Day gift, or just to welcome Spring. Let's get started! DIY Spring Flower Terra Cotta Pot Video tutorial Materials Artificial flowers One terra cotta pot (I'm reusing a pot from a previous craft) Acrylic paint Craft stick Faux pearl embellishments Foam block Adding paint and other designs I used a pot that was previously painted and had some twine added to it. I decided to keep the existing paint and twine and add a few painted flowers to the pot. For the flowers, I used light purple and blue for the petals, and white for the center of each flower. Adding embellishments I decided to a