
Target Wood Sleigh Upgrade

Transform your Target wood sleigh into a stunning Christmas centerpiece with this easy DIY upgrade. Get step-by-step instructions and ideas to spruce up your holiday decor.

Christmas wood sleigh painted white, displayed with red wooden stars, mini lights, mini gifts and foliage

Video tutorial

 Hi everyone! I'm so excited to share this simple decorating craft with you. I recently took a trip to one of my local Target stores, and I found this wood sleigh in the Dollar Spot. I was pretty excited because I knew I could upgrade the look of this sleigh with just a few materials. Like most of my crafts, I use just a few materials when creating my crafts.  If you're ready, let's begin and upgrade this wood sleigh.

Materials, foliage, twine, hot glue, wooden sleigh, and paint

Materials needed for this craft

One Wood Sleigh

(Target Dollar Spot)

Wooden Stars 

(Joann's Craft Store)

White paint

Red paint

Scissors

Hot glue

Christmas greenery 

(Joann's Craft Store)

Twine

Optional - Mini lights, wrapped gifts, Christmas Vinyl Sticker

This craft was around $12

Start by applying some white paint to your sleigh. When applying the paint to your sleigh, you can also paint the inside of your sleigh. You will probably need around 2-3 coats of paint for your sleigh.

Set it aside, and allow it to fully dry.


Painted white sleigh


Once your sleigh has had enough time to dry, you can add your Christmas vinyl sticker on the back side of your sleigh. Again, this is completely optional.
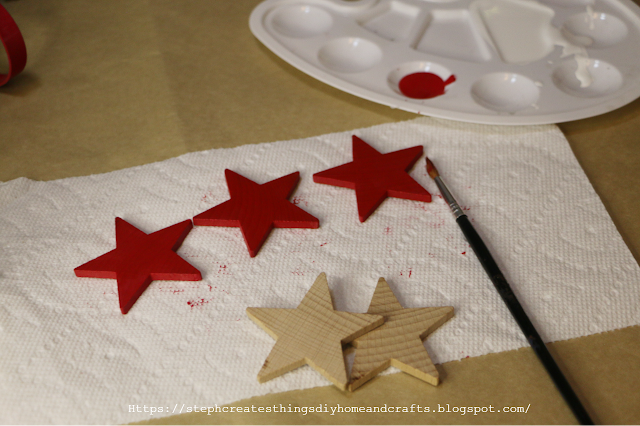
Three painted red wooden stars


Next, take your wooden stars and apply red paint. For my sled, I decided to use three stars.  Be sure to allow your stars to completely dry.

Take some twine, and cut a small strand using your scissors. Using some hot glue, apply your twine onto one side of your sleigh. Apply the hot glue onto the ends of the twine. 

( You can either add your stars on before adding the twine onto your sleigh, or you can add them on after you have added your twine onto your sleigh). 

Ball of twine, hot glue, and scissors

Twine displayed on the side of the sleigh

Stars attached to the twine displayed on the side of the sleigh


I went ahead and added my stars on after my twine was glued onto my sleigh. 

When adding on your stars, be sure to protect your fingers from the hot glue. Add each star onto the twine, and that's it for that step. 

This step is completely optional, but it honestly adds a cute touch to this project. If you have any old boxes around your home or gift boxes, they can easily be added to this project. Take any box and wrap it in your favorite holiday wrapping paper. If you have some gift boxes, take them and add some twine, greenery, and a cute bow. 

Completed wood sleigh displayed with foliage, wooden stars and wrapped gifts


You're ready to start adding in your gift boxes and greenery. Take your greenery and gift boxes, and add them to the inside of your sleigh. If you choose to add any mini lights, add them after you have added them to your decorations. 

Your project is now complete, and wasn't it so easy to create?! I hope you have enjoyed this sleigh upgrade.  I love hearing from you all. Let me know in the comments below if you'll be creating your very own. Thank you so much for stopping by.

I'll see you soon!

Pin Share Save

Pinterest pin displaying completed wood sleigh decoration with text description


Comments

  1. Very cute- I love the lights! Thank you for sharing at Party In Your PJ's - you are being featured on my blog Tuesday evening!

    ReplyDelete
  2. I love your adorable sled. It brings back memories of my childhood.
    Merry Christmas,
    Kippi

    ReplyDelete
    Replies
    1. Kippi, thank you so much. I love that it brought back some memories of childhood for you. :) Thank you so much for stopping by.

      Merry Christmas,
      Stephanie

      Delete
  3. How cute, I like that you added the mini lights! Thanks so much for linking up at the Unlimited Link Party 91. Shared.

    ReplyDelete
  4. Absolutely adorable and so creative.
    I visited you via Share Your Style #412
    I linked up this week with = 10+11+12. It would be awesome if you would share your links with us M-S at SeniorSalonPitStop. You will find it under BLOGGING.

    ReplyDelete
  5. This turned out so great. I was just there and didn't see these. Oh well, may have to go back! I did get two cute star shaped pillows. Featuring when my party opens. Happy Thanksgiving!

    ReplyDelete
    Replies
    1. Carol—oh, I really hope they bring these wagons back! I purchased this some time ago, but it sure would be great if they brought them back. Those pillows sound super cute! I'll need to visit my Target soon and check it out. Thank you for the feature; very exciting. Happy Thanksgiving!

      Delete

Post a Comment

I love hearing from you! Your comments and creative ideas truly brighten my day. I do my best to respond to everyone, so if you have a question or just want to say hello, please leave a note below. To keep our community a positive and inspiring space, spam or off-topic comments will be removed. Happy crafting!

Popular posts from this blog

Transforming Oui Yogurt Jars: Creating a Window Hanging Flower Display

Transforming Oui Yogurt jars into a hanging flower display is a simple way to add charm to any space. In this post, you'll learn how to customize and hang these jars with flowers. Get ready to create a beautiful, eco-friendly display that brightens up your home or garden. Whether you're new to upcycling or just itching for a quick creative fix, this easy and budget-friendly project will brighten up any window in your home with elegance and charm. Video tutorial What You’ll Need: 3 Oui yogurt jars (or any small glass jars you have on hand) Transfer stickers of your choice — I used cold transfer stickers I snagged on sale at my local Michaels Artificial flowers Scissors Floral cutters Twine Spring tension rod (or clear sturdy command hooks) 1. Prep Your Jars and Add a Personal Touch Begin with clean, dry jars. These little glass containers serve as the perfect blank canvas. Select your transfer stickers—I opted for a floral theme because who doesn’t love more blooms? I trimmed th...

Simple DIY Autumn Floral And Bead Wreath

  Create a beautiful autumn wreath with this simple DIY tutorial. Learn how to incorporate floral elements and beads to make a stunning seasonal decoration for your home. Hello! I am delighted to have you here with me today. For this DIY project, I have a simple idea that I think you'll love. We will be creating an Autumn floral and bead wreath using just a few materials. If you're viewing this project, I'm sure you love Fall as much as I do. It is my favorite season, and I have been busy creating new crafts to share with all of you. Video tutorial How to create an Autumn floral and bead wreath Materials One wreath  $4.99  (I'm using a grapevine wreath, and I purchased it at Michael's. It is a 14'' wreath) Faux fall floral  (My flowers were purchased at Michael's, and it was actually a stem bundle)  $9.99 , but they are having a sale. I paid $4.99 Beads  $1.60  (Purchased at Michael's) Stretch cord  $2.88  (Purchased at Walmart) You will also...

$5 Target Mini Wheelbarrow Decoration Redesign

Hello everyone. I hope that you are all doing well. Last week was a busy week for my household. We had lessons and appointments, and a lot of studying happened. With all of the hecticness going on, I was able to take a trip with my girls to one of our local Target stores. I found this super cute mini wheelbarrow in the dollar section during our trip there. This was five dollars, and I couldn't wait to come up with a craft to share with all of you. This is a quick redesign project; you only need a few materials. Video tutorial Materials One mini wheelbarrow Spray paint Faux floral or succulents Painter's tape Floral cutters Hot glue Craft rocks Adding painter's tape to the wheelbarrow Stary by adding your painter's tape to your wheelbarrow. I applied my tape to the areas where I did not want my spray paint getting on.  Adding Spray paint to the wheelbarrow After adding your tape, take your wheelbarrow and add your spray paint. Adding craft rocks inside of the wheelbarrow...

DIY Magnetic Faux Succulent & Floral Lids — Upcycled Fridge Accent

I created these magnetic faux succulent and floral lids using some metal jar tops that I had saved. With a little creativity, they transformed into charming, lightweight accents that add a pop of color and personality to the fridge. Each lid features its own tiny arrangement—part succulent and part floral—all crafted with intention and charm. This project is easy and budget-friendly, allowing you to use items you already have while adding a lovely touch to your home. Quick Video Tutorial Materials Metal jar lids (one large, one small) Letter beads (to spell LOVE ) Faux moss Faux succulents Faux vines Faux flowers (pink, green foliage, white accents) Hot glue gun and glue sticks Magnets I began with the larger metal lid, attaching small letter beads to spell out LOVE . This created a meaningful little focal point and set the tone for the rest of the design. Next, I glued a layer of faux moss along the bottom of the lid. The moss added softness and helped anchor the colorful...

Easy DIY Upcycled Cardboard Heart Flower Holder

 Transform your cardboard into a charming heart flower holder with this easy DIY project, which adds a touch of love to your home! I'm happy to share a simple upcycled craft project with you today. This is the perfect craft if you have extra cardboard around your house after the holidays.  Video tutorial Materials Needed - Cardboard - Scissors - Heart shape for tracing (I’m using a heart from my heart banner) - Acrylic paint (I’m using white and pink) - Pencil - Hot glue - Artificial flowers -Floral foam ball - Optional: Fabric hearts (I found a pack of fabric hearts at my local Dollar Tree) Begin by tracing the heart on the cardboard. I used my fabric banner heart to trace four hearts on the cardboard. Next, using scissors, cut out each heart. Afterward, take a paintbrush and apply paint to each heart. I painted the hearts white and pink, only on the front sides. Use hot glue to begin attaching each heart. When you finish attaching them, there will be an opening in the middle...

Search This Blog

All content Copyright

Copyright 2021-2026 I ask that you do not take or use my photos or words without permission. If you have any questions, please feel free and contact me. Also, for more information on this blog, check out the disclosure policy tab above. Thank you