
Target Wood Sleigh Upgrade

Transform your Target wood sleigh into a stunning Christmas centerpiece with this easy DIY upgrade. Get step-by-step instructions and ideas to spruce up your holiday decor.

Christmas wood sleigh painted white, displayed with red wooden stars, mini lights, mini gifts and foliage

Video tutorial


 Hi everyone! I'm so excited to share this simple decorating craft with you. I recently took a trip to one of my local Target stores, and I found this wood sleigh in the Dollar spot. I was pretty excited because I knew I could upgrade the look of this sleigh with just a few materials. Like most of my crafts, I use just a few materials when creating my crafts.  If you're ready let's begin and upgrade this wood sleigh.


Materials, foliage, twine, hot glue, wooden sleigh, and paint

Materials needed for this craft

One Wood Sleigh

(Target dollar spot)

Wooden Stars 

(Joann's Craft Store)

White paint

Red paint

Scissors

Hot glue

Christmas greenery 

(Joann's Craft Store)

Twine

Optional - Mini lights, Wrapped gifts, Christmas Vinyl Sticker

This craft was around $12

Start by applying some white paint to your sleigh. When applying the paint to your sleigh you can also paint the inside of your sleigh. You will probably need around 2-3 coats of paint for your sleigh.

Set it aside, and allow it to fully dry.


Painted white sleigh


Once your sleigh has had enough time to dry, you can add your Christmas vinyl sticker on the back side of your sleigh. Again, this is completely optional.
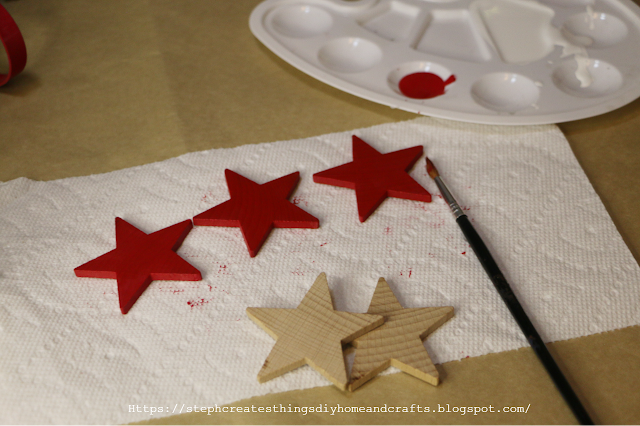
Three painted red wooden stars


Next, take your wooden stars, and apply red paint. For my sled, I decided to use three stars.  Be sure to allow your stars to completely dry.

Take some twine, and cut a small strand using your scissors. Using some hot glue, apply your twine onto one side of your sleigh. Apply the hot glue onto the ends of the twine. 

( You can either add your stars on before adding the twine onto your sleigh, or you can add them on after you have added your twine onto your sleigh). 

Ball of twine, hot glue, and scissors

Twine displayed on the side of the sleigh

Stars attached to the twine displayed on the side of the sleigh


I went ahead and added my stars on after my twine was glued onto my sleigh. 

When adding on your stars, be sure to protect your fingers from the hot glue. Add each star onto the twine, and that's it for that step. 

This step is completely optional, but it honestly adds a cute touch to this project. If you have any old boxes around your home or gift boxes they can easily be added to this project. Take any box and wrap them in your favorite holiday wrapping paper. If you have some gift boxes, take them, and add some twine, greenery, and a cute bow. 

Completed wood sleigh displayed with foliage, wooden stars and wrapped gifts


You're ready to start adding in your gift boxes, and greenery. Take your greenery, and gift boxes, and add them to the inside of your sleigh. If you choose to add any mini lights, add them after you have added them to your decorations. 

Your project is now complete, and wasn't it so easy to create?! I hope you have enjoyed this sleigh upgrade.  I love hearing from you all. Let me know in the comments below if you'll be creating your very own. Thank you so much for stopping by.

I'll see you soon!

Pin Share Save

Pinterest pin displaying completed wood sleigh decoration with text description


Comments

  1. Very cute- I love the lights! Thank you for sharing at Party In Your PJ's - you are being featured on my blog Tuesday evening!

    ReplyDelete
  2. I love your adorable sled. It brings back memories of my childhood.
    Merry Christmas,
    Kippi

    ReplyDelete
    Replies
    1. Kippi, thank you so much. I love that it brought back some memories of childhood for you. :) Thank you so much for stopping by.

      Merry Christmas,
      Stephanie

      Delete
  3. How cute, I like that you added the mini lights! Thanks so much for linking up at the Unlimited Link Party 91. Shared.

    ReplyDelete
  4. Absolutely adorable and so creative.
    I visited you via Share Your Style #412
    I linked up this week with = 10+11+12. It would be awesome if you would share your links with us M-S at SeniorSalonPitStop. You will find it under BLOGGING.

    ReplyDelete
  5. This turned out so great. I was just there and didn't see these. Oh well, may have to go back! I did get two cute star shaped pillows. Featuring when my party opens. Happy Thanksgiving!

    ReplyDelete
    Replies
    1. Carol—oh, I really hope they bring these wagons back! I purchased this some time ago, but it sure would be great if they brought them back. Those pillows sound super cute! I'll need to visit my Target soon and check it out. Thank you for the feature; very exciting. Happy Thanksgiving!

      Delete

Post a Comment

I love hearing from you! Your comments and creative ideas truly brighten my day. I do my best to respond to everyone, so if you have a question or just want to say hello, please leave a note below. To keep our community a positive and inspiring space, spam or off-topic comments will be removed. Happy crafting!

Popular posts from this blog

DIY Budget-Friendly Succulent Plant Hanger Design

 Hi everyone! I hope that you are doing well. Today I am sharing an easy DIY craft that is budget-friendly, and easy to create. A material list will be provided, along with step-by-step instructions on creating your very own. Be sure to check out the video tutorial below. Video tutorial Materials One 4x4 framed art Acrylic paint Faux succulents Hot glue and any other heavy-duty adhesive Twine Scissors  Floral cutters Paintbrush You can find most of these materials at your local Dollar Tree This project costs under five dollars If your frame comes with beads as shown in the picture above, take your scissors and remove the beads. You will actually reuse the beads later on in this craft. Take the inner section of your out and set it aside. Next, take your acrylic paint and paintbrush, and begin to apply your paint to your frame. I applied three coats of my paint to my frame. Next, use your paintbrush you apply paint over the inner section of the frame we removed earlier. I applie...

Decoupaged Glass Jar Candle Holders with Faux Leaves and Gold Wire

  Learn how to create beautiful decoupaged glass jar candle holders using leaves and gold wire. This DIY project is a perfect way to upcycle old glass jars and create unique candle holders for your home decor.  I hope you're all doing well. The weather has cooled down, and we're enjoying the change. I'd like to share a quick upcycling decoupage project with you all today.  I had some extra glass yogurt jars and bought two taper candle holders from Target's dollar section. I wasn't sure what to do with them at first. In today's project, I will show you how to decorate small glass jars using faux fall leaves and gold wire. Video tutorial Materials Needed: - Two taper candle holders - A paintbrush - Mod Podge - Faux fall leaves or a decorative napkin - Hot glue - Two battery-operated tealight candles - Gold wire Applying Mod Podge and faux leaves to glass jars To start with, grab a paintbrush and use it to apply Mod Podge on your glass jar. Apply a small amount of ...

🎄🌟Easy Christmas Gift Wrapping Ideas

Get creative this holiday season with these easy Christmas gift-wrapping ideas. From simple and elegant to fun and festive, find inspiration for wrapping your gifts in style. I’m going to share some quick gift-wrapping decorating ideas with all of you. I grabbed a few empty boxes and my red and brown gift paper. Although I’m not a professional when it comes to wrapping paper, I thought I would share some decoration ideas with all of you. I had all of my materials on hand, but a lot of these are fairly cheap when purchased at a craft store. Let’s decorate! Check out the video tutorial   Materials Wrapping paper Mini garland Acrylic paint Paintbrush Decorative gems Twine or craft rope Decorative tape Tape Hot glue Scissors Wooden Christmas mini decorations (such as a mini wood wreath and an ornament) Gift wrap decoration number one For the first design, I am using brown wrapping paper, tape, red paint, green paint, white paint, two wooden Christmas decorations, hot glue, and twine to...

Upcycled Plastic Bowl Hanging Planter

  Hi everyone! I hope that you are doing well. I had a few microwavable noodle bowls that I washed out and put away. I took a few days to think about what I could create using these bowls. It finally came to me, and I decided I would take one of the plastic bowls, and upcycle it. We will take this plastic bowl, and create a hanging planter. I will take you through each step, and as always I will provide a video tutorial. If you're ready, create with me! Hanging planter video tutorial Materials One Plastic Bowl  I'm reusing a plastic noodle bowl One hole puncher Twine You will need four sections of twine, of the same length. River pebbles, or craft rocks  I purchased river pebbles at my local Dollar Tree. Medium size wood beads (optional) Paint I'm using Acrylic chalk paint. Color is called mineral.l Hot glue Faux succulents, and vines Craft foam blocks Paintbrush or sponge brush Scissors Floral snips Begin by taking your hole puncher, and punching out four holes in your ...

Three Easy Mason Jar Designs

 Hello! Today we'll be making three designs for mason jars. This project is quite simple and requires only one mason jar. We'll create three themes - a star/4th of July theme, a succulent theme, and a summer floral theme. For this craft, I had everything except for my decorative buttons. I managed to find two packs of decorative buttons at my local Walmart - one had cacti designs, and the other had floral designs. I'll take you through each step of how I used these buttons for the project.   Video tutorial Materials  One mason jar- You will only need one jar for this project Foam block- We are using three sections from the foam block.  Craft knife- Used for cutting the foam block if not already cut into sections Hot glue Paint brushes Decorative buttons, or any other decorative item Floral Paint- I'm using chalk paint on my mason jar. You will also need paint for your wooden stars if you are using them. Twine Optional-Foam stars Creating your Star/4th of July design ...

Search This Blog

All content Copyright

Copyright 2021-2025 I ask that you do not take or use my photos or words without permission. If you have any questions, please feel free and contact me. Also, for more information on this blog, check out the disclosure policy tab above. Thank you