
DIY Cute Mini Side Tables

Hello everyone! I am thrilled that you have decided to join me today. We will be making adorable mini side tables. My two daughters have been asking for mini side tables for their rooms. My oldest daughter wanted one to place her favorite book and reading lamp near her bed. This is a hands-on project, so get ready to start creating our mini side tables together.


Watch the video tutorial


Materials needed for the project
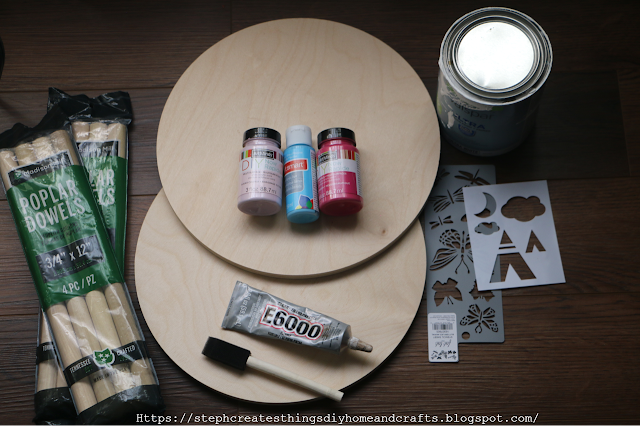

Two precut wood circles 

$8.58 each at Lowes

Paint

You can use any color. You can go with stain or paint. I was using Valspar white paint and a few fun colors.

Two packs of Poplar Dowels 3/4'' x 12''

$3.30 -Each pack comes with 4 dowels, or you can buy the 8-pack. They did not have the 8-pack in stock when I was shopping.

Screws 

I used a total of eight screws


Glue

I used E6000 glue for this project

Drill

You will need this for drilling pilot holes into your dowels and drilling through the table

Paintbrush, sponge brush, or roller

Painters tape


Creating your table

To start off, paint the pre-cut wood circles. I suggest painting the table tops white, including the tops and around the edges. It's best to apply three coats of paint and make sure to let the tabletops dry completely.

While you wait for your precut wood circles to dry, you can start painting the dowels. If you choose to paint them in two different colors, it's recommended to use painter's tape to separate the areas. For instance, I painted one set of dowels with white and blue, and the other set with white and purple. Similar to the tabletop, you will need to apply 2-3 coats of paint to the dowels.


Once you have finished painting your dowels, set your dowels aside and allow them to dry.

Once your dowels are dry, you can start working on attaching  them to the tabletop

Steps on attaching your dowels to your tabletop


To begin, mark the pre-cut circular tabletop with the locations where you want to attach the legs. You can use a speed square to make these marks. After that, drill pilot holes in each dowel and through the tabletop. This step is important to prevent any cracks or splitting.

Now, drill a hole on the top surface of the tabletop, which should be slightly larger than the screw's head, about 1/16 inch deep. This will help in making the screw heads sit flush with the tabletop.

Insert the screws through the tabletop, making sure they poke out from the bottom slightly. Apply glue to the tops of the legs and then screw them in the rest of the way through the tabletop and the dowel.

Once you have attached the legs to the tabletop, take some paint and cover the screws. If you don't want the screws to show, you can use some wood putty and gently sand the putty once it has dried. If you end up applying wood putty, be sure to paint over it once you have sanded it smooth. This should help minimize the screw's appearance.


Final touches

In my video, I mentioned that I had plans to use stencils for the table tops. However, I later decided against it. My 10-year-old daughter wanted a blend of white and blue on her table so that it could resemble the sky, while my 7-year-old wanted white tabletops with purple polka dots. To create the dots, I used a round sponge brush. After touching up the legs, I was done with the project. My daughters were thrilled to have these mini tables in their respective rooms. 

This table is perfect for any space. I hope that you have enjoyed this mini side table DIY project. If you have any questions, please don't hesitate to reach out to me! I love hearing from all of you. 


I'll see you soon!


Pin/Share/Save


Comments

  1. Thanks for sharing with us I'll be featuring you this week when the next to Grandma's house we go link party starts!

    ReplyDelete

Post a Comment

I love hearing from you! Your comments and creative ideas truly brighten my day. I do my best to respond to everyone, so if you have a question or just want to say hello, please leave a note below. To keep our community a positive and inspiring space, spam or off-topic comments will be removed. Happy crafting!

Popular posts from this blog

Easy Steps to Create a Cozy Autumn Tablescape at Home

Hello everyone! I’m excited that you decided to visit the blog today. I wanted to share how to create a cozy autumn tablescape at home. My goal was to design something warm and inviting, as our table is a space where we share conversations, drink coffee, tackle homework, and simply enjoy each other’s company.  I typically don’t go all out when decorating my dining table, but I wanted to show you how I styled it using decor pieces I already had. I would love for you to join me in this decorating adventure! Watch the video tutorial Create a Cozy Autumn Tablescape at Home Items I'm adding to my table:  -White tablecloth runner - Battery-operated leaf lights  - Reusing glass jars  - Mini pumpkins and other fall decorations  - Small "Hello Fall" sign  - Faux flowers I began by spreading my white tablecloth down the center of the table. Around Halloween, I purchased this tablecloth a few years ago at my local Walmart. After laying it out, I realized that I could ...

How to Make Easy Beaded Wine Glass Charms

 I love creating small, simple crafts that add a personal touch to gatherings, and these wine glass charms were such a fun project. They’re easy to make, customizable, and perfect for parties, holidays, or even a cozy night in with friends. Each charm slips right onto the stem of a wine glass, making it easy for everyone to keep track of their drink. These charms come together quickly using beads, wire rings, and small metal pendants. You can mix and match colors and charms to fit any theme, and each one turns out a little different — which is part of the fun. Watch the video tutorial Materials Here’s what I used to make my wine glass charms: Wire rings Beads Small metal charms Jewelry pliers If your wire rings need trimming, use wire cutters—mine didn’t, so I didn’t need them for this project.  Choose your beads and charms Pick out the colors and shapes you want to use. I chose soft pinks, purples, and clear beads, along with heart, spiral, and flower charms. Each charm desig...

3 Ways To Decorate Wood Pumpkins

 Hi everyone! I hope that you are all doing well. I created these adorable pumpkin decorations and wanted to share them with you. I'm going to take you through three different design styles for each pumpkin. This is a pretty simple project and takes just a few materials.  Check out the video tutorial!  Materials Three wood pumpkins I purchased a pack of these pumpkins at Walmart. They actually come with string for hanging Mod Podge Paint Wood tile letters Decorative napkin Scissors Hot glue Twine Faux fall floral Wood beads Paintbrush For my first pumpkin design, I mixed two paint colors together. I used my chalk paint, and milk jug and mixed it with a red acrylic paint I had on hand. I used brown to paint the stem of my pumpkin. Next, I decided to add a leaf, and two flowers. I used my hot glue and added them to my pumpkin. That completes our design for pumpkin number one. For my second design, I painted my pumpkin white and the stem a light green.  After allowing m...

Easy Breezy DIY: How To Make Summer Coasters

Happy Summer! I'm excited to share this simple DIY craft with you. I found some cute summery napkins at my local Dollar Tree and knew I wanted to create another summer craft, but I wasn't sure what I wanted to create. Today I will show you how to create these simple summer coasters that are perfect for the season. Video tutorial Easy Breezy DIY: How To Make Summer Coasters Materials: - Round wood circles - Napkins - Mod Podge (I'm using the dishwasher-safe one) - Acrylic paint - Paintbrush - One cork sheet (I'm using the adhesive cork sheet from Dollar Tree) Begin by taking your adhesive cork sheet and flipping it over so that the adhesive backing is facing up. Next, take a pencil and start to trace each of your round wooden circles. Then, take your scissors and cut out each of the traced circles. You can use a craft knife to make any necessary adjustments.  After that, take your circles and begin to remove the back of each of the cork circles exposing the sticky backin...

A Sweet Little Clay Trinket Dish Makeover

If you’re looking for a quick, beginner‑friendly craft, this hand‑painted clay trinket dish is such a sweet project. I’ll show you how to turn a simple clay blank into a petite floral dish with a glossy finish that’s perfect for holding rings, earrings, and tiny treasures. It’s a small DIY that comes together quickly and adds a charming, whimsical touch to any space. Watch the Video Tutorial Want to See the Process? I filmed the whole thing! You can watch the full painting process here: Materials I Used small clay trinket dish acrylic paint (green base + floral colors) fine detail brush gold paint Mod Podge (glossy) This dish started out completely plain. I love pieces like this because they’re basically a blank canvas, no pressure, just play. I chose a soft green base coat to give the florals something cozy and calm to sit on. Once the base was dry, I started building the design: stems and leaves first tiny pops of color for the flowers a thin black outline to make everything stand ou...

Search This Blog

All content Copyright

Copyright 2021-2026 I ask that you do not take or use my photos or words without permission. If you have any questions, please feel free and contact me. Also, for more information on this blog, check out the disclosure policy tab above. Thank you