
Easy Dollar Tree Frog Garden Decoration Using One Clay Pot

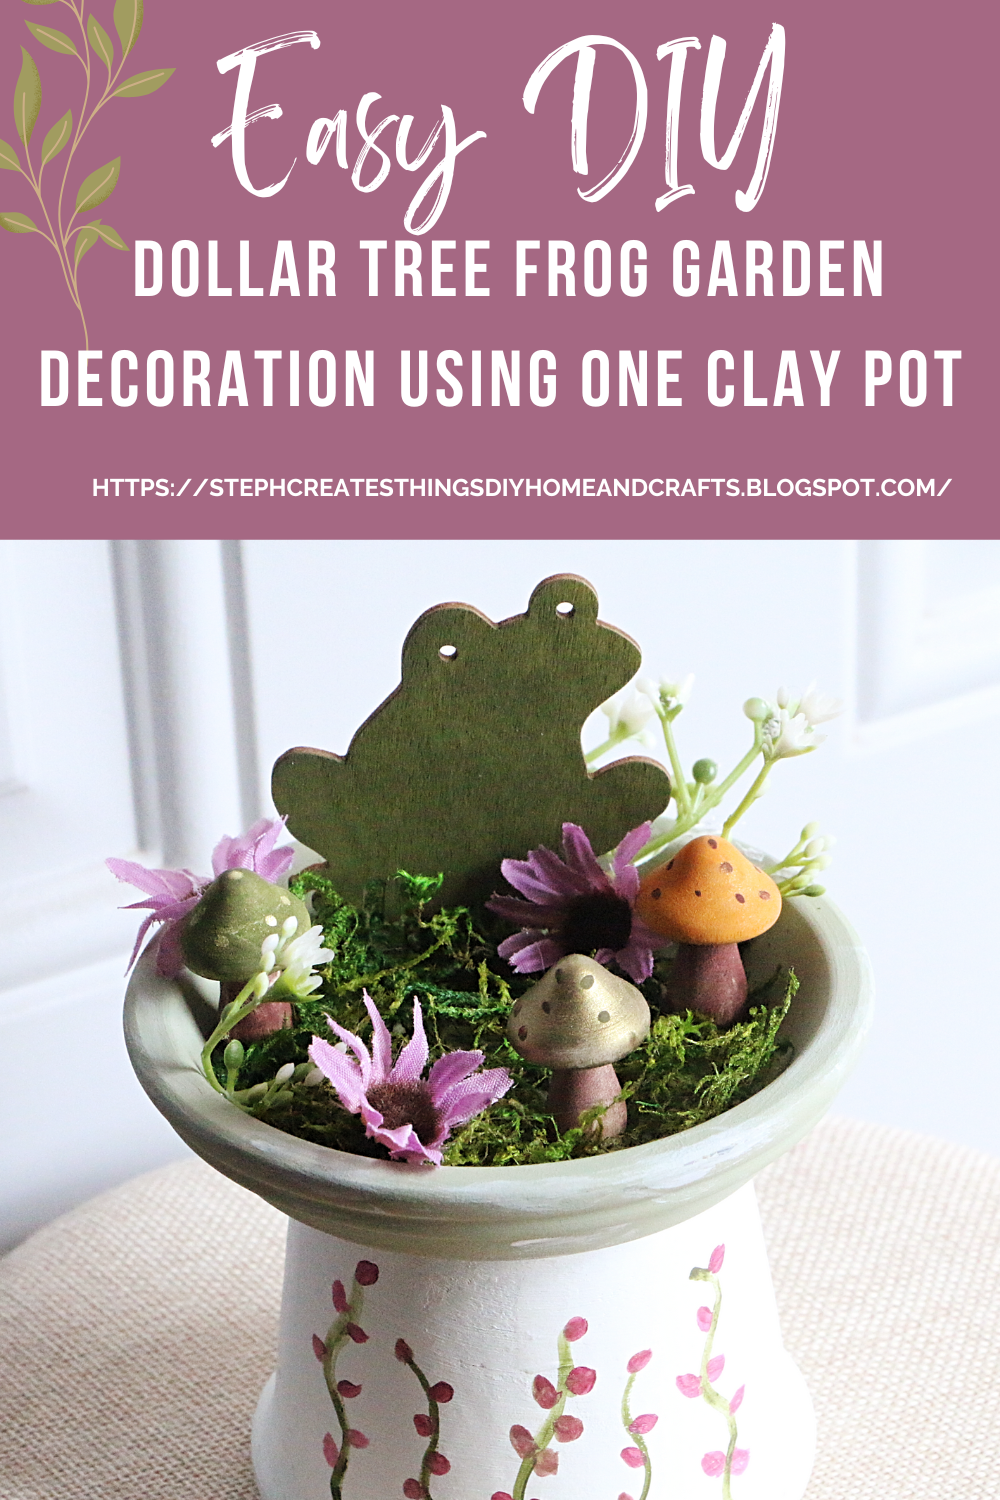
There's something truly magical about transforming everyday items into enchanting décor, and today, we're bringing a touch of whimsy to your garden! Using a simple clay pot, a charming wooden frog decoration, vibrant faux flowers, and mini mushrooms from Dollar Tree, you can craft an enchanted frog garden decoration that feels like it belongs in a fairy tale.


Video tutorial


What You'll Need:

  • 1 Clay pot (any size)

  • 1 Wooden frog decoration (available at Dollar Tree)

  • Faux flowers in assorted colors

  • Mini mushrooms (available at Dollar Tree)

  • Acrylic paints & brushes

  • Hot glue gun & glue sticks

  • Moss or faux greenery (optional)

1. Prep Your Clay Pot

I repurposed a clay pot and saucer from previous craft endeavors for this project. The saucer was pre-painted, with craft moss attached for texture. If you're starting fresh, use adhesive to secure the saucer to the pot's base. Once flipped upside down, the saucer sits on top while the pot’s opening faces downward. Paint both pieces, and once they’re dry, add craft moss to the saucer for a natural feel.

2. Paint the Wooden Frog

I used floral cutters to remove the wooden stick attached to the frog, as I wanted only the frog itself. Using a small sponge brush, I applied dark green paint to give the frog a lively and natural look.


3. Decorate the Mini Mushrooms

I incorporated three wooden mushrooms into the design, painting them in warm, earthy tones: orange, brown, green, and bronze for a woodland-inspired effect.


4. Add Decorative Details

I painted delicate green vines on the pot to enhance the garden aesthetic and accented them with small purple flower blossoms. Then, I attached the frog, mushrooms, and artificial flowers to the saucer using hot glue to ensure they stay securely in place.


Final Thoughts

Your frog garden decoration is ready to shine! Display it in a cozy corner, a tiered tray, or as a charming accent on your mantel. This delightful DIY is affordable and simple to create and brimming with charm!



Pin Share Save


Comments

  1. This is so adorable! I love the frog and the tiny mushrooms!

    ReplyDelete
    Replies
    1. Susan, thank you. I'm glad you enjoyed it. 😊

      Delete
  2. Adorable! I love seeing what you come up with from DT. Our home away from home, right? Featuring when my link party opens.

    ReplyDelete
    Replies
    1. Carol, thank you! I enjoy sharing at your party. :) Have a great weekend.

      Delete
  3. This is so clever and fun! You did a lovely job on the flowers. Thank you for sharing this with us at the Will Blog for Comments #61 linkup! Looking forward to see what you'll share next week at #62. Have a great week.

    ReplyDelete
    Replies
    1. Jennifer, thank you! Happy that you enjoyed this craft. :)

      Delete
  4. This is so cute! You are so creative.
    Thanks bunches for sharing with Sweet Tea & Friends this month my friend.

    ReplyDelete
  5. This little mini forest in a plant pot is positively enchanting! Way to work simple dollar store items to elevate them to this! Adorable.

    ReplyDelete
    Replies
    1. Donna, thank you! I'm so glad that you enjoyed it. 😊

      Delete

Post a Comment

I love hearing from you! Your comments and creative ideas truly brighten my day. I do my best to respond to everyone, so if you have a question or just want to say hello, please leave a note below. To keep our community a positive and inspiring space, spam or off-topic comments will be removed. Happy crafting!

Popular posts from this blog

Easy Steps to Create a Cozy Autumn Tablescape at Home

Hello everyone! I’m excited that you decided to visit the blog today. I wanted to share how to create a cozy autumn tablescape at home. My goal was to design something warm and inviting, as our table is a space where we share conversations, drink coffee, tackle homework, and simply enjoy each other’s company.  I typically don’t go all out when decorating my dining table, but I wanted to show you how I styled it using decor pieces I already had. I would love for you to join me in this decorating adventure! Watch the video tutorial Create a Cozy Autumn Tablescape at Home Items I'm adding to my table:  -White tablecloth runner - Battery-operated leaf lights  - Reusing glass jars  - Mini pumpkins and other fall decorations  - Small "Hello Fall" sign  - Faux flowers I began by spreading my white tablecloth down the center of the table. Around Halloween, I purchased this tablecloth a few years ago at my local Walmart. After laying it out, I realized that I could ...

How to Make Easy Beaded Wine Glass Charms

 I love creating small, simple crafts that add a personal touch to gatherings, and these wine glass charms were such a fun project. They’re easy to make, customizable, and perfect for parties, holidays, or even a cozy night in with friends. Each charm slips right onto the stem of a wine glass, making it easy for everyone to keep track of their drink. These charms come together quickly using beads, wire rings, and small metal pendants. You can mix and match colors and charms to fit any theme, and each one turns out a little different — which is part of the fun. Watch the video tutorial Materials Here’s what I used to make my wine glass charms: Wire rings Beads Small metal charms Jewelry pliers If your wire rings need trimming, use wire cutters—mine didn’t, so I didn’t need them for this project.  Choose your beads and charms Pick out the colors and shapes you want to use. I chose soft pinks, purples, and clear beads, along with heart, spiral, and flower charms. Each charm desig...

A Sweet Little Clay Trinket Dish Makeover

If you’re looking for a quick, beginner‑friendly craft, this hand‑painted clay trinket dish is such a sweet project. I’ll show you how to turn a simple clay blank into a petite floral dish with a glossy finish that’s perfect for holding rings, earrings, and tiny treasures. It’s a small DIY that comes together quickly and adds a charming, whimsical touch to any space. Watch the Video Tutorial Want to See the Process? I filmed the whole thing! You can watch the full painting process here: Materials I Used small clay trinket dish acrylic paint (green base + floral colors) fine detail brush gold paint Mod Podge (glossy) This dish started out completely plain. I love pieces like this because they’re basically a blank canvas, no pressure, just play. I chose a soft green base coat to give the florals something cozy and calm to sit on. Once the base was dry, I started building the design: stems and leaves first tiny pops of color for the flowers a thin black outline to make everything stand ou...

How I Refreshed an Old Garden Statue with Paint (Easy Patio DIY)

This charming toad perched on his toadstool has been a beloved part of our patio for years, enduring the passage of time while gradually succumbing to the effects of sun and weather. With each season, he has faded a little more, losing some of his vibrant colors and details. Rather than allowing him to blend into the background and become just another forgotten decoration, I decided it was time to breathe new life into him.  Watch the Video Tutorial I shared the whole process in a quick YouTube Shorts video called “Watch Me Refresh This Old Garden Statue.” It’s a simple before‑and‑after, but such a satisfying one.  Materials I Used Garden statue (mine is a toad on a toadstool) Sandpaper Acrylic paints Small detail brushes Mod Podge (for sealing and protection) Sanding and Painting I began by gently sanding the statue to smooth out the chipped and faded paint. It only takes a few minutes, but it makes such a difference. Once the surface felt ready, I brought out my a...

Four Colorful Fall Tray Designs Using Faux Pansies

Fall is the perfect season to cozy up your home with warm tones, textured layers, and pops of unexpected color. Today, I’m sharing four creative ways to decorate a fall tray using faux pansies—yes, pansies! These cheerful blooms aren’t just for spring. With the right mix of autumn accents, they can bring a vibrant twist to your seasonal decor.  I'll be showing you how to create four fun and colorful fall tray designs using faux pansies. Follow along as I decorate and show you how to get inspired to add a touch of autumn to your home decor. Video tutorial Whether you're styling a coffee table centerpiece or a kitchen vignette, all you need is: A tray of your choice Faux pansies or other seasonal flowers Decorative pots, metal tins, or vases A few favorite fall-themed accents, like pumpkins, candles, or woodland creatures  1. Thankful & Bright: Yellow Pansies with a Metal Bucket For this first tray, I used my metal autumn bucket that reads “Always Be Thankful”—a Dolla...

Search This Blog

All content Copyright

Copyright 2021-2026 I ask that you do not take or use my photos or words without permission. If you have any questions, please feel free and contact me. Also, for more information on this blog, check out the disclosure policy tab above. Thank you