
How to Make an Easy Hydrangea Grapevine Wreath

This easy tutorial teaches how to make a beautiful grapevine wreath with pink hydrangea flowers. Perfect for spring home decor.

Hello everyone! Today, I am excited to share my latest creation with you. I decided to make a simple wreath for the Spring season using some materials I already had at home. You don't need many materials to create your own wreath, which makes this project perfect if you're looking for something to do with some extra materials you have lying around.


floral wreath with hello design

Video tutorial

Materials-flowers, wreath, paint and wire
Materials
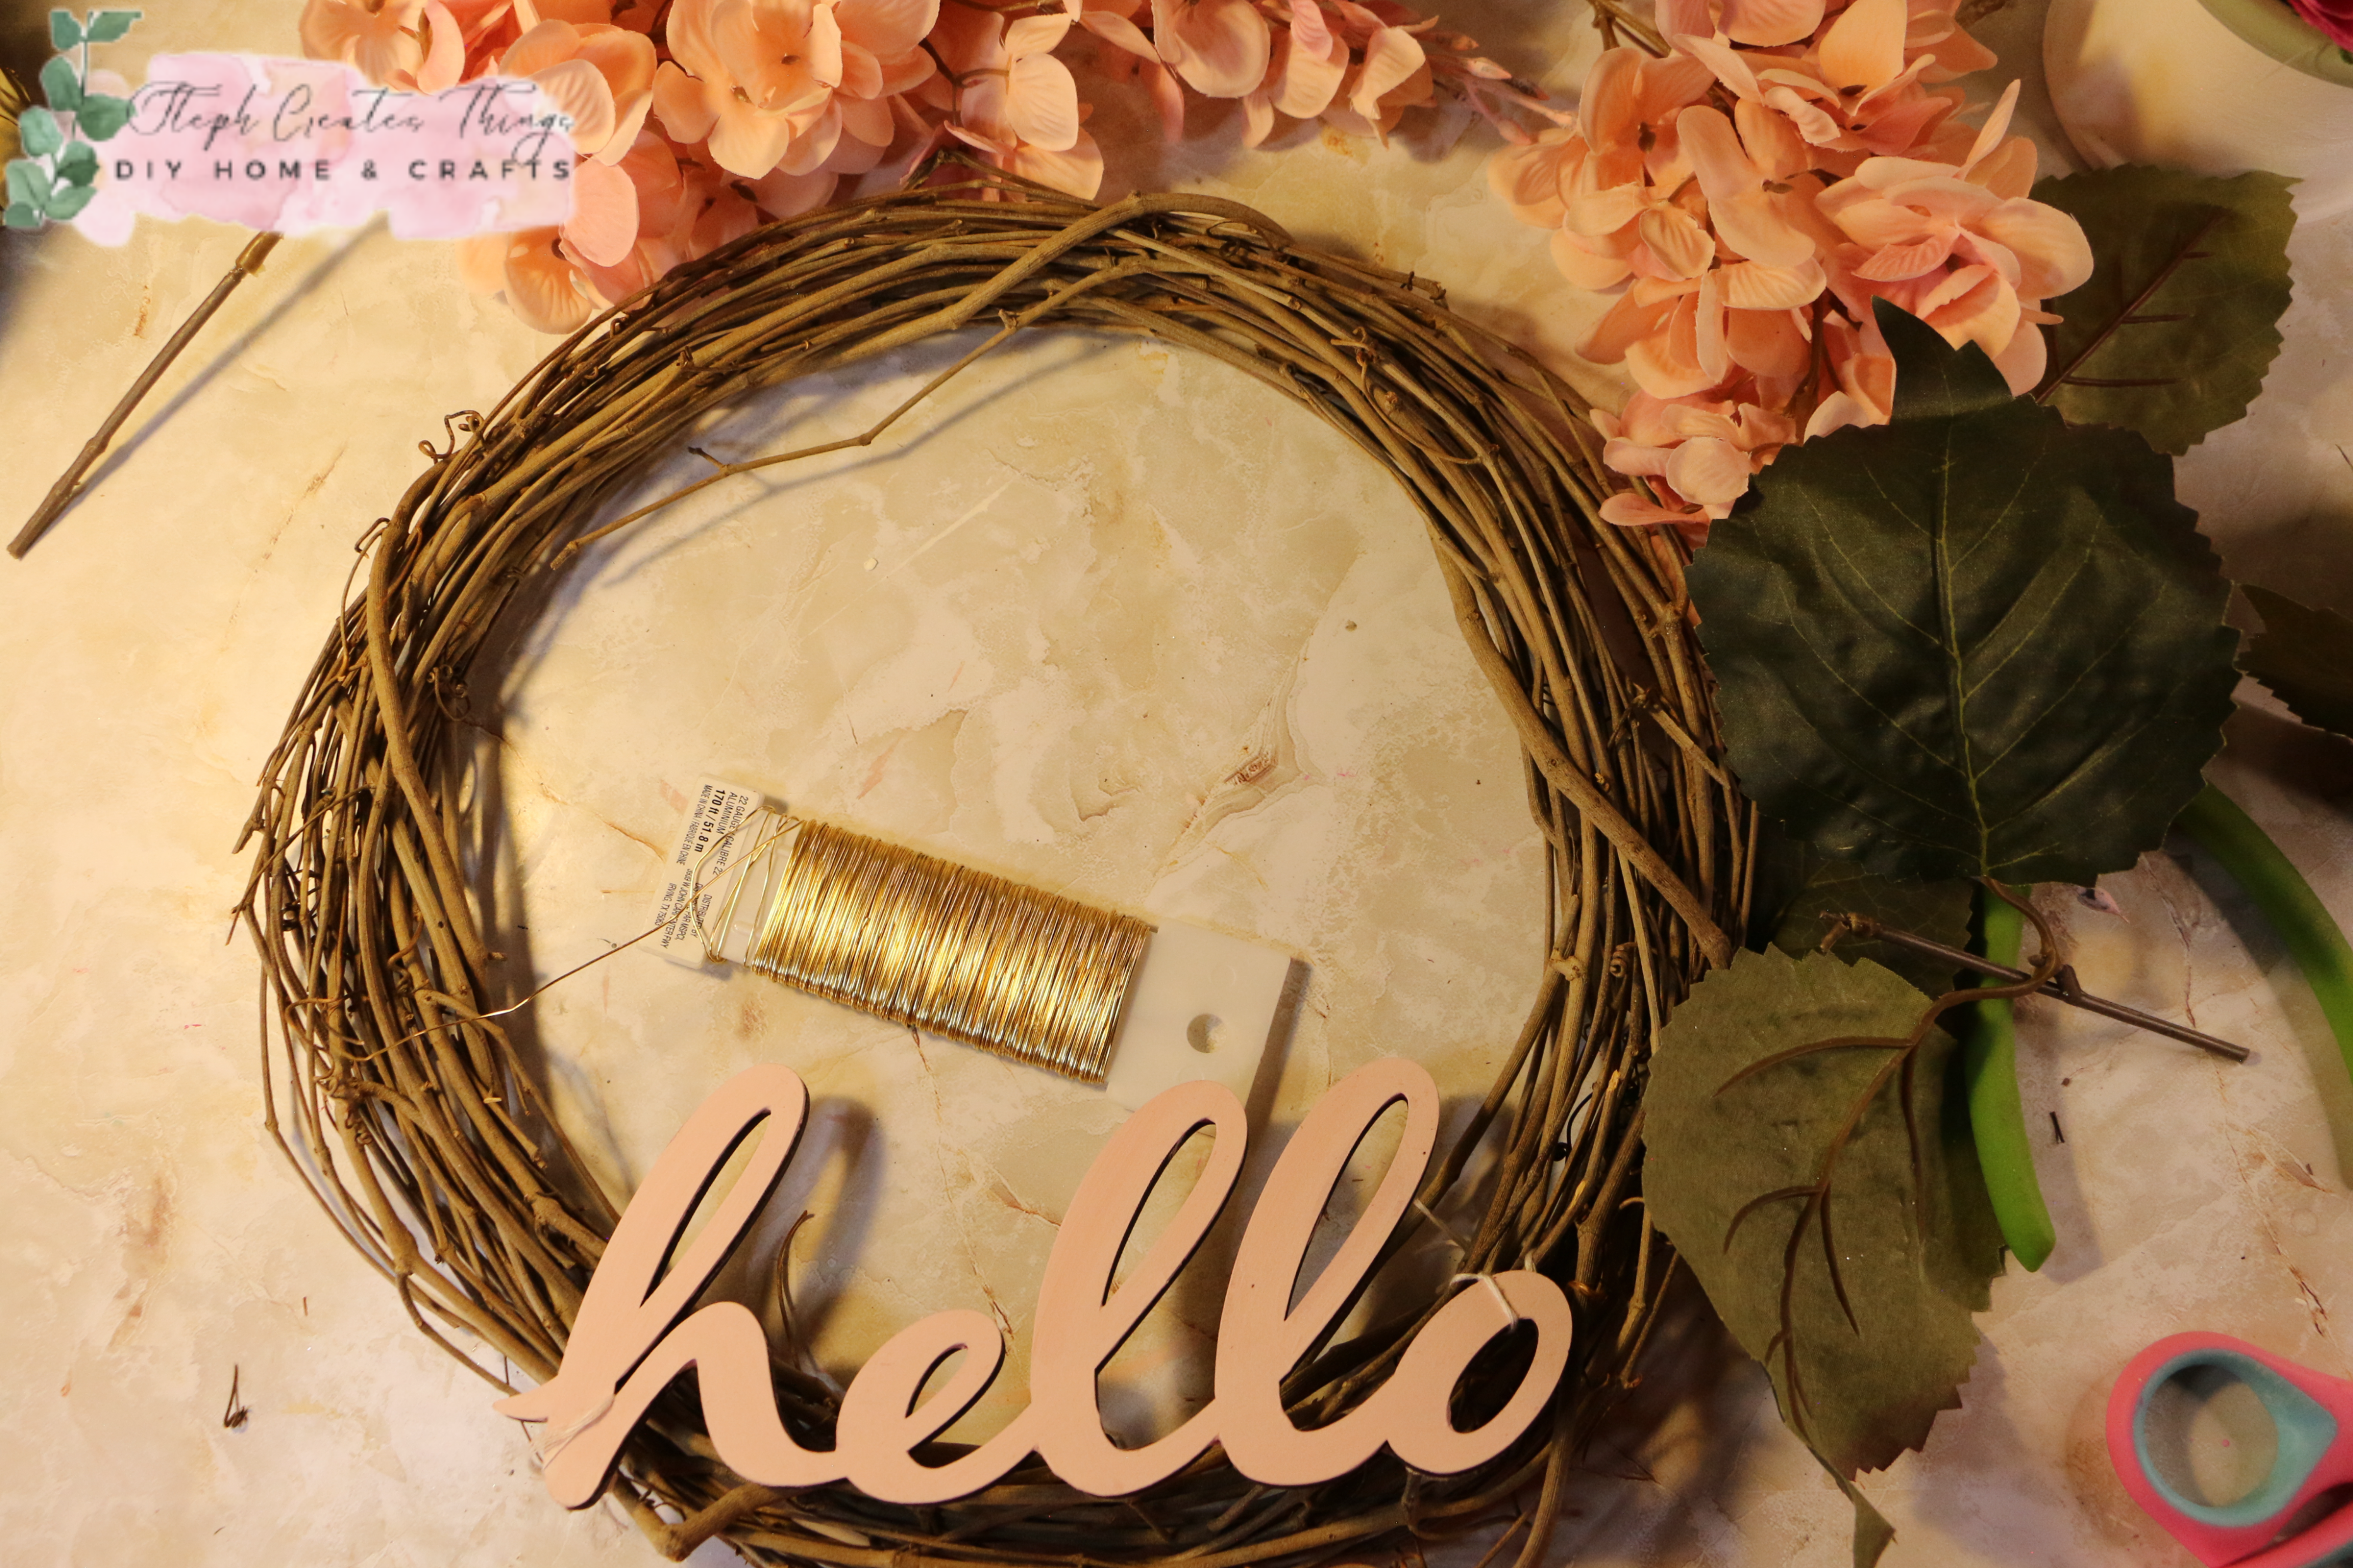
One grapevine wreath 
18" diameter
Artificial hydrangea flowers
One hello decoration
Wire
Floral cutters
Twine
String
Paint

Paint and hello decoration
To create a new spring-themed wreath, start by painting your hello sign. If you already have a hello sign, you can change its color to match this project. Allow the paint to dry completely before moving on. 
wreath, hello sign and string

hand holding hello sign over wreath
Once the sign is dry, attach it to your grapevine wreath. I suggest using a string to attach the sign. Pick a string color that blends in with the paint you will apply later. Thread the string through the letters and tie it off on both ends. 


hello sign, wire, and wreath

Now, it's time to add flowers to your wreath. Cut smaller sections of your flower bundle using floral cutters. Remove some leaves to add later. Cut wire into sections. Take each section of wire and insert it through the wreath and around the flowers. Twist the wire ends to secure each section of the flower in place. 

You can add flowers on one side of the wreath or all around it. Use the leaves you cut earlier to fill any open areas on the wreath. Simply push them through the wreath without using wire.

floral, wreath, and twine

The final step is to cut some twine and fold it so the ends meet. Tie the twine to the wreath to create a hanger. 

By recycling materials, you can create a beautiful and simple wreath that is perfect for displaying during the spring season.

You might also enjoy:

Pin Share Save

Hydrangea Grapevine Wreath Pinterest Pin

Comments

  1. Replies
    1. Jenna, thank you! 😊 I appreciate you visiting.

      Delete
  2. What a lovely way to recycle bits around the home. Your wreath looks beautiful! :)

    ReplyDelete
    Replies
    1. Jayne, thank you. 😊 I appreciate you visiting.

      Delete
  3. This is so pretty, I love a cheerful wreath. Thanks for sharing at Handmade Monday :-)

    ReplyDelete
  4. This is just so pretty. Might have to try and make my own

    ReplyDelete
    Replies
    1. Natasha, thank you! Yes, give it a try. 😊 I appreciate you visiting.

      Delete
  5. Replies
    1. Amy, you're so kind. I appreciate it so much. 😌 Thank you.

      Delete
  6. Steph, this is just lovely! I appreciate the tutorial . Pinned 📌.
    Thanks so much for sharing this tutorial with Sweet Tea & Friends this month.

    ReplyDelete

Post a Comment

Thank you so much for taking the time to leave a comment. Your comments brighten my day. I hope that you know that it is appreciated. I do my best to respond to every comment. If you have a question, please feel free and ask away!

Popular posts from this blog

How to Make a Charming Tea Bag Holder Using a Garden Pot and Wood Circle

  Are you a tea lover looking for a creative DIY project? Learn to create a unique tea bag holder using a garden pot, wood circle, wooden bead, and paper floral decorations. Get inspired and add a personal touch to your tea time. Today, we will make a tea bag holder using a garden ceramic pot and a wooden circle. This holder is both functional and cute. Below, I will provide a list of materials and step-by-step instructions. Video tutorial How to Make a Charming Tea Bag Holder Using a Garden Pot and Wood Circle Materials  Garden pot- I'm using a white 4inch planter pot (The one I am using is a ceramic pot)  One wood circle- I picked up a pack of 6  3'' wood circles at my local Walmart store for $1.80 Mod Podge Decorative napkin Paintbrush One medium or large wooden bead Paper flowers and leaves Adhesive Scissors White acrylic paint Letter stamps Stamp ink Preparing your decorative napkin and Mod Podge Let's begin by taking a decorative napkin and removing the second lay

Easy 4th Of July Metal hanging design

 Hello everyone! How have you been? I hope all is well. My girls are enjoying the start of summer break, and this mama is busy. I wanted to share this super easy decoration with all of you. I created this simple metal hanging decoration for the 4th of July. I absolutely love how it turned out. I found this metal holder at my local Dollar Tree. I haven't seen it in the store before. I was excited to find this and brainstorm for my next project. As always, the material list is below. I will walk you through each step of creating your very own.  Video tutorial Materials One metal hanging holder Mod Podge  Tulle or ribbon Acrylic paint Craft foam block Foam scatter stars Faux flowers One decorative napkin Scissors Floral cutters Hot glue Three craft sticks Twine Applying paint to metal design Start by taking your paintbrush and applying your acrylic paint to your metal holder. I only used my paint on the metal surface. When applying the acrylic paint I noticed it does go on smoothly. Y

How to Create an Artificial Succulent Birdhouse Decoration

  Hello everyone! I have a quick and easy DIY craft project to share with you. I wasn't sure what to do with the second birdhouse I purchased at my local Dollar Tree a while back. If you follow me, you probably know how much I love succulents, especially faux ones. So, why not design a birdhouse with a faux succulent roof? I would love it if you could create one with me. The process is simple, and I'll take you through a full materials list. Video tutorial How to Create an Artificial Succulent Birdhouse Decoration To make the birdhouse design, you will need the following materials: - One craft birdhouse (you can buy it at Dollar Tree) - Assorted faux succulents - Craft moss - Artistic paint (Espresso in this case) - Paintbrush - Hot glue Applying paint to the birdhouse Start by applying acrylic paint to your birdhouse. Use Espresso color, and add a small amount of water to thin out the paint. This will result in a stained finish without having to use stain. After applying the p

Floral Painted Jewelry Dish using Plant Saucer

Learn how to make a beautiful floral-painted jewelry dish using a plant saucer with easy step-by-step instructions in this guide. Today, I'm excited to share a DIY tutorial with you. We'll be making a jewelry dish using plastic plant saucers. I had bought two plant saucers from Lowe's but had yet to use them. So, this would be a great way to make use of them. I made two jewelry dishes for my daughters. Video tutorial Floral Painted Jewelry Dish using Plant Saucer These are the materials I am using:  Plastic plant saucers that measure 4.17 x 4.17 x 1.01 inches  Acrylic paint in various colors Paintbrushes Mod Podge Painting flowers onto the plant saucer First, make sure your plant saucer is clean and dry. Then, use a small paintbrush to paint a few assorted flowers on it. Paint as many flowers as you like. Adding a painted background Once the paint has dried, paint the background of your plastic saucer with your choice of paint. I painted one dish a light blue, and the other

Fun Decorative Summer Sign

  Hi everyone! I'm so excited to bring you all this fun summer craft. Today we're creating this fun summer hanging sign. I was excited to find some items at a discount. If you're ready, I'll take you through each step to create your summer decorative sign. Video tutorial Materials I found the floral at Michael's craft store for a discounted price of $0.79.  I bought a summer-designed napkin at Dollar Tree for $1.25 per pack.  The "Hello" wood décor was purchased at Michael's for $1.19, as well as the wood summer décor, which was also discounted.  I only used the summer flip-flops for my craft, at $1.19 each. I'm using white and bright magenta paint.  The wood square plaque measuring 10'' x 10'' was bought at Michael's for $5.99.  I also got Mod Podge, a sponge brush or paintbrush, floral snips, scissors, and wire cutters, which are needed to remove the metal section from the summer wood décor pieces. Begin by applying your white

DIY Cute Tabletop Organizer Using Metal Cans

Hello there! If you're new here, welcome to my blog! In this post, I will be sharing an easy DIY tutorial on how to create a functional and adorable tabletop organizer using metal cans. With a few basic materials such as a round particle board, spray paint, and some other supplies, you can transform ordinary cans into a stylish and useful organizer to keep your desk or workspace tidy. I hope you enjoy this tutorial and find it helpful! Video tutorial  DIY Cute Tabletop Organizer Using Metal Cans     Materials needed: - One round wooden board - Four tin cans - Chalk spray paint - Acrylic paint - Mod Podge - Decorative napkin - Four wooden square pieces - Scissors - Wood glue - Paintbrush Optional: - Twine - Fabric hearts I found a color called Ella Rose at my local Lowe's store. This time, I decided to work with chalk spray paint instead of using regular paint and a paintbrush. I took four cans to my garage and sprayed around three coats of chalk paint on them. If you decide to

DIY Dollar Tree Nail Polish Organizer

  Hello there! I'm delighted to have you on the blog today. Are you seeking a creative DIY idea to organize your nail polish collection? If yes, then you have come to the right place.  Today, I will share a simple and functional method to organize your nail polish collection using only three main materials. You will need stock paper, gem strips, and a three-compartment plastic organizer, all of which can be purchased from your local Dollar Tree or craft store. Video tutorial  DIY Dollar Tree Nail Polish Organizer These are the things you'll need:  A plastic three-compartment organizer  Gem strips  Shimmery cardstock (found a pack at Dollar Tree)  Hot glue  Scissors and a pencil Tracing the organizer onto cardstock  To create your nail polish organizer, first, place the plastic organizer on top of the cardstock, and trace the shape of the organizer on the cardstock using a pencil. Don't worry if it could be better, just focus on tracing the shape as accurately as possible. C

Dollar Tree Mini Bead Floral Spring Wreaths

Transform Dollar Tree's mini bead wreaths into beautiful spring floral bead wreaths with this easy DIY tutorial. Add a touch of spring to your home decor with this creative and budget-friendly project.  I'm excited to share a quick and simple DIY project with you today. Last year, I purchased two mini bead hanging decorations displayed with the fall decor. I decided to add them to my craft stash and use them in the springtime. In this tutorial, I will show you how to create mini bead floral wreaths and provide a full list of materials needed for each step.  Dollar Tree Mini Bead Floral Spring Wreaths Video tutorial Materials Round mini beaded hanging decorations Artificial floral accents One large craft/popsicle stick Paintbrush Acrylic paint Floral cutters Hot glue/Adhesive Step one: Applying paint Before painting, remove any previous decorations such as the plaid autumn leaves that were attached to the wreaths I'm using. To start with, apply paint to your beaded wreath. Y