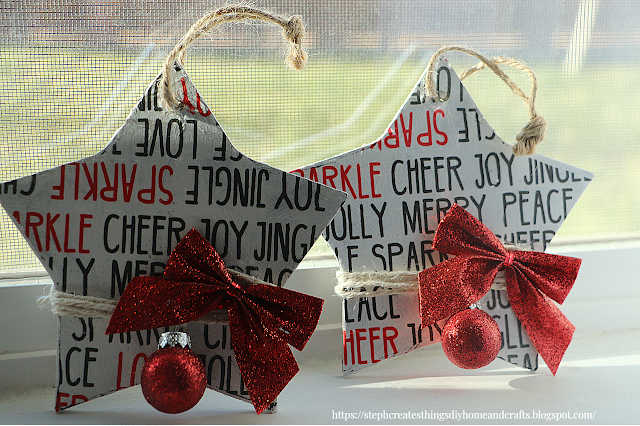
Get creative this Christmas and learn how to make easy and beautiful DIY wood decorative stars. With the art of decoupage and some simple decorating techniques, you can add a touch of handmade charm to your holiday decor. Find step-by-step instructions and inspiration for creating your own festive stars.
Hello everyone! Today I am bringing you another quick and easy Christmas craft. I found these cute wooden stars at Target for one dollar each, and I figured we would do some decoupage, and create some cute Christmas designs on them. If you're ready, I would love it if you created it with me.
Video tutorial
Materials needed
- Two wooden stars purchased at Target
- White acrylic paint
- Two mini bows
- Two decorative holiday napkins
- Two mini ornaments
- Hot glue
- Scissors
- One paint brush
- Twine or craft rope
- Mod podge
- One marker for tracing
Begin by applying your acrylic paint onto each of your wooden stars. I applied one coat to each of my wooden stars. Be sure that after you allow your paint to completely dry. I used my blow dryer to help with drying my paint.
After, take your napkin and lay it flat. Take your wooden star and lay it over your napkin. Using your marker, begin to trace out the shape of your star onto your napkin. Use your scissors and cut out your traced star shapes.
Next, take your Mod Podge and begin to apply a thin layer to your stars. After, take your traced-out stars and begin to add them over the mod podge you applied. Gently smooth out any lines. I always use my blow dryer on a low setting to help with the Mod Podge process.
After, apply a thin layer of Mod Podge over your napkin.
Now you are ready to work with your twine. Take your twine and begin to wrap it around your star. You can tie off your twine and then wrap it around, or you can take your twine and continue to wrap your twine and glue your twine down, using your hot glue. I tied, wrapped, and glued my twine down.
Once you have wrapped your twine around, take your mini bow, and using your hot glue, attach your bow just above your twine.
When adding your ornament, take a strand of twine, pull it through your wrapped section of twine, and tie it off. Take your ornament, and insert your twine through the opening on your ornament. Tie it off, and your wooden Christmas stars are now complete. I used a little hot glue to glue down the twine behind my bow.
This was such a simple craft, and I really hope you enjoyed creating it with me. Be sure to let me know if you decide to create your very own.
Pin Save Share


How pretty, are those, I really like them. Thanks so much for linking up at A Themed Linkup 131 for Christmas Crafts and Décor. Shared.
ReplyDeleteDee, thank you so much! I appreciate you stopping by and checking them out.
DeleteVery cute
ReplyDeleteThank you!
DeleteSo pretty! I have difficulty with decoupaging napkins on to wooden disc ornaments. I just can't seem to get it right. I found your tutorial very helpful.
ReplyDeleteThank you bunches for sharing this with Sweet Tea & Friends this month my friend.
Paula, thank you so much! I'm happy to hear you found the tutorial helpful. Maybe you can give the decoupaging a try again.
DeleteCONGRATS! Your post is FEATURED at A Themed Linkup 132 for Christmas Trees and Ornaments from the previous linkup for Christmas Crafts and Décor.
ReplyDeleteDee, thank you so much!! I'll be sure to come by for a visit.
DeleteThis is so cute! It turned out beautifully. Visiting from Senior Salon Pit Stop.
ReplyDeleteThank you! 🥰
DeleteThese are adorable!
ReplyDeleteThank you!
DeleteSo cute and fun to make. Featuring when my party opens!
ReplyDeleteCarol, thank you very much. 😊🌟
DeleteSuch a cute littler Christmas DIY and perfect for kids to help with too. Thank you for sharing your DIY Christmas decorations at Create, Bake, Grow and Gather this week. I'm delighted to be featuring them at today's party and pinning too.
ReplyDeleteKerryanne, thank you very much!
Delete