
Wood crate floral display with mini watering can

 Hello everyone! I hope all is well. Today we are creating a floral display using one wood crate from Dollar Tree. I absolutely love the wood crates at Dollar Tree, and I thought it would make a perfect display when including one mini watering can. The mini watering can be purchased at Hobby Lobby. If you're ready we will begin creating this simple DIY project.


Video tutorial


Materials

  • One wood crate box
  • One bendable metal wire
  • One paint brush
  • Paint
  • Floral 
  • Floral snips
  • Craft foam block
  • Hot glue
  • Twine
  • Craft clothespins

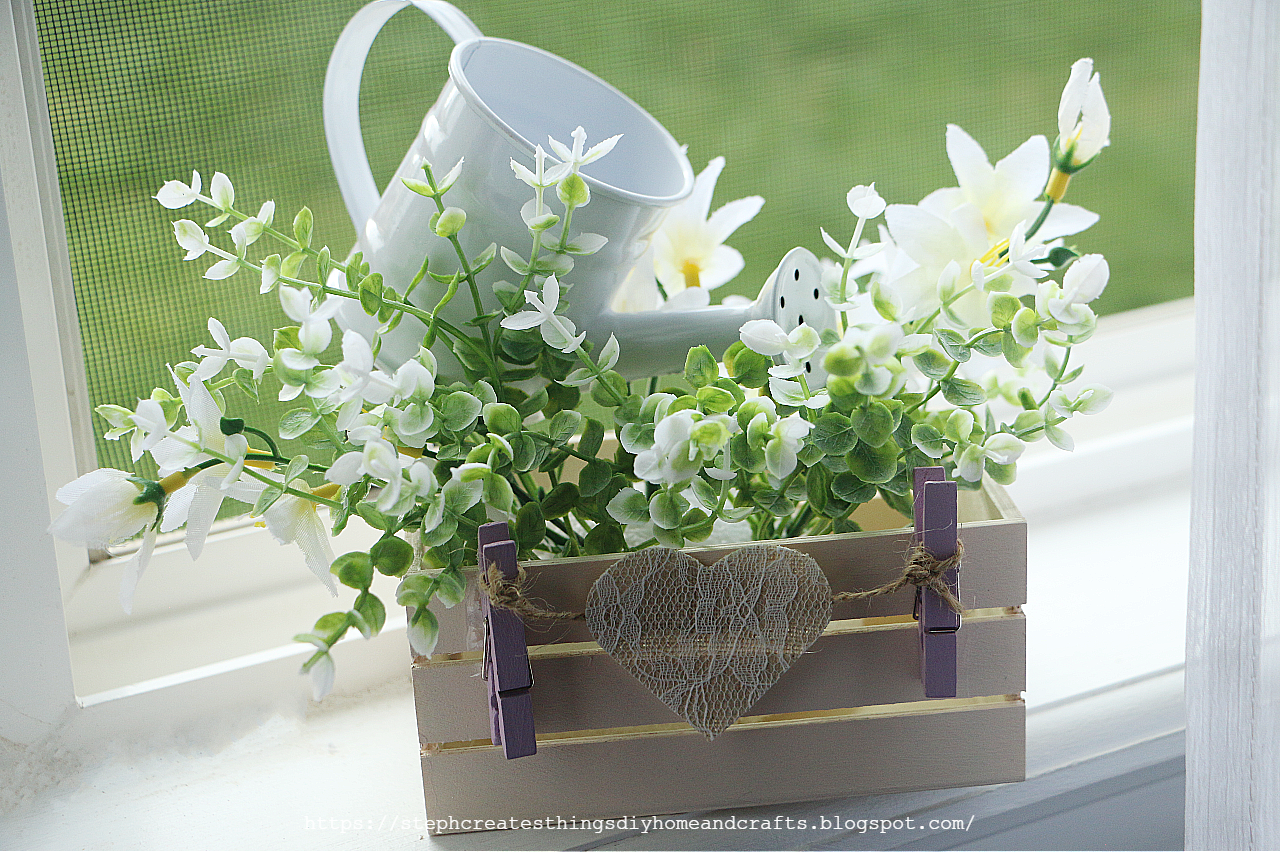
Start by taking your paint, paintbrush, and your wood crate. Begin to apply paint to your wood crate. Be sure to paint all sections on your wood crate box.


Next, take your metal piece, and bend it so that your metal makes an L shape. Apply hot glue onto the shorter section of your metal. After applying glue onto the metal, take your watering can and place it on top of the bent metal section. You will need to take extra hot glue and apply it to the bottom of the watering can. This helps to give it extra support. 

After, take the longer end of your metal, add hot glue, and press it against one corner on the inside of your wood crate box.  At this point, your watering can should be standing in the corner of your box.

Next, take your craft foam, and add it to the bottom of your wood crate.

Take your floral snips, and begin to cut your flowers to size. After cutting your floral to size, take each piece, and insert it through your foam piece.

Now you are ready to add on your craft clothespins. Take your clothespins, and add hot glue on the back of each one. Add them to the front of your wood crate. 

Next, take your scissors, and cut a small section of twine. Take each end, and tie it around the top of each of your clothespins. I decided to tie it around the top of the clothespins because trying to hang it from the opening of the clothespins caused my twine to hang too low. 

After you have added your twine, take your craft fabric heart, and using hot glue, glue it onto your twine. I also added a little glue on the back side of the fabric heart and glued it onto both the twine and wood crate. 

Your floral display is now complete. I love how simple, and quick this craft was. Thank you so much for stopping by, and creating with me. I'll see you soon!

Check out these other floral crafts--

 DIY Wood Crate Floral Truck Design

Blossom Branch Arrangement

DIY Wood Crate Floral Design

Pin/Save/Share


Comments

  1. Stephanie this is so dang cute!! Thank you for stopping by Oh My Heartsie Girl to share your blog with us!!! Hope to see you every week! have a great weekend!

    ReplyDelete
    Replies
    1. Karren, thank you so much! I love how it turned out as well. I'll have to share this next time on your link party. :)

      Delete
  2. This turned out so cute. Thanks for sharing.

    ReplyDelete
    Replies
    1. Aw, thank you so much! And you're very welcome. =)

      Delete
  3. Such a cute floral window display. Thanks for sharing each step of the process.

    ReplyDelete
    Replies
    1. Judy, thank you! And you're very welcome. So happy to hear you enjoyed it. :)

      Delete
  4. SO SO cute, that little watering can is super sweet and this is a great way to showcase it.

    ReplyDelete
  5. Steph, your wood crate floral display is so pretty! I love the unique idea of adding the watering can to the crate. I'm happy to be featuring your post at Tuesday Turn About this week! Pinned!

    ReplyDelete
    Replies
    1. Thank you so much! I'm so happy to hear that you enjoyed this craft. :)

      Delete
  6. Stephanie,
    I love this display. Congratulations, you are being featured on Thursday Favorite Things. I hope you stop by. https://www.eclecticredbarn.com/2022/06/thursday-favorite-things.html
    Hugs,
    Bev

    ReplyDelete
    Replies
    1. Bev, thank you so much! I'm so happy to hear you enjoyed it. =)

      Delete
  7. Stephanie, your sweet crate and watering can craft is really fun for summer! So glad you shared it a week ago at Share Your Style. I was very happy to share it at SYS #349 this past Wednesday for you. <3

    Really fun! Hope you are having a great weekend!!
    Barb :)

    ReplyDelete
    Replies
    1. Barb, thank you so very much. I will be sure to stop by. I've been having such a busy week. I hope that you have a lovely weekend. Thank you so much for stopping by. :)

      Delete

Post a Comment

Thank you very much for taking the time to leave a comment. Your feedback brightens my day, and I hope you know its appreciated. I always do my best to respond to every comment. If you have a question, please feel free to ask! When you leave a comment, if you include your name or blog link, I will visit your blog and leave a comment in return! ***Spam or comments that don't provide valuable feedback will be removed.*** Thank you!

Popular posts from this blog

Winter Floral Tray: Easy Steps Using Dollar Tree Cutting Board

 Hello everyone! I’m excited to share my latest craft with you all. Today, we will be creating a floral winter tray using a bamboo cutting board from Dollar Tree. I often come across these bamboo cutting boards at my local Dollar Tree, and this time, I decided to pick one up. This craft is simple and budget-friendly. Join me as we make a winter floral tray using just a few materials! Video tutorial Materials One bamboo cutting board Winter faux foliage Paintbrush Hot glue Four wooden beads Acrylic paint Optional faux mini trees Begin by applying acrylic paint to the wooden cutting board. I decided to mix two colors together: white and English ivy green. Next, take four wooden beads and use hot glue to attach them to the underside of the board. I had a few extra beads from a previous project. After that, attach the faux foliage to the wooden board using hot glue. Depending on how you want to display the items on your board, arrange the foliage around the edges. This will ensure enou...

Fall Floral Display Using Glass Yogurt Jars

 Hi everyone. I hope that you are all doing well. I am patiently waiting for Fall to arrive. Fall is my favorite season of them all. I love the golden leaves, hot apple cider by the fire pit, sitting out in the evenings roasting marshmallows. It is simply the best for me. Do you have a favorite season? What do you enjoy about it?  Today I am sharing a quick upcycle craft. I decided to use my glass Oui yogurt jars. I love these little jars and what a perfect way to reuse them. I will show you how to decorate these jars using mod podge, and acrylic paint. We will add faux flowers to each glass jar as well. Video tutorial Materials  Three small glass jars I'm reusing my Oui glass yogurt jars Twine Acrylic paint Paintbrushes Mod podge Decorative napkin Faux floral and foliage Decorative tape/Washi tape Scissors Applying paint to glass yogurt jars Begin by applying your paint to two of your glass jars. Each jar needed around three coats of paint.  I used acrylic chalk pai...

Spring Hanging Design Using Bamboo Serving Boards

 Today I am sharing an easy project. We are creating two Spring hanging designs using bamboo serving boards. I purchased these boards at my local Big Lots store. It was two for five dollars. I actually was not sure what I was going to do with them, but the other day I figured it out. I will provide a step-by-step tutorial, a material list, and a video tutorial will also be included. Happy crafting! Video tutorial Main materials Hot glue or any adhesive of your choice Floral cutters Twine Faux floral Pencil Scissors Paintbrush Acrylic paint First design One wooden serving board One decorative napkin Mod Podge Second design Ribbon One craft chalkboard watering can Floral sticker Painting the serving board Begin by applying your acrylic paint to your wooden serving board.  Adding the decorative napkin Next, take your decorative napkin and unfold it. Place your napkin on top of your painted board and begin to trace out the center of your board. If your napkin has a second layer be...

All content Copyright

Copyright 2021-2025 I ask that you do not take or use my photos or words without permission. If you have any questions, please feel free and contact me. Also, for more information on this blog, check out the disclosure policy tab above. Thank you