Learn how to create a beautiful and unique DIY wood-stacked book decor that adds a charming touch to any room. This step-by-step guide will show you how to create this craft using simple materials and techniques.
Hi everyone! I hope you're all doing well. This week, I worked on creating a simple stacked wood book decoration. I've been inspired to make these for a while now. I saw a few projects where people were using the Dollar Tree wood box. I decided I wanted my stacked books to be slightly bigger than the Dollar Tree ones, so I checked out some wooden shadow boxes at Michaels. I'll share the step-by-step process I used to make this project.
Video tutorial
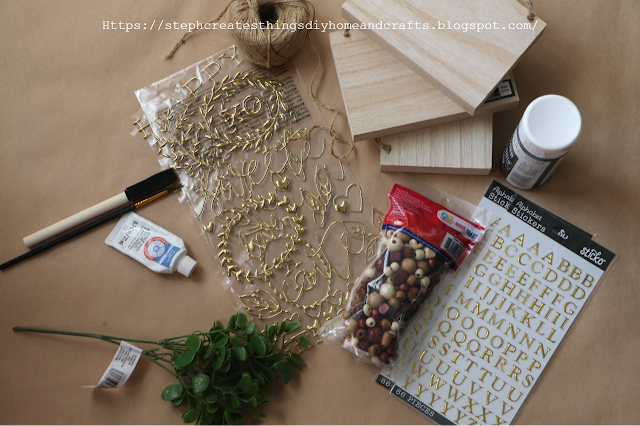
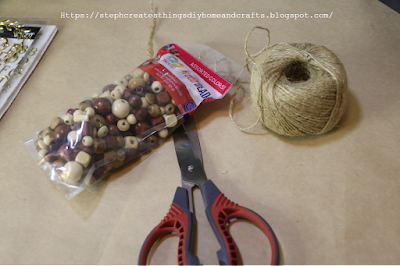
Materials
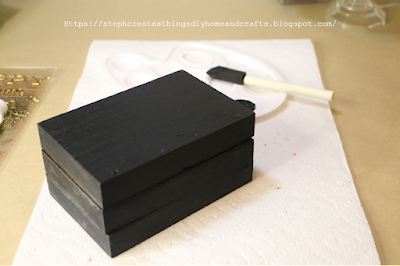
3 wood shadow boxes (These boxes were $1 each)
Wood beads
Twine
Black paint
White paint
Greenery
Wood filler
Hot glue
Gold lettering
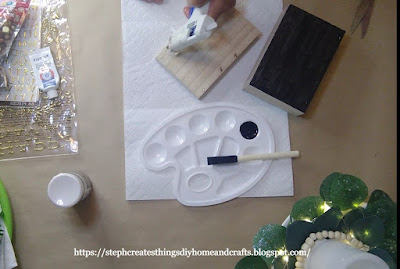
Sponge brush/Paintbrush
Creating your stacked wooden books
Start by taking any twine and screws out of your box. This only applies if you have purchased the wooden shadow boxes from Michaels. The back of each box had two screws in it, and also stapled twine. I went ahead and pressed the two staples completely down after removing the twine, and I filled the screw holes in with just a little wood filler.
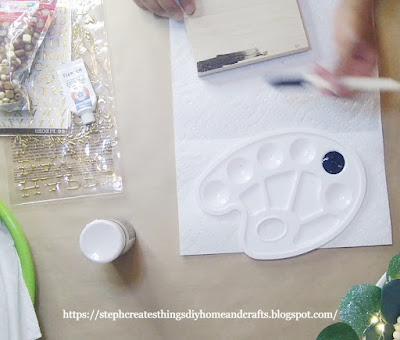
Begin by applying black paint to the top of your first wooden shadow box. I recommend using about three coats of paint for a solid finish.
Once you have finished painting the first box, take your hot glue and apply it to the next box.
You won’t need to paint the tops of the other two boxes since they will be stacked. Make sure to flip the boxes over so that the open sides of each shadow box are facing down.
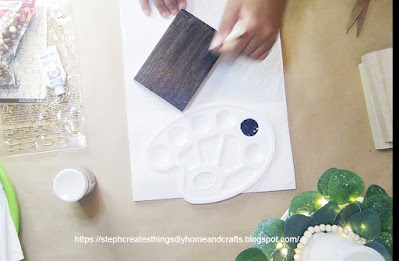
Apply glue to the closed side of each box. Then, glue the boxes together and stack them on top of one another. Once your boxes are stacked, apply black paint around all four sides.
Allow the black paint to dry completely. Next, take some white paint and add a line of paint between the spaces on the front side of each block. This will create a shadow effect.
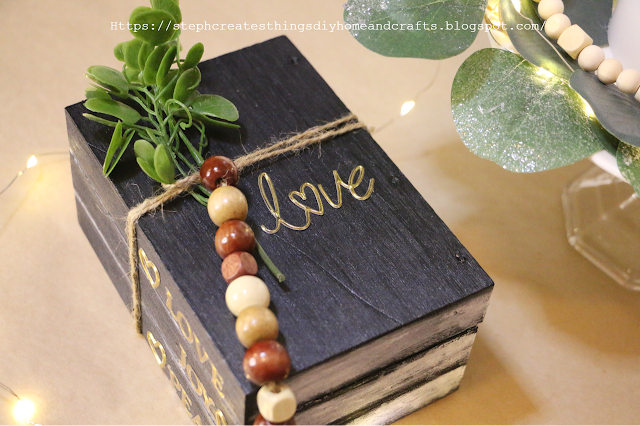
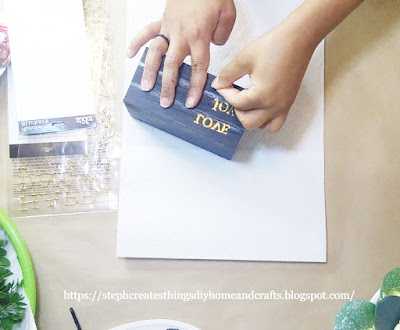
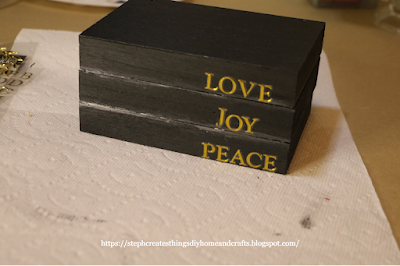
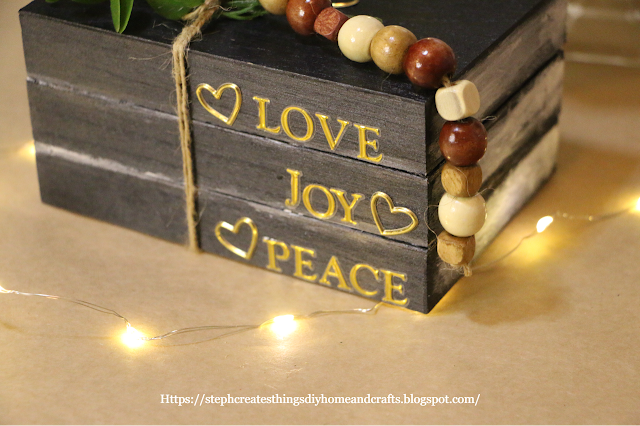
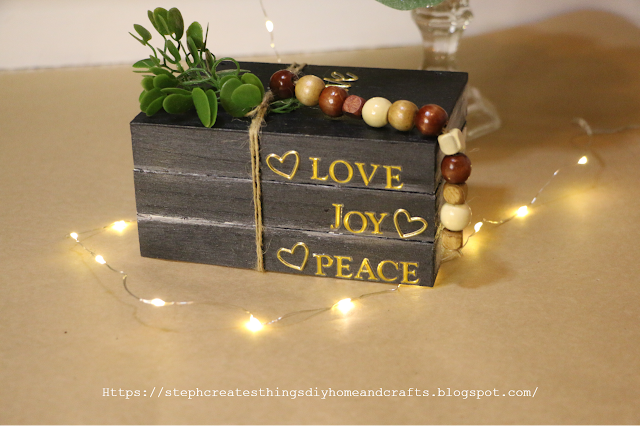
Take your gold letters and apply them to the front of your boxes. I went with the words love, joy, and peace. If you have any gold heart stickers, you can apply those as well. It is completely optional, but I also applied a gold love sticker on the top of my book stack.
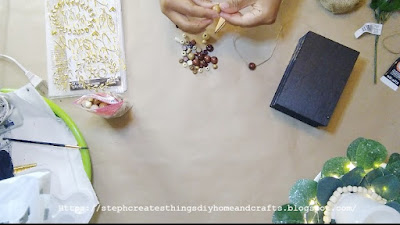
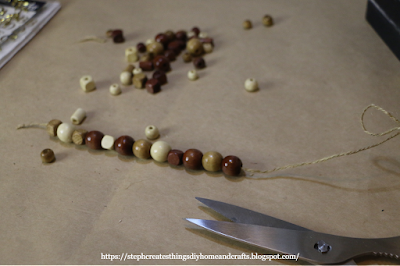
Now you are ready to create your bead design. Take some twine and string a few beads onto your twine. You can go with any pattern that you choose.
I found that if you apply just a small amount of clear adhesive on the very end of your twine, it makes it easy to string the beads down the twine.
Once you have around ten beads, you can tie off the end. I tied a knot at the very end and cut off any extra twine.
Next, take your greenery and cut a small section off. Set it aside with your bead design.
You can now apply white paint to all three sides of your books. I did this because I wanted my wood-stacked books to appear to have pages. Applying the black paint first and the white after helps give the books a shadow effect.
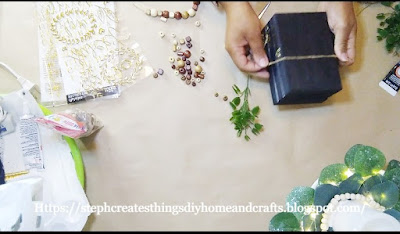
Take some extra twine and wrap it around your stacked books. I used two sections of twine that I cut and tied around my books.
All that is left is to insert your greenery through the twine on top and add your beads. I tied my beads through the top of the twine next to my greenery.
That is it; your stacked wood books are complete! I hope that you have enjoyed this simple DIY project. If you have any questions, please feel free to ask! I love hearing from all of you. Thank you so much for stopping by!!
What a lovely DIY, Steph! And I love the twist of using press on decals for the lettering! Thank you for sharing at Tuesday Turn About... I'll be featuring you at this week's party!
These look great Stephanie, I love stacked books and use them in decor often. I have never made some from wood though. Too cute! Thank you for sharing.
Great idea. It turned out beautifully! Visiting from Unlimited Link Party 134. (I'd love to have you post this at my linkup as well, if you'd like: https://lifetalesbooks.blogspot.com/p/calling-fellow-bloggers.html)
I love hearing from you! Your comments and creative ideas truly brighten my day. I do my best to respond to everyone, so if you have a question or just want to say hello, please leave a note below. To keep our community a positive and inspiring space, spam or off-topic comments will be removed. Happy crafting!
Transforming Oui Yogurt jars into a hanging flower display is a simple way to add charm to any space. In this post, you'll learn how to customize and hang these jars with flowers. Get ready to create a beautiful, eco-friendly display that brightens up your home or garden. Whether you're new to upcycling or just itching for a quick creative fix, this easy and budget-friendly project will brighten up any window in your home with elegance and charm. Video tutorial What You’ll Need: 3 Oui yogurt jars (or any small glass jars you have on hand) Transfer stickers of your choice — I used cold transfer stickers I snagged on sale at my local Michaels Artificial flowers Scissors Floral cutters Twine Spring tension rod (or clear sturdy command hooks) 1. Prep Your Jars and Add a Personal Touch Begin with clean, dry jars. These little glass containers serve as the perfect blank canvas. Select your transfer stickers—I opted for a floral theme because who doesn’t love more blooms? I trimmed th...
Create a beautiful autumn wreath with this simple DIY tutorial. Learn how to incorporate floral elements and beads to make a stunning seasonal decoration for your home. Hello! I am delighted to have you here with me today. For this DIY project, I have a simple idea that I think you'll love. We will be creating an Autumn floral and bead wreath using just a few materials. If you're viewing this project, I'm sure you love Fall as much as I do. It is my favorite season, and I have been busy creating new crafts to share with all of you. Video tutorial How to create an Autumn floral and bead wreath Materials One wreath $4.99 (I'm using a grapevine wreath, and I purchased it at Michael's. It is a 14'' wreath) Faux fall floral (My flowers were purchased at Michael's, and it was actually a stem bundle) $9.99 , but they are having a sale. I paid $4.99 Beads $1.60 (Purchased at Michael's) Stretch cord $2.88 (Purchased at Walmart) You will also...
Hello everyone. I hope that you are all doing well. Last week was a busy week for my household. We had lessons and appointments, and a lot of studying happened. With all of the hecticness going on, I was able to take a trip with my girls to one of our local Target stores. I found this super cute mini wheelbarrow in the dollar section during our trip there. This was five dollars, and I couldn't wait to come up with a craft to share with all of you. This is a quick redesign project; you only need a few materials. Video tutorial Materials One mini wheelbarrow Spray paint Faux floral or succulents Painter's tape Floral cutters Hot glue Craft rocks Adding painter's tape to the wheelbarrow Stary by adding your painter's tape to your wheelbarrow. I applied my tape to the areas where I did not want my spray paint getting on. Adding Spray paint to the wheelbarrow After adding your tape, take your wheelbarrow and add your spray paint. Adding craft rocks inside of the wheelbarrow...
I created these magnetic faux succulent and floral lids using some metal jar tops that I had saved. With a little creativity, they transformed into charming, lightweight accents that add a pop of color and personality to the fridge. Each lid features its own tiny arrangement—part succulent and part floral—all crafted with intention and charm. This project is easy and budget-friendly, allowing you to use items you already have while adding a lovely touch to your home. Quick Video Tutorial Materials Metal jar lids (one large, one small) Letter beads (to spell LOVE ) Faux moss Faux succulents Faux vines Faux flowers (pink, green foliage, white accents) Hot glue gun and glue sticks Magnets I began with the larger metal lid, attaching small letter beads to spell out LOVE . This created a meaningful little focal point and set the tone for the rest of the design. Next, I glued a layer of faux moss along the bottom of the lid. The moss added softness and helped anchor the colorful...
Transform your cardboard into a charming heart flower holder with this easy DIY project, which adds a touch of love to your home! I'm happy to share a simple upcycled craft project with you today. This is the perfect craft if you have extra cardboard around your house after the holidays. Video tutorial Materials Needed - Cardboard - Scissors - Heart shape for tracing (I’m using a heart from my heart banner) - Acrylic paint (I’m using white and pink) - Pencil - Hot glue - Artificial flowers -Floral foam ball - Optional: Fabric hearts (I found a pack of fabric hearts at my local Dollar Tree) Begin by tracing the heart on the cardboard. I used my fabric banner heart to trace four hearts on the cardboard. Next, using scissors, cut out each heart. Afterward, take a paintbrush and apply paint to each heart. I painted the hearts white and pink, only on the front sides. Use hot glue to begin attaching each heart. When you finish attaching them, there will be an opening in the middle...
Copyright 2021-2026
I ask that you do not take or use my photos or words without permission. If you have any questions, please feel free and contact me. Also, for more information on this blog, check out the disclosure policy tab above. Thank you


I love this idea, how clever!
ReplyDeleteYou're most welcome to join me in a cuppa at Tea With Jennifer,
Jennifer
Hi Jennifer, aw thank you so much! I'll be sure to stop by! :)
DeleteWhat a lovely DIY, Steph! And I love the twist of using press on decals for the lettering! Thank you for sharing at Tuesday Turn About... I'll be featuring you at this week's party!
ReplyDeleteJulie, thank you so much.I'm so happy to hear that you enjoyed this project. Thank you so much for the feature.
DeleteThese look great Stephanie, I love stacked books and use them in decor often. I have never made some from wood though. Too cute! Thank you for sharing.
ReplyDeleteThank you. There was a time I was having such a fun time creating these wooden stacked books using the wooden crates from Dollar Tree.
DeleteVery pretty, another one you need to put in a shop :) Thanks so much for linking up at the #UnlimitedLinkParty 122. Pinned.
ReplyDeleteVisiting again to say thanks so much for linking up at the #UnlimitedLinkParty 134. Pinned again too.
ReplyDeleteThese are adorable!
ReplyDeleteThank you! :)
DeleteGreat idea. It turned out beautifully! Visiting from Unlimited Link Party 134. (I'd love to have you post this at my linkup as well, if you'd like: https://lifetalesbooks.blogspot.com/p/calling-fellow-bloggers.html)
ReplyDeleteJennifer, thank you so much. Yes, I will join your linkup as well. Thank you for visiting. :)
DeleteStephanie, CONGRATS! Your post is FEATURED at the #UnlimitedLinkParty 135!
ReplyDeleteThank you, Dee. 😊
DeleteThese are super cute! They came out great. Thanks so much for sharing at the Home Imagined link party. XO- MaryJo
ReplyDeleteThanks for sharing with us, I'm featuring you this week when the next To Grandma's house we go link party starts!
ReplyDeleteTarahlynn, thank you very much. Excited to be featured at your party. 😊
DeleteHappy New Year Creative Friend! This is just brilliant and I'm featuring when my first party of the year opens. LOVE these!
ReplyDeleteCarol, Happy New Year, friend. Aw, I'm so glad you enjoyed it. It was such a fun project. Can't wait to join your party later.
Delete