Easy Breezy DIY: How To Make Summer Coasters

Happy Summer! I'm excited to share this simple DIY craft with you. I found some cute summery napkins at my local Dollar Tree and knew I wanted to create another summer craft, but I wasn't sure what I wanted to create. Today I will show you how to create these simple summer coasters that are perfect for the season.


Video tutorial
Easy Breezy DIY: How To Make Summer Coasters

Materials:

- Round wood circles

- Napkins

- Mod Podge (I'm using the dishwasher-safe one)

- Acrylic paint

- Paintbrush

- One cork sheet (I'm using the adhesive cork sheet from Dollar Tree)

Begin by taking your adhesive cork sheet and flipping it over so that the adhesive backing is facing up. Next, take a pencil and start to trace each of your round wooden circles. Then, take your scissors and cut out each of the traced circles. You can use a craft knife to make any necessary adjustments. 

After that, take your circles and begin to remove the back of each of the cork circles exposing the sticky backing. Gently press your circle onto the wooden coaster. Do this for each of your coasters. I decided to add a cork bottom to each of my coasters because I wanted my coasters to have a smooth surface when placed on wooden surfaces or glass.


You are now ready to apply your acrylic paint to each of the wooden circles. I chose colors like brighter pink, yellow, blue, and red. Allow your paint to completely dry. You can also use a heating tool to help the process along. After allowing it to dry, add a thin layer of Mod Podge over the acrylic paint.

Next, remove the second layer of your napkin. Use scissors to cut out the desired design you will want to use for your coasters. I found these summery napkins at my Dollar Tree store and I thought they would go great for my summer coaster designs. 

I ended up using my watercolor paintbrush to cut around my napkin. I decided I did not want a straight cut, and by using the paintbrush I was able to remove the edges and give the napkin a different look.

You are now ready to add your napkin cutouts to each of the coasters. Before adding the napkin cutouts, add another layer of the Mod Podge over each of the coasters. Once you have added the cutouts, take your decorations and add them over the Mod Podge.

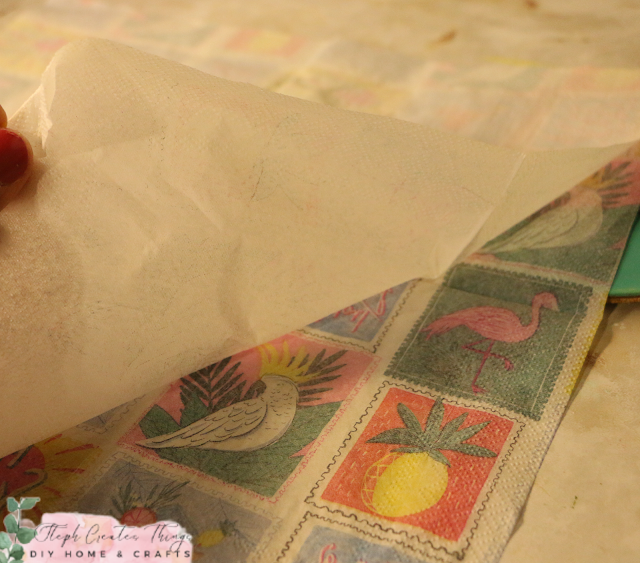
 Next, place a section of parchment paper over the coaster, and use my mini iron, pressing down and moving over the decoration for a few seconds. I love using this technique; it helps to smooth out the design, leaving you with a smooth appearance.

Allow your coasters to fully dry. It takes 28 days for the Mod Podge to cure before you can wash the surface. I would recommend spot-cleaning your coasters with a damp cloth if needed.

Once your coasters have completely dried, use a sealer to seal off your coasters.

That's it! Your summer coasters are complete. All that's left is to pour yourself a nice tall glass of lemonade, set your coasters out, and enjoy! Perfect for summer!

You might also enjoy

Easy DIY Summer Serving Tray

Pin Share Save 


Comments

  1. I love these Stephanie! The summery napkins and the colourful paints work really well together! #MMBC :)

    ReplyDelete
  2. Such fun, cheerful Summer coasters!

    ReplyDelete
  3. What a lovely way to reuse those napkins. So perfect for something like this.

    ReplyDelete
  4. Wow, such a cute summer fun activity, especially for indoors! #Alittlebitofeverything

    ReplyDelete
    Replies
    1. Thank you! Happy to hear you enjoyed this DIY craft.

      Delete
  5. What a super fun idea. They turned out SO cute, Stephanie! Thank you for sharing this lovely post with us at the Will Blog for Comments #42 linkup. We hope to see you next time with more posts to share, old or new.

    ReplyDelete
    Replies
    1. Jennifer, thank you. Glad you enjoyed this craft.

      Delete
  6. Super cute idea! Thanks for adding it to Farmhouse Friday 355. I'm featuring it tomorrow! pinned

    ReplyDelete
  7. These coasters are SO bright and summery! Adorable designs!

    ReplyDelete
    Replies
    1. Thank you so much. I'm glad you enjoyed them.

      Delete
  8. These are great Steph! I always enjoy your tutorials too.
    Thanks' bunches for sharing with Sweet Tea & Friend's this month dear friend.

    ReplyDelete

Post a Comment

Thank you so much for taking the time to leave a comment. Your comments brighten my day. I hope that you know that it is appreciated. I do my best to respond to every comment. If you have a question, please feel free and ask away!

Popular posts from this blog

Decoupaged Glass Jar Candle Holders with Faux Leaves and Gold Wire

  Learn how to create beautiful decoupaged glass jar candle holders using leaves and gold wire. This DIY project is a perfect way to upcycle old glass jars and create unique candle holders for your home decor.  I hope you're all doing well. The weather has cooled down and we're enjoying the change. I'd like to share a quick upcycling decoupage project with you all today.  I had some extra glass yogurt jars and bought two taper candle holders from Target's dollar section. I wasn't sure what to do with them at first. In today's project, I will show you how to decorate small glass jars using faux fall leaves and gold wire. Video tutorial Materials Needed: - Two taper candle holders - A paintbrush - Mod Podge - Faux fall leaves or a decorative napkin - Hot glue - Two battery-operated tealight candles - Gold wire Applying Mod Podge and faux leaves to glass jars To start with, grab a paintbrush and use it to apply Mod Podge on your glass jar. Apply a small amount of M

Easy Steps to Create a Cozy Autumn Tablescape at Home

Hello everyone! I’m excited that you decided to visit the blog today. I wanted to share how to create a cozy autumn tablescape at home. My goal was to design something warm and inviting, as our table is a space where we share conversations, drink coffee, tackle homework, and simply enjoy each other’s company.  I typically don’t go all out when decorating my dining table, but I wanted to show you how I styled it using decor pieces I already had. I would love for you to join me in this decorating adventure! Video tutorial Create a Cozy Autumn Tablescape at Home Items I'm adding to my table:  -White tablecloth runner - Battery-operated leaf lights  - Reusing glass jars  - Mini pumpkins and other fall decorations  - Small "Hello Fall" sign  - Faux flowers I began by spreading my white tablecloth down the center of the table. Around Halloween, I purchased this tablecloth a few years ago at my local Walmart. After laying it out, I realized that I could achieve that look by laye

Upcycled Craft: Fall Floral Decoration Using A Metal Can

 Hello everyone! I hope you are doing well. Personally, I am tired of the heat we've been experiencing and I'm eagerly anticipating the arrival of fall weather here in Colorado. How is the weather where you are? Thank you all for joining me again to create some crafts today. Our project is a fall flower arrangement made from a metal can. I cleaned out a snack can and transformed it into a beautiful display of fall florals using materials I had at home. However, if you don't have these materials, you can find them at most craft stores. I will provide a list of materials below as always, so let's get started! Video Tutorial Materials One metal can Mod podge Decorative napkin Faux Fall Floral Acrylic paint Wooden beads Paintbrush Scissors Floral cutters Applying paint to the can The first step is to apply paint to your metal can. Make sure to let each coat of acrylic paint dry completely before applying the next coat. Apply a total of three coats of paint and use a blow dr

Upcycle Your Candle Lids: Easy Steps for Fall Shelf Decor

Hello everyone! Happy Autumn! I'm excited that fall has arrived. Today I'm going to share an easy upcycled craft idea with you. We'll be creating Autumn shelf sitter decor using two candle lids. I wasn't sure what to do with my candle lids, but I decided to make fall shelf sitter decor after giving it some thought. If you're ready, let's begin building your very own. Video Tutorial Materials - Two candle lids (wooden or metal) - Acrylic paint - Paintbrush - Mod Podge (optional) - Craft moss - Mini wooden mushrooms - Scissors - Assorted fall decor (e.g. flowers, fall vase filler glitter leaves, smaller faux succulent flowers in deep purple color) - Hot glue Begin by applying acrylic paint to both the wooden lid and wooden mushrooms. I decided to paint the tops of the wooden mushrooms orange and brown. First, if your napkin is 2-ply, remove the second layer. Then, use scissors to cut out the designs you want to add to the project. Afterward, use a smaller paintbru

Fall Floral Display Using Glass Yogurt Jars

 Hi everyone. I hope that you are all doing well. I am patiently waiting for Fall to arrive. Fall is my favorite season of them all. I love the golden leaves, hot apple cider by the fire pit, sitting out in the evenings roasting marshmallows. It is simply the best for me. Do you have a favorite season? What do you enjoy about it?  Today I am sharing a quick upcycle craft. I decided to use my glass Oui yogurt jars. I love these little jars and what a perfect way to reuse them. I will show you how to decorate these jars using mod podge, and acrylic paint. We will add faux flowers to each glass jar as well. Video tutorial Materials  Three small glass jars I'm reusing my Oui glass yogurt jars Twine Acrylic paint Paintbrushes Mod podge Decorative napkin Faux floral and foliage Decorative tape/Washi tape Scissors Applying paint to glass yogurt jars Begin by applying your paint to two of your glass jars. Each jar needed around three coats of paint.  I used acrylic chalk paint. Cutting you

Turn Old Glass Jars into Beautiful Fall Candle Holders

Get ready to get creative this fall with DIY upcycled glass candle decorations. Follow this easy step-by-step guide to transform old glass jars into beautiful seasonal decor pieces. I will demonstrate how to create two fall candle decorations using glass jars. You will only need a few materials to get started. If you're ready, let's begin! Video tutorial Materials Glass jars fall decorated leaves faux fall leaves Acrylic paint Twine or craft string Hot glue Paintbrush Mod Podge Battery-operated tealight candles Applying paint and Mod Podge Begin by mixing paint and Mod Podge. I decided to do this for my jars to give them more of a stained-glass appearance. I went with brown and orange for my jars. Adding napkin cut-outs and faux leaves After cutting out your napkin designs, use Mod Podge to adhere them to your first jar. Make sure to remove the second layer of the napkin before adding each cutout to the jar. Apply Mod Podge to the jar, place the design over the Mod Podge, and

How to Create Fall Crate Décor Using Dollar Tree Items

Hello everyone! I hope you are doing well. You all know how much I love these wooden crates from Dollar Tree. I created this cute fall decor that can be added to a tiered tray or mantel. We'll use one wooden crate and a house plaque from Dollar Tree. Let's create and decorate together! Please check out my newest link party on the  Crazylittlelovebirds  blog if you haven't already. It runs from Fridays at 9 am MST to Tuesdays at 11 pm MST.  Video tutorial Materials One wooden crate One wooden house plaque Acrylic paint Wooden letters Any Adhesive or Hot glue Foam craft blocks Faux fall floral/greenery Paintbrushes Mod Podge Decorative paper Floral cutters Scissors One pencil for tracing I have chosen to decorate with mini pumpkins, a squirrel figurine, and an unpainted leaf ornament for the fall season. Step 1: Tracing your wooden house plaque onto decorative paper Place the wooden house plaque on the decorative paper and trace its shape with a pencil. Cut out the traced sha

🍂5 Simple Fall Centerpiece Ideas|Perfect for Thanksgiving

 Hello everyone! I hope that you are doing well. I wanted to share 5 fall centerpiece ideas that are perfect for displaying during the fall season and also on Thanksgiving. I put together five simple designs that are affordable, and easy to put together.  Video tutorial For our first design, we will be using six faux mini pumpkins, succulent flowers, two scented candles, and a faux vine. For each centerpiece, I am using my longer rectangle wood tray that I built. If you would like to build your very own just click the link for the tutorial- DIY Decorative Kitchen Tray Build And Decorate I purchased a pack of these mini white and green pumpkins at Hobby Lobby. They are currently having a sale on fall décor and other fall items. I started by taking my pumpkins and placing them onto my tray. You want to be sure to leave room for your candles. Place your candles and begin to add your succulent flowers. I added my succulents between my mini pumpkins. After, take your faux vine and place it