
Create a floral display using one Dollar Tree metal tabletop decoration

Create a stunning floral display using just one Dollar Tree metal tabletop decoration. This budget-friendly project will add a touch of charm and elegance to any space. Get inspired and start crafting your beautiful centerpiece today. Today will take you through an easy tutorial showing you each step of creating a metal tabletop decoration. As always I will provide you will a materials list and there will also be a video tutorial included in the post if you are interested in checking that out. Thank you for visiting and creating with me.

Metal tabletop decoration displaying floral and leaf design


Video tutorial 

Materials such as napkins, faux floral, metal decor, and acrylic paint


Materials needed

One metal tabletop decoration- Dollar Tree
Napkins- Any design will do, and you will only need one
Faux floral- Michaels 
Hot glue
Scissors
Paint- I'm using white chalk paint
Paintbrush
Twine
Mod Podge
One pencil for tracing

Decorative napkin and scissors

Begin by taking your decorative napkin, and placing it on top of your metal decoration.

 Using a pencil trace an outline around your napkin. Once you have traced the shape of your metal decoration onto your napkin, take your scissors, and cut out the shape.

Next, if your napkin is two-ply, remove the bottom layer of your napkin. Set your napkin aside.

Acrylic paint, metal decor, and paintbrush

metal decor painted white near a paintbrush

Take your metal tabletop decoration, and apply around two coats of paint. I decided to use white chalk paint because applying chalk paint to metal surfaces seems to adhere much better, and it takes fewer coats of paint. Allow the paint to dry between coats. I used my heat gun to help with drying. 

Painted metal decor near Mod Podge bottle

Now you are ready to apply your mod podge over the painted surface on your metal decoration.  Using a paintbrush, apply a thin layer of your Mod Podge.

Decorative metal decor with leaf design near paintbrush

After you have applied your Mod Podge, take your napkin and apply it over the Mod Podge. Be sure after you apply it on top of your Mod Podge you smooth out any lines and wrinkles. It is fine if you are not able to completely smooth them out. I used my heat gun to help with drying. 

Now you can apply your Mod Podge on top of your napkin. And after applying it, give it some time to fully dry. You can also use a heat gun, or blow dryer to help with drying. 

Faux greenery near floral cutters

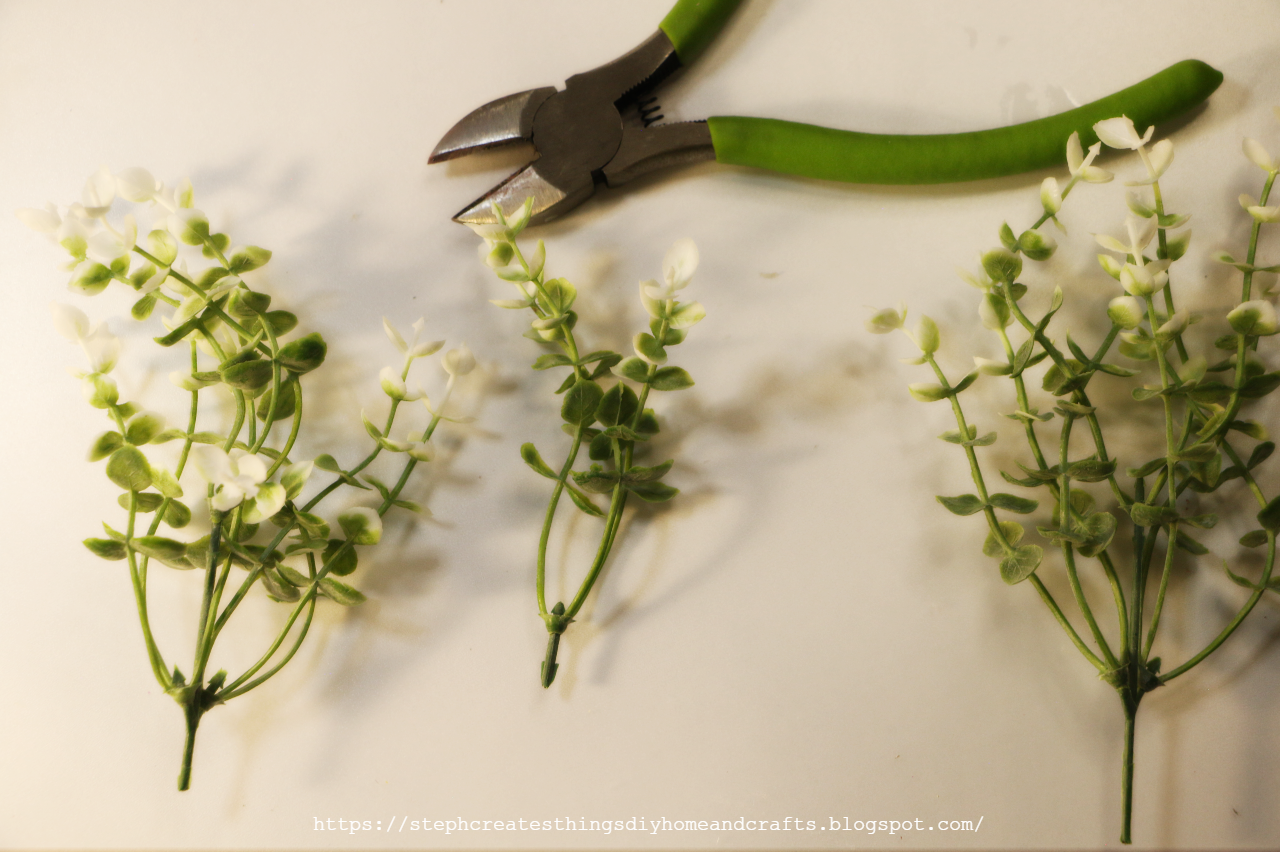
Next, take your floral snips, and begin to cut your floral. You can go at any length. You just want to be able to make it look as though your flowers are overflowing from the top of your decoration. 

Floral near metal decoration and hot glue

Hand placing greenery onto painted metal decor

Once you have cut your floral, use some hot glue to attach your floral to the top side of the metal decoration. 

twine being placed around top section of metal decor

Twine wrapped around top section of metal decor with floral and decorative design

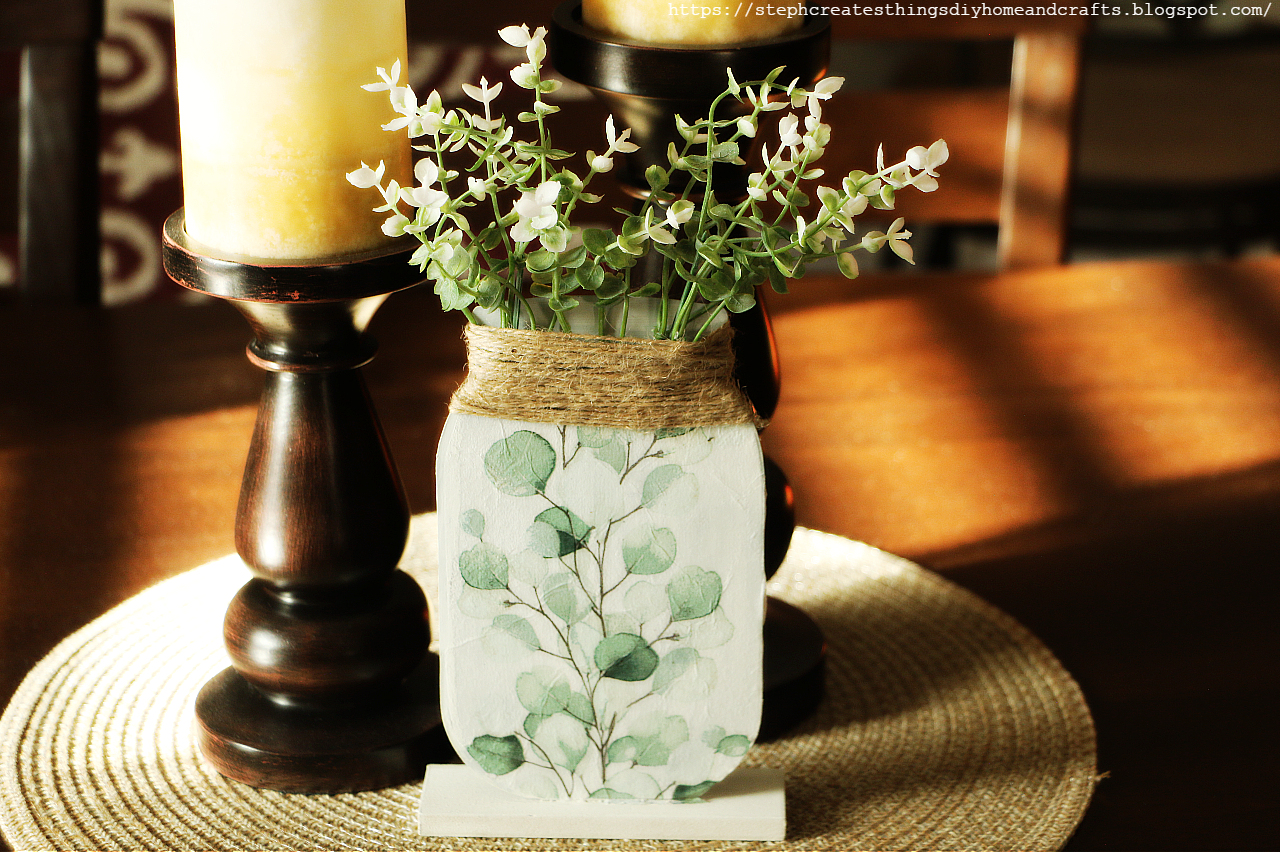
Begin to wrap your twine around the top section of your metal decoration. You want to be sure to cover any of the flower stems with your twine. Wrap your twine around several times, until it has covered the stems of your flowers. Once you have wrapped your twine around the top section, cut any remaining twine off, and glue down the end of your twine.

This last step is optional, but if you choose you can apply some paint to the bottom wood stand. I applied some of my white chalk paint, and I think it turned out wonderful. 

Your floral display is now complete. I love how simple this craft was, and it looks beautiful displayed in any room. Let me know if you decide to create your very own. Thanks so much for stopping by. I'll see you soon! 

 metal tabletop decor displayed on windowsill with floral and decorative leaf design


metal tabletop decoration being displayed on a table near two candle pillars

Pin/Save/Share

Pinterest pin displaying metal tabletop decoration


Comments

  1. This is such a cute, springtime piece to add to any vignette or table-scape. And it looks fariry easy to make. Thanks for providing the instructions.
    Carol
    www.scribblingboomer.com

    ReplyDelete
    Replies
    1. Carol, thank you so much, and you're very welcome. I'm so happy to hear you enjoyed this craft. Thanks so much for stopping by!

      Delete
  2. Oh, WOW! You really transformed that metal!! That is so pretty! Thanks so much for linking up at the #UnlimitedLinkParty 101. Shared.

    ReplyDelete
    Replies
    1. Dee, thank you! I was actually surprised at this transformation. I wasn't sure how it was going to turn out with the mod podge, but I was pretty happy with the end result. Thanks so much for stopping by.

      Delete
  3. Stephanie, CONGRATS! Your post is FEATURED at the #UnlimitedLinkParty 102!

    ReplyDelete
    Replies
    1. Dee, thank you so much! I will be by for a visit.

      Delete
  4. What an adorable idea and so simple too. I appreciate those simple crafts! I am visiting from Grammy's Grid, thank you for sharing your inspiration with us!

    ReplyDelete
    Replies
    1. Aw, thank you so much. Yes, I love how simple this was to create. I also appreciate simple crafts. Thanks so much for stopping by. It is appreciated. :)

      Delete
  5. This is so cute Stephanie! I love Dollar Tree crafts, easy on the purse strings. :)

    ReplyDelete
  6. That is just the cutest plant-themed shelf sitter in the land! You're totally all ready for spring approaching! Love how the plant on top gives it a neat 3D effect!

    ReplyDelete
    Replies
    1. Thank you so much. I'm glad that you enjoyed it. 😊

      Delete

Post a Comment

I love hearing from you! Your comments and creative ideas truly brighten my day. I do my best to respond to everyone, so if you have a question or just want to say hello, please leave a note below. To keep our community a positive and inspiring space, spam or off-topic comments will be removed. Happy crafting!

Popular posts from this blog

DIY Budget-Friendly Succulent Plant Hanger Design

 Hi everyone! I hope that you are doing well. Today I am sharing an easy DIY craft that is budget-friendly, and easy to create. A material list will be provided, along with step-by-step instructions on creating your very own. Be sure to check out the video tutorial below. Video tutorial Materials One 4x4 framed art Acrylic paint Faux succulents Hot glue and any other heavy-duty adhesive Twine Scissors  Floral cutters Paintbrush You can find most of these materials at your local Dollar Tree This project costs under five dollars If your frame comes with beads as shown in the picture above, take your scissors and remove the beads. You will actually reuse the beads later on in this craft. Take the inner section of your out and set it aside. Next, take your acrylic paint and paintbrush, and begin to apply your paint to your frame. I applied three coats of my paint to my frame. Next, use your paintbrush you apply paint over the inner section of the frame we removed earlier. I applie...

DIY Magnetic Faux Succulent & Floral Lids — Upcycled Fridge Accent

I created these magnetic faux succulent and floral lids using some metal jar tops that I had saved. With a little creativity, they transformed into charming, lightweight accents that add a pop of color and personality to the fridge. Each lid features its own tiny arrangement—part succulent and part floral—all crafted with intention and charm. This project is easy and budget-friendly, allowing you to use items you already have while adding a lovely touch to your home. Quick Video Tutorial Materials Metal jar lids (one large, one small) Letter beads (to spell LOVE ) Faux moss Faux succulents Faux vines Faux flowers (pink, green foliage, white accents) Hot glue gun and glue sticks Magnets I began with the larger metal lid, attaching small letter beads to spell out LOVE . This created a meaningful little focal point and set the tone for the rest of the design. Next, I glued a layer of faux moss along the bottom of the lid. The moss added softness and helped anchor the colorful...

Easy 4th Of July Metal hanging design

 Hello everyone! How have you been? I wanted to share this super easy decoration with all of you. I created this simple metal hanging decoration for the 4th of July. I absolutely love how it turned out. I found this metal holder at my local Dollar Tree. I haven't seen it in the store before. I was excited to find this and brainstorm for my next project. As always, the material list is below. I will walk you through each step of creating your very own.  Video tutorial Materials One metal hanging holder Mod Podge  Tulle or ribbon Acrylic paint Craft foam block Foam scatter stars Faux flowers One decorative napkin Scissors Floral cutters Hot glue Three craft sticks Twine Applying paint to metal design Start by taking your paintbrush and applying your acrylic paint to your metal holder. I only used my paint on the metal surface. When applying the acrylic paint I noticed it does go on smoothly. You could prep the metal surface if you are concerned about the paint not adhering ...

Personalize Your Space: DIY Floral Summer Sign on Plywood

I recently found a floral summer sign made of plywood at Michaels and decided to personalize it with some paint and lettering. I used my new Cricut Maker 3 for this DIY project and I'm excited to share the process with you. Join me as I show you how to paint and decorate this simple project. Video tutorial Materials needed:  - Floral plywood sign - Acrylic paint - Paintbrush - Lettering (created with Cricut Maker 3 and foil matte vinyl) You can use stencil or sticker lettering of your choice Start by applying paint to your plywood sign. I started with white and yellow paint for the center of my sign. Next, apply paint to each of the flowers on the sign. I used darker pink, yellow, light blue, and yellow colors. After that, I used my Cricut Maker 3 to create a "hello summer" lettering using foil matte vinyl. You can use any lettering or stencil you prefer. This was my first time using the Mother's Day gift I received. To apply my letters, I gently removed them with my ...

Decorate Glass Jars for Valentine’s Day: An Easy & Adorable DIY

 💖 Valentine’s Day is a wonderful opportunity to add a bit of extra love to your home. A simple and charming craft that you can complete in under an hour is decorating glass jars. These jars are sweet, customizable, and budget-friendly. Whether you’re making a romantic centerpiece, a cute gift, or simply enhancing the festive vibe in your space, this DIY project is both enjoyable and beautiful. Video tutorial below ❤️ Materials You’ll Need Two small glass jars (any size or shape you love) Acrylic paint or chalk paint Heart fabric garland Heart stickers Hot glue Artificial flowers Mod Podge Paintbrush Paint Your Jars and Seal with Mod Podge Begin by applying a coat of either acrylic or chalk paint to your jars. Chalk paint provides a soft, matte finish, while acrylic paint offers brighter colors; both options look great. I chose acrylic paint and applied several coats, allowing each coat to dry in between.  After the first coat has dried, apply a seco...

Search This Blog

All content Copyright

Copyright 2021-2026 I ask that you do not take or use my photos or words without permission. If you have any questions, please feel free and contact me. Also, for more information on this blog, check out the disclosure policy tab above. Thank you