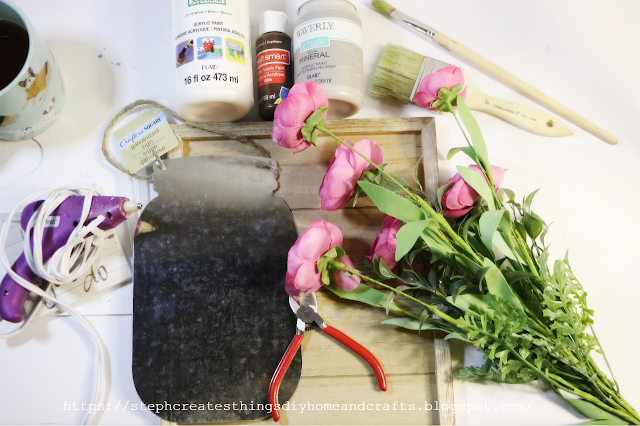
Spring Floral Wall Décor

 Hello, and welcome! Today we are creating this beautiful floral wall decor that is perfect for displaying in the Spring time. Honestly, I love how this DIY project turned out, I will leave it hanging in my kitchen even after the Spring season is over. This project takes just a few materials and is definitely budget-friendly. 


Video tutorial


Materials needed

  • One galvanized metal hanging sign is $1.25 at Dollar Tree
  • One wood rectangle hanging decor $3 at Target dollar aisle 
  • Paint--Acrylic or chalk 
  • Hot glue
  • Faux Spring floral
  • Optional- heart decoration
  • Twine
  • My total cost was around $6
  • Wire cutters/Scissors


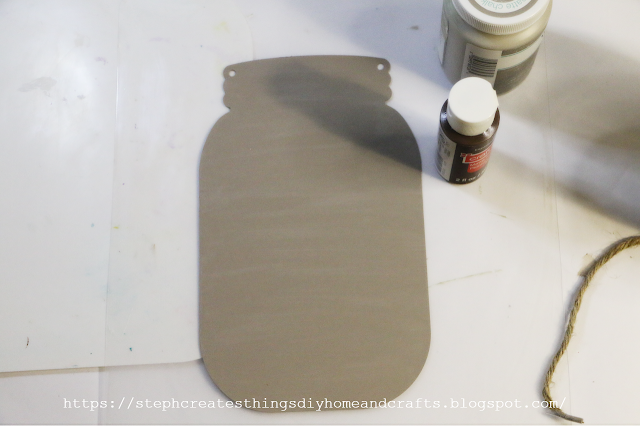
Begin by applying paint to the wood decor. I decided to use white paint. Make sure to apply white paint on the front, sides, top, and bottom. Let each coat of paint dry in between when applying paint. I added around three coats of paint for full coverage. Once you have applied your paint onto the wood, set it aside. 


Next, take your galvanized metal sign, and remove the hanging twine from it. 

Take your paint, and apply your paint onto your metal sign. I mixed two colors together to create the color on my metal sign. You will need around three coats of paint. Allow your metal sign to completely dry. 


Now you're ready to add your twine. Take your twine, and glue one end of your twine onto the back side of the metal sign on the top section. Start to wrap your twine around the top section. Once you have wrapped the amount of twine that you would like for your metal sign, snip the end, apply some onto the twine, and press it down onto the back of the metal sign.


Next, take your sign, and apply hot glue to the back. Once you have applied the glue, press your sign onto your wood decor, and set it aside.


 Take your wire cutters, and begin to cut your floral stems and leaves. I cut my floral stems off on some, and on a few, I left a shorter stem.  I did this because I was able to slide the stem behind the metal sign. Once you have cut your leaves, and floral, using some hot glue, apply a small amount onto the floral, and leaves. 

Add your flowers and leaves just above the top section of your metal sign. Just randomly place them. But be sure to create a look as if the flowers, and leaves are inside, and hanging over a little. 


This last step is optional, but you can add a heart decoration to the metal sign. That is it! You're all done. I displayed my wall decor in my kitchen just above my cabinets with a few other decorations. 

I absolutely love how this turned out, and I'd love to hear when, and if you create your very own. Thank you so much for stopping by.  I'll see you soon. 

You might also like

Easy Spring Wood Sign

DIY Decorative Spring Wooden Stacked Books

Spring Canvas Frame Art Display


Pin/Save/Share


Comments

  1. That looks really nice, love the flowers and that it's framed. Thanks so much for linking up at the #UnlimitedLinkParty 104. Shared.

    ReplyDelete
    Replies
    1. Thank you! I love how simple this was to create.

      Delete
  2. Stephanie, CONGRATS! Your post is FEATURED at the #UnlimitedLinkParty 105!

    ReplyDelete

Post a Comment

Thank you very much for taking the time to leave a comment. Your feedback brightens my day, and I hope you know its appreciated. I always do my best to respond to every comment. If you have a question, please feel free to ask! When you leave a comment, if you include your name or blog link, I will visit your blog and leave a comment in return! ***Spam or comments that don't provide valuable feedback will be removed.*** Thank you!

Popular posts from this blog

Winter Floral Tray: Easy Steps Using Dollar Tree Cutting Board

 Hello everyone! I’m excited to share my latest craft with you all. Today, we will be creating a floral winter tray using a bamboo cutting board from Dollar Tree. I often come across these bamboo cutting boards at my local Dollar Tree, and this time, I decided to pick one up. This craft is simple and budget-friendly. Join me as we make a winter floral tray using just a few materials! Video tutorial Materials One bamboo cutting board Winter faux foliage Paintbrush Hot glue Four wooden beads Acrylic paint Optional faux mini trees Begin by applying acrylic paint to the wooden cutting board. I decided to mix two colors together: white and English ivy green. Next, take four wooden beads and use hot glue to attach them to the underside of the board. I had a few extra beads from a previous project. After that, attach the faux foliage to the wooden board using hot glue. Depending on how you want to display the items on your board, arrange the foliage around the edges. This will ensure enou...

Spring Hanging Design Using Bamboo Serving Boards

 Today I am sharing an easy project. We are creating two Spring hanging designs using bamboo serving boards. I purchased these boards at my local Big Lots store. It was two for five dollars. I actually was not sure what I was going to do with them, but the other day I figured it out. I will provide a step-by-step tutorial, a material list, and a video tutorial will also be included. Happy crafting! Video tutorial Main materials Hot glue or any adhesive of your choice Floral cutters Twine Faux floral Pencil Scissors Paintbrush Acrylic paint First design One wooden serving board One decorative napkin Mod Podge Second design Ribbon One craft chalkboard watering can Floral sticker Painting the serving board Begin by applying your acrylic paint to your wooden serving board.  Adding the decorative napkin Next, take your decorative napkin and unfold it. Place your napkin on top of your painted board and begin to trace out the center of your board. If your napkin has a second layer be...

Celebrate in Style: DIY Patriotic Napkin Rings

Hey everyone! I hope you're doing well. Today, I want to share an easy DIY project. We're going to make patriotic napkin rings using just a few materials. I usually find extra craft supplies in my craft bins because I often shop craft sales at the stores. I got the wooden stars and rings from my local Hobby Lobby store. The great thing about this project is that it's easy and quick. I'll provide you with a materials list and a step-by-step tutorial. Video tutorial Celebrate in Style: DIY Patriotic Napkin Rings Materials Acrylic paint  Gem strips (I'm using the gem strips from Dollar Tree)  E6000 or hot glue  Paintbrush  Wooden stars  Wood rings size 1.89in (4.8cm) Start by painting each of your wooden rings and stars. I chose to paint my rings white. Apply the paint to each ring's outer, back, and inner surface. For the stars, I went with red, white and blue. Next, we will attach the gem strips to each ring. Before adding the gem strips, attach each star to a wo...

All content Copyright

Copyright 2021-2025 I ask that you do not take or use my photos or words without permission. If you have any questions, please feel free and contact me. Also, for more information on this blog, check out the disclosure policy tab above. Thank you