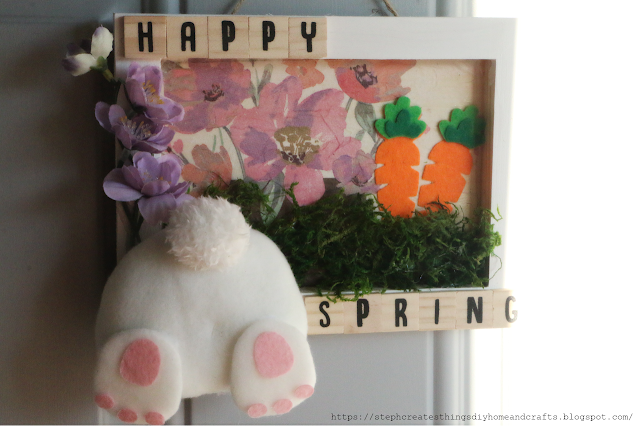
Get ready to welcome the spirit of spring with a joyful DIY project - a Happy Spring sign! You will learn how to create your very own handmade sign that will bring a touch of brightness to your home or garden. Follow our step-by-step guide for a fun and creative craft activity.
Today, we will be making a Happy Spring sign that is perfect for celebrating the arrival of the new season. I went to my local Dollar Tree and finally found the fluffy bunny bottom that I decided to add to this project. If you are ready, let's create your very own Happy Spring sign.
Video tutorial
I have listed all the materials required for this craft below. Please note that I have excluded prices and locations for some of the materials that I already had. - Bunny bottom: Purchased from Dollar Tree at $1.25
- Wooden letters: I bought Alphabet tiles from Walmart which came in a pack of 100 and cost $2.97
- Unpainted wood panel: The size is 6''x 8'' x.75''
- Hot Glue
- Napkins: Purchased from Dollar Tree at $1.25
- Twine
- Spring Floral
- Felt carrot stickers: Purchased from Dollar Tree at $1.25
- Paint
- Floral snips
- Sponge brush
- Mod Podge
- Scissors
- Moss
The total cost for all these materials is around $9.
Step One: Applying paint to the wooden panel
Start by taking your wood panel, and applying white paint to the front, top, bottom, and sides of your panel. Apply around two coats of paint, and then set it aside to allow it to dry. If you have a heat gun or blow dryer you can use that to help speed along the drying process.
Step two: Tracing and cutting the decorative napkin
Next, take your napkin, and unfold it. Lay the decorative side up on the inside of your wood panel. If your wood panel is flat, just lay it on top. Using a pencil, begin to trace out your napkin. You will trace just enough to fit on the inside, or on top of your panel.
Step three: Adding the napkin and applying Mod Podge
Take your scissors cut around the traced lines, and remove any of the extra leftover napkins. Be sure to remove the bottom layer of the napkin. After removing the bottom layer, your napkin will be thinner, and ready for when applied on top of the Mod Podge.
You are now ready to take your wood panel and apply a thin layer of Mod Podge using your sponge brush.
After you have applied a thin layer of Mod Podge, set your napkin on top, and gently press your napkin down. Take your sponge brush, and apply a thin layer of Mod Podge on top of your napkin. Be sure to smooth out any wrinkles, and bubbles. I used a blow dryer to help with drying. This also helped with removing any wrinkles, and bubbles that I may have missed.
Step four: Adding the moss
Next, take your moss, and spread it out. Use your hot glue, and apply it to the bottom section of your wood panel. After, apply the moss on top of your hot glue.
Step five: Adding the wooden tile letters
Take your wood tiles, and arrange them on the top corner, and bottom corner of your sign. I chose to go with the words happy, and Spring. Be sure to arrange them first, and then apply your hot glue once you are ready to add them to your wood panel.
Step six: Adding the bunny bottom, felt stickers, and floral Next, take your bunny bottom, and add it to the bottom corner of your sign.
Take your felt stickers, and add them behind the moss. I used two of my felt carrots.
Next, use your floral snips to cut your floral down to the desired size you are wanting. I cut a smaller section since my wood panel is smaller. Take some of your hot glue, and add your floral onto your wood panel. I chose to add my floral near the bunny bottom.
After completing the front side of your sign, flip it over. Cut a medium strand of twine using your scissors. Apply hot glue to the twine and attach it to the back of the sign. For extra hanging strength, put two blocks on top of the bottom ends of the twine. Then, press them down tightly and add more hot glue.
Your sign is now finished and ready to be displayed in any space you want. Whether it's your kitchen, pantry door, front door, or guest room, it will look great.
I hope you found this project enjoyable and inspiring. Please let me know if you decide to make your own. I love hearing from all of you.
I'll see you soon!
Pin/Share/Save


.png)


Stephanie this is adorable! I'd love to invite you to join my weekly link party and share your ideas for a chance to be featured! Hope you will join us!
ReplyDeletehttps://www.ourtinynest.com/2023/02/22/weekly-link-party-336/
Thank you so much! 😊 I will stop by your link party. I appreciate you stopping by.
DeleteThis is super cute, so much fun!
ReplyDeleteThank you! :)
DeleteSo simple but elegant.
ReplyDeleteI visited you via Grace Filled Moments: Sweet Tea & Friends February Link-Up | Oops-a-Daisy! When God Laughs with Us About Our Mix-Ups
My links: 28+29. We will be so happy if you share your links with us at SeniorSalonPitStop. Link under BLOGGING.
Esme, aw thank you so much for visiting. 😊 Happy to hear you enjoyed my Easter sign. 🐣
Delete