Mini Wood Ladders With Holiday Decorations

 Hello everyone, I hope that you all had a wonderful Thanksgiving surrounded by loved ones, and just a time to really focus on what you are most thankful for. I am extremely thankful for my family, and our health.  I am also so very thankful to be able to share my DIY projects with all of you. I really enjoy sharing, and I appreciate all of you.

I recently decided to create two mini ladders. This came to mind when I was going through my craft supplies, and came across a few of my holiday decorations that were stashed away from previous crafts. I figured I would come up with something fun, and this would give me a chance to add more decorations to our home.

 This craft takes about an hour to create. Between the painting, a few cuts are made, and attaching the dowels together. 

If you're ready to start creating, come along, and create these two mini wood ladders with me. 


 Mini Wood Ladders With Holiday Decorations Video tutorial


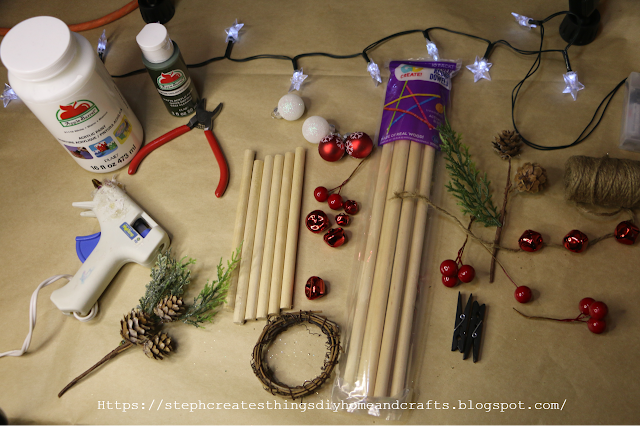
Materials list

White paint

English Ivy Green- 0.50 (Purchased at Walmart)

Wood Dowels (Pack of 10) $1.97 (Purchased at Walmart)

Hot Glue (Or you can use Wood glue or a heavy-duty adhesive) 

Paintbrush

Holiday greenery/ Decorations/ Berries/ Mini wreath

Twine

Ribbon Trim/Rope- $3.44 (Walmart)

I used one ornament word tag ( 1 set for $1.98 at Walmart)

Craft jingle bells

Mini Ornaments ($3.98 at Walmart)

Craft clothespins 

Scissors


Creating your mini wood ladders


Start with taking three dowels and cutting them in half. You will end up with six halves.  You will need a total of four dowels which will be the sides of your ladders. You will not need to cut the four dowels. 

Next, take your paint and apply it to all dowel rods. For this project I wanted one of my ladders to be white, and the other wanted a green color. I went with a color called English Ivy Green.  You can go with any paint color of your choice. 

Once you have applied paint to all dowel rods, set them aside and allow them to completely dry.  Once all wood dowel rods are dry, you are now ready to start putting your ladders together. 


I did notice that using just hot glue for this project was definitely not the best choice. I ended up applying a second adhesive with my hot glue. This really seemed to help and made everything secure. Keep in mind that you can also use wood glue for this project. You will want to allow the glue to completely dry before adding on any decorations.

Take the three of the cut dowel rods, and add them between the two longer dowels. Once you have positioned the three rods and spaced them exactly where you want them to be, you can now apply your adhesive. 

When applying your adhesive apply it to the ends of your cut pieces, and glue the rod between the two long rods. You will repeat this for the next two pieces. Once you have done this, you will have completed putting together your ladder. 


When creating your second ladder, you will repeat all of the steps mentioned above. 


Decorating the white ladder


I wanted to create a holiday theme. So I went with a few holiday decorations.  Using some twine, take your bells, and string them across. I decided to tie the ends of my twine around the top section of my white ladder.  I wanted to be able to easily remove any of my holiday decorations if I decided to change the theme of my ladders. 


Take your cut rope, and ornament word tag, apply a small amount of glue on the back side of the tag, and add it to your rope. Tie the ends of your rope onto your ladder. This will be just like the bells. They will loop across your ladder. 

Next, take your greenery, berries, and twine, and add them to the bottom section of your ladder. I went ahead the tied some twine around my greenery and berries, and then I tied them around the bottom section of my ladder. 

Decorating the green ladder

Start by gluing some craft clothespins on the top section of your ladder. 

Next, take some twine, and string some mini ornaments across your twine. I added the ends of the twine on each clothespin and looped it across the top section of my ladder.


Take your mini wreath and add on berries and some greenery. I ended up gluing my berries, and greenery on my mini wreath.  I just hung it over the top section of my ladder.

Add some greenery, and twine with other assorted decorations and tie it off on the bottom of your ladder. I used greenery with some pinecones attached to it. 

Your ladders are now complete, and ready to be added to your holiday decor. I decided to add my green ladder near my fireplace, and my white ladder was added in my kitchen on one of my wood trays. I love how they turned out, and it was so simple to create. I hope that you enjoyed this DIY project. Let me know in the comments below if you'll be creating your very own. 

I'll see you soon! 


Pin/Save/Share


Comments

Popular posts from this blog

DIY Mini Wood Lantern

  Hello everyone. I'm so excited to share this mini wood lantern craft with you all. I recently bought a box of wood tumbling blocks from Dollar Tree, and I wasn't sure what I was going to create with them. I decided since I also had some wood craft popsicle sticks on hand that I would use those with the blocks, and create a mini wood lantern. This project took around 30 minutes, but I promise you, you will just love how it all comes together with just a few materials. If you're ready, I'd love it if you created it with me!  Video tutorial Materials One pack of wood tumbling blocks  I purchased mine at my local Dollar Tree Ten wood craft popsicle sticks Paint  I'm using black paint, I also had some antique white paint on hand, but I went with black paint Hot glue Twine Faux floral, and greenery One medium-sized bead One battery-operated candle Floral snips Scissors Building the top and bottom sections of the lantern Start by taking five of your tumbling blocks. Usin...

Decoupaged Glass Jar Candle Holders with Faux Leaves and Gold Wire

  Learn how to create beautiful decoupaged glass jar candle holders using leaves and gold wire. This DIY project is a perfect way to upcycle old glass jars and create unique candle holders for your home decor.  I hope you're all doing well. The weather has cooled down, and we're enjoying the change. I'd like to share a quick upcycling decoupage project with you all today.  I had some extra glass yogurt jars and bought two taper candle holders from Target's dollar section. I wasn't sure what to do with them at first. In today's project, I will show you how to decorate small glass jars using faux fall leaves and gold wire. Video tutorial Materials Needed: - Two taper candle holders - A paintbrush - Mod Podge - Faux fall leaves or a decorative napkin - Hot glue - Two battery-operated tealight candles - Gold wire Applying Mod Podge and faux leaves to glass jars To start with, grab a paintbrush and use it to apply Mod Podge on your glass jar. Apply a small amount of ...

Three Easy Candle Jar Ideas for Cozy Porch Décor

I've always thought there was something so comforting about soft candlelight, especially when it’s paired with a few simple faux florals and greenery. Today, I’m sharing a sweet little project in which I decorated a glass jar in three different ways. Each jar has its own personality, glow, and gentle charm. These pieces are perfect for porch décor, but they work beautifully anywhere you want to add a touch of warmth. I love projects like this—simple materials, quiet moments, and a finished piece that feels peaceful and handmade. Video tutorial  Materials I Used Clear glass jar Battery‑operated candle Faux string of pearls Faux succulents Faux vine Bright pink faux flowers (tops removed from stems) Yellow faux flowers Faux foliage Optional: woven mat or tray for display Jar 1: Succulents & String of Pearls For the first jar, I wanted something earthy and calming. I placed a faux string of pearls inside the jar and let it settle naturally. Around it, I tucked in a few faux succul...

Dollar Tree Wood Crate Floral Design

Create a beautiful floral arrangement in a wood crate from Dollar Tree! With this DIY tutorial, you'll learn how to design stunning floral creations using affordable supplies from Dollar Tree. Perfect for home decor or special occasions. Video tutorial Materials One wood house decoration One wood crate Paint Faux floral Mod Podge Decorative napkin Floral cutters Scissors Hot glue Paintbrush One pop-up sticker One craft block One craft knife (Most of my materials listed can be purchased at Dollar Tree)   Start by applying paint to your wooden house decoration. I only applied my paint on the outer and inside surfaces of the wood. Next, take your decorative napkin, and use a pencil to trace the shape of your wood house onto the napkin.  Be sure to remove the second layer of your napkin. Once you have traced out the shape, take your scissors, and cut out the shape. Afterward, take your Mod Podge, and apply a thin layer onto the inner surface of your wooden house. Place your napkin...

Easy Breezy DIY: How To Make Summer Coasters

Happy Summer! I'm excited to share this simple DIY craft with you. I found some cute summery napkins at my local Dollar Tree and knew I wanted to create another summer craft, but I wasn't sure what I wanted to create. Today I will show you how to create these simple summer coasters that are perfect for the season. Video tutorial Easy Breezy DIY: How To Make Summer Coasters Materials: - Round wood circles - Napkins - Mod Podge (I'm using the dishwasher-safe one) - Acrylic paint - Paintbrush - One cork sheet (I'm using the adhesive cork sheet from Dollar Tree) Begin by taking your adhesive cork sheet and flipping it over so that the adhesive backing is facing up. Next, take a pencil and start to trace each of your round wooden circles. Then, take your scissors and cut out each of the traced circles. You can use a craft knife to make any necessary adjustments.  After that, take your circles and begin to remove the back of each of the cork circles exposing the sticky backin...

Search This Blog

All content Copyright

Copyright 2021-2026 I ask that you do not take or use my photos or words without permission. If you have any questions, please feel free and contact me. Also, for more information on this blog, check out the disclosure policy tab above. Thank you